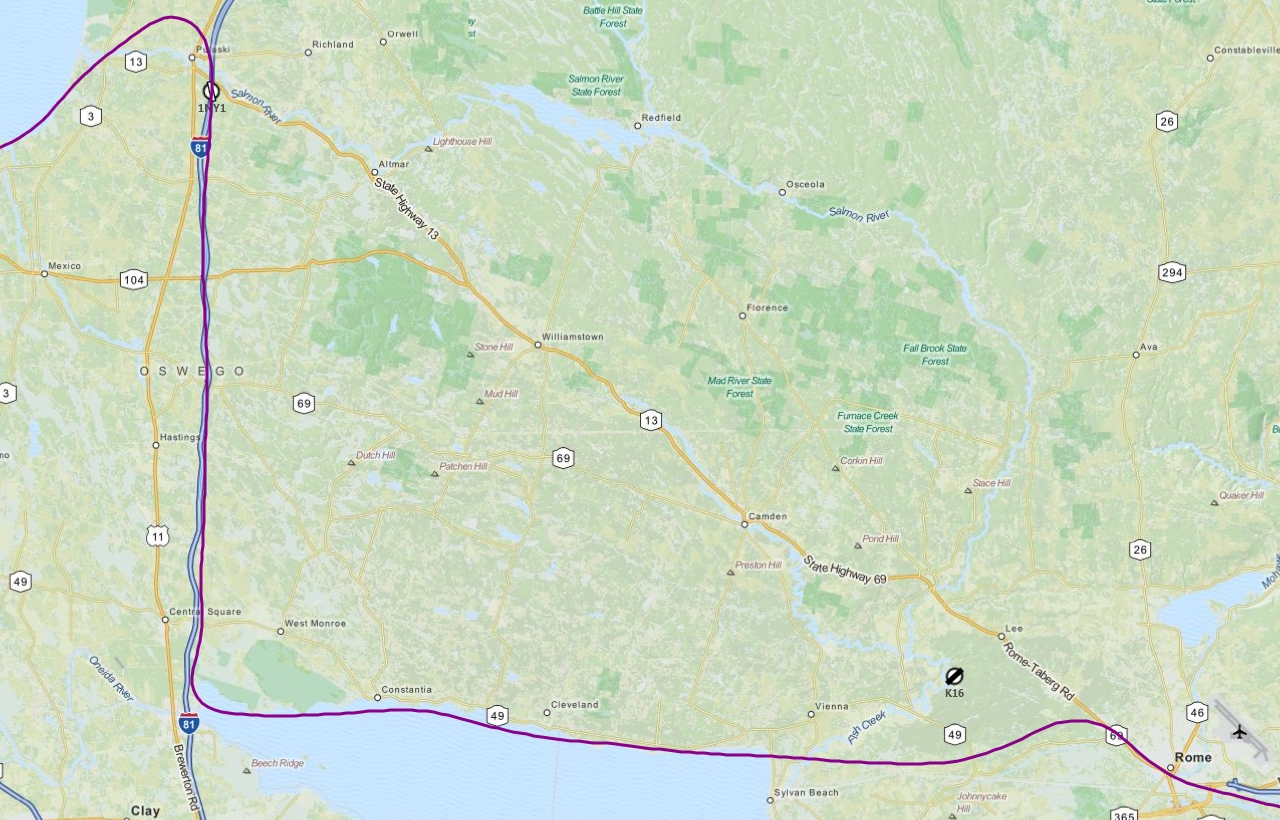
So my original plan after Buffalo was to continue working my way west and head towards Chicago. But then I up and purchased FS Global ULTIMATE – The Americas as I have mostly flown with nothing but default MSFS mesh (the only exception being a 5m mesh over parts of northern NJ). So with some hi-fidelity mesh installed I had to fly over mountains and the closest were the Adirondacks in upstate New York. So – where could I fly to around that area? To help me there I headed on over to the Virtual-Dispatch scenery database which is the most comprehensive collection of airport sceneries I’ve yet found that is easy to search and see what airports are in what area. If you know of any that aren’t listed it’s really easy to add some so definitely do so! Anyways, I found KGFL in Glen Falls that would be a perfect destination and started working my route. I decided to simply fly along the Lake Ontario coast, turn inland around 20mi south of the Watertown VOR and just cruise around the mountains until I picked up the Glen Falls VOR and use that to track to the airport from wherever I ended up. The one problem I knew I might have was weather – it was nice in Buffalo when I departed but the report for Glen Falls was fog all morning. So I made sure to keep a list of alternates ready.
I should mention this was the second attempt at making this trip – the day before I tried after flying the helicopter around but just as I was leaving the Buffalo area some strong turbulence hit and ripped my aircraft apart again. So that put me off flying for the rest of the day. When I came back for this second try I just disabled completely the “Clear Air Turbulence” setting in AccuFeel – screw it. Not worth the trouble. Before departing KBUF airspace the other day though I did one touch and go since the wind was calm – it still worked fine the way I did it with the headwind on my last flight. Sweet.
So the flight went well until I reached the mountains. Flying over the lake I was able to climb through a gap in the scattered cloud cover to FL050 around Rochester since I wanted to cut across the bay and stay out of Charlie airspace – so extra height would help me glide to shore if my engine failed. I waited until I was outside of an MOA with a floor of FL040 – technically I could fly in it and just stay tuned to the proper control frequency but since FSX doesn’t simulate any MOA activity I just try to avoid them. When I am forced to fly through I simply set my radio to the proper frequency. Anyways shortly after I hit the westward edge of the Adirondack range the weather closed in to conditions that were less than ideal for flying through mountains – I probably could have forged on but always better to play it safe. Fortunately at the time I was just flying by Piseco Airport (K09) so I quick entered the pattern there and put the plane on the ground. Live to fly another day – that’s a good motto. Hopefully the weather clears up soon!
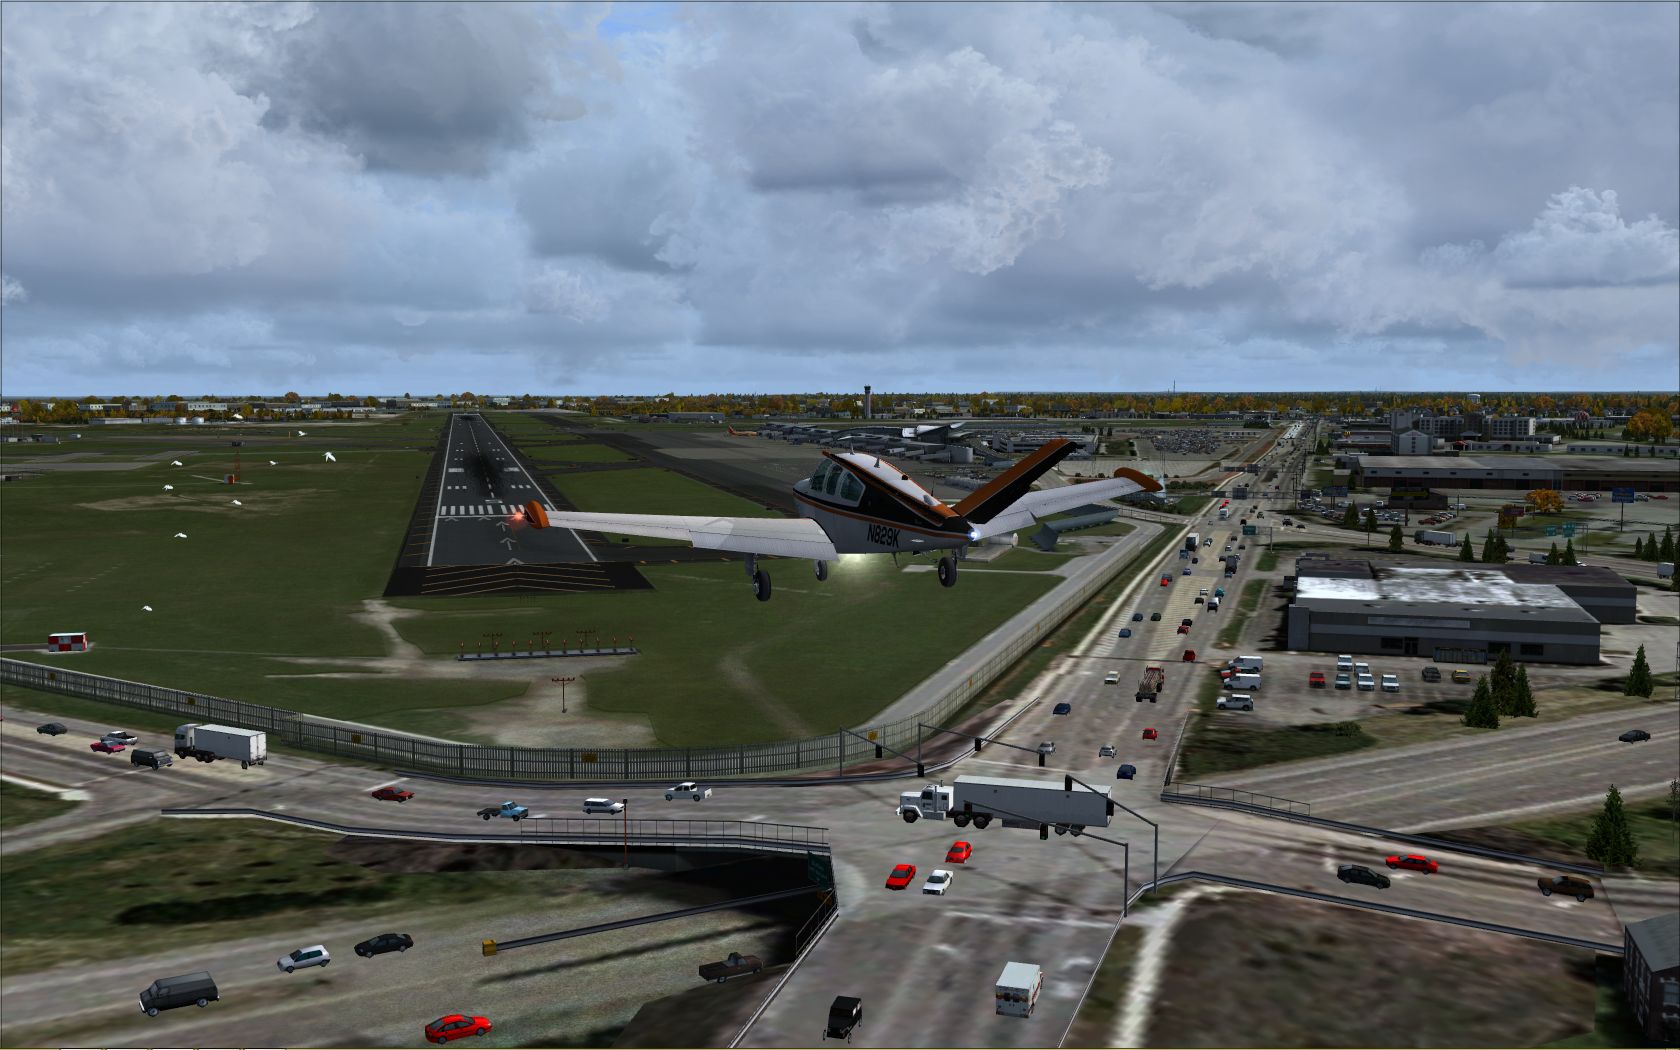
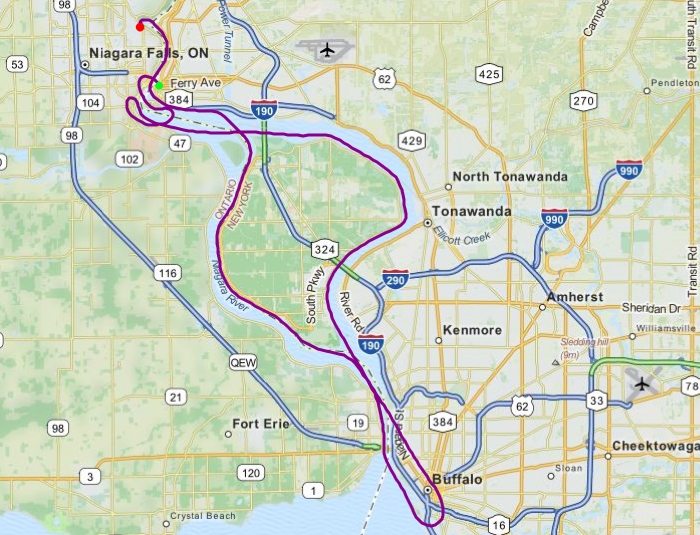
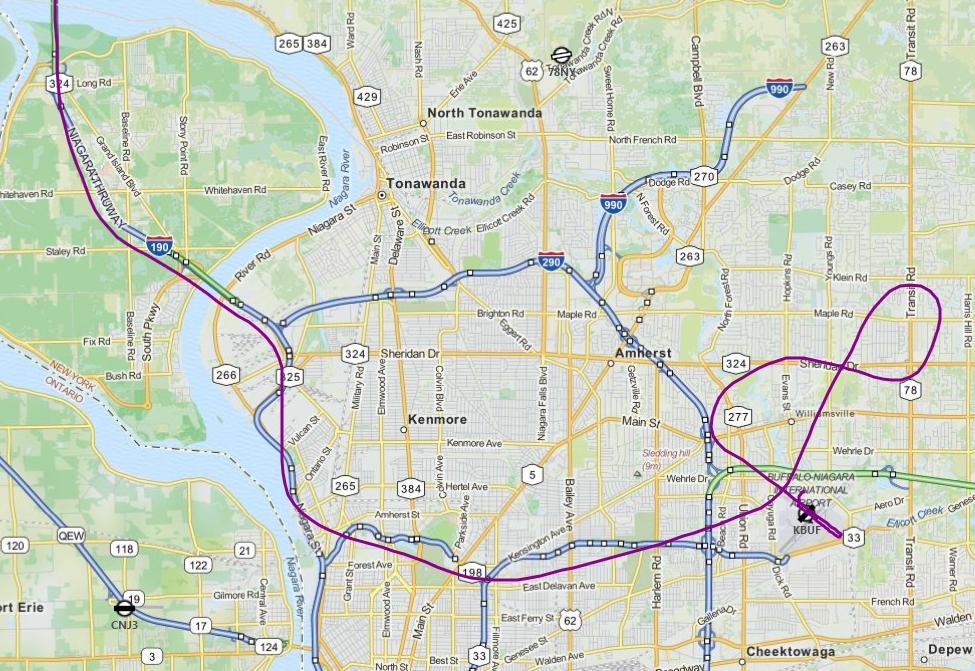
Weather was turning crappy at home (Nor’easter that’s here now was on the way back on Monday when this flight took place) but up in Buffalo they were having some nice weather so I hopped into the Bell 206B from last time and took another flight around Niagara and Buffalo but in the daylight this time. No real plan, I just took off and headed for the falls, decided I wanted another pass and then decided to head over to Buffalo, turn around and come back. I knew I wanted to land over at the heli tour pad on the Canadian side, but that was about it.
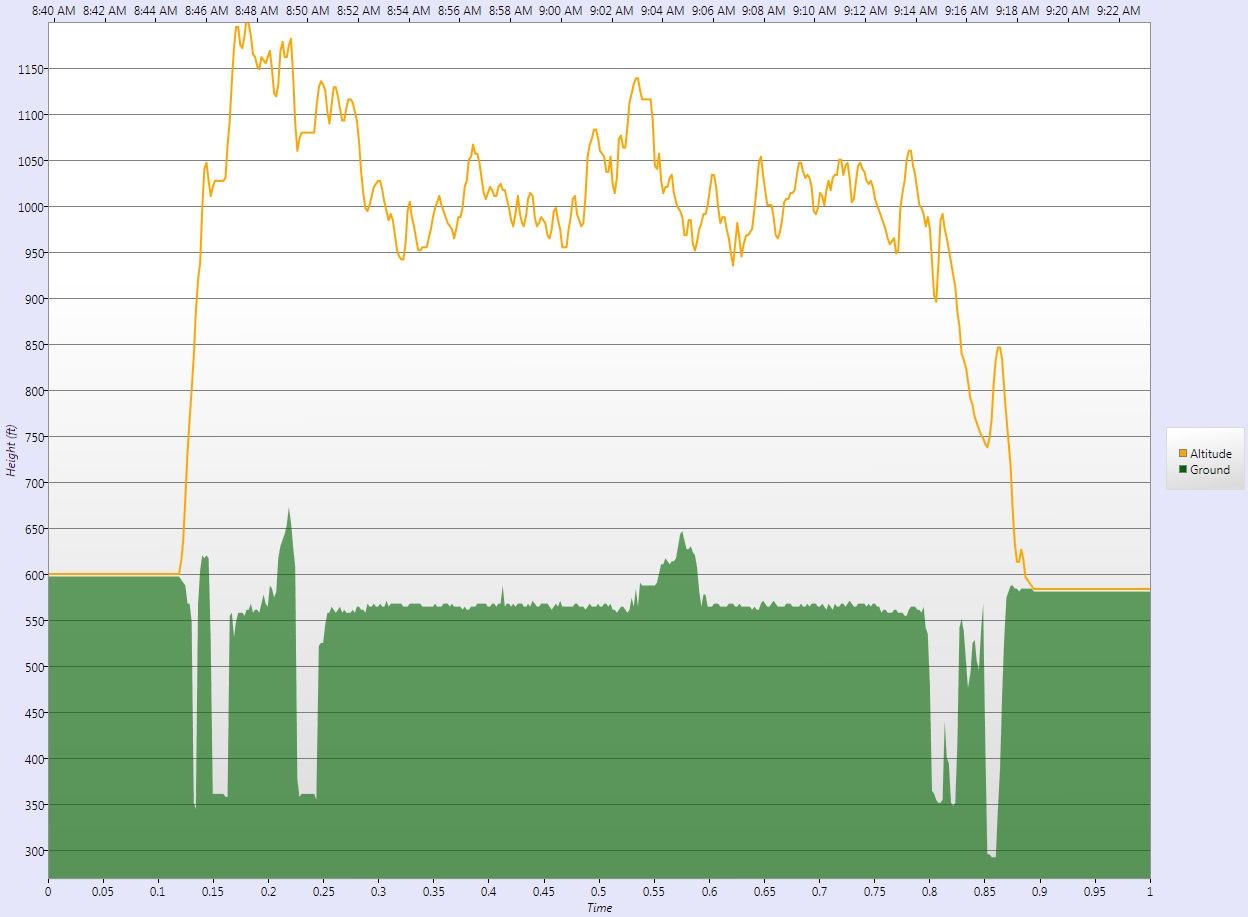
I didn’t fly too high, kept it to around 1,000 feet the whole time – which probably annoyed the crap out of the virtual residents of Buffalo as I exited their city northwards over the urban areas, haha. One of the big challenges to helicopter flying is maintaining your altitude without any form of autopilot. I like the challenge, although sometimes I’m afraid it absorbs too much of my concentration – thankfully I don’t have any virtual traffic to really watch out for. Still, it’s hard – as this altitude chart shows
Note that the lines are 50 feet variances, but still that’s a good deal of ups and downs along the way!
I was particularly pleased with my landing this time out. I tuned into the KIAG ATIS to get the wind direction and marked it on my compass using the heading bug. Then I made a nice smooth approach to the pad into the wind and only hovered around for about 30 seconds before setting her down. I think I will make one more flight around the area to get back to the helipad at KBUF.
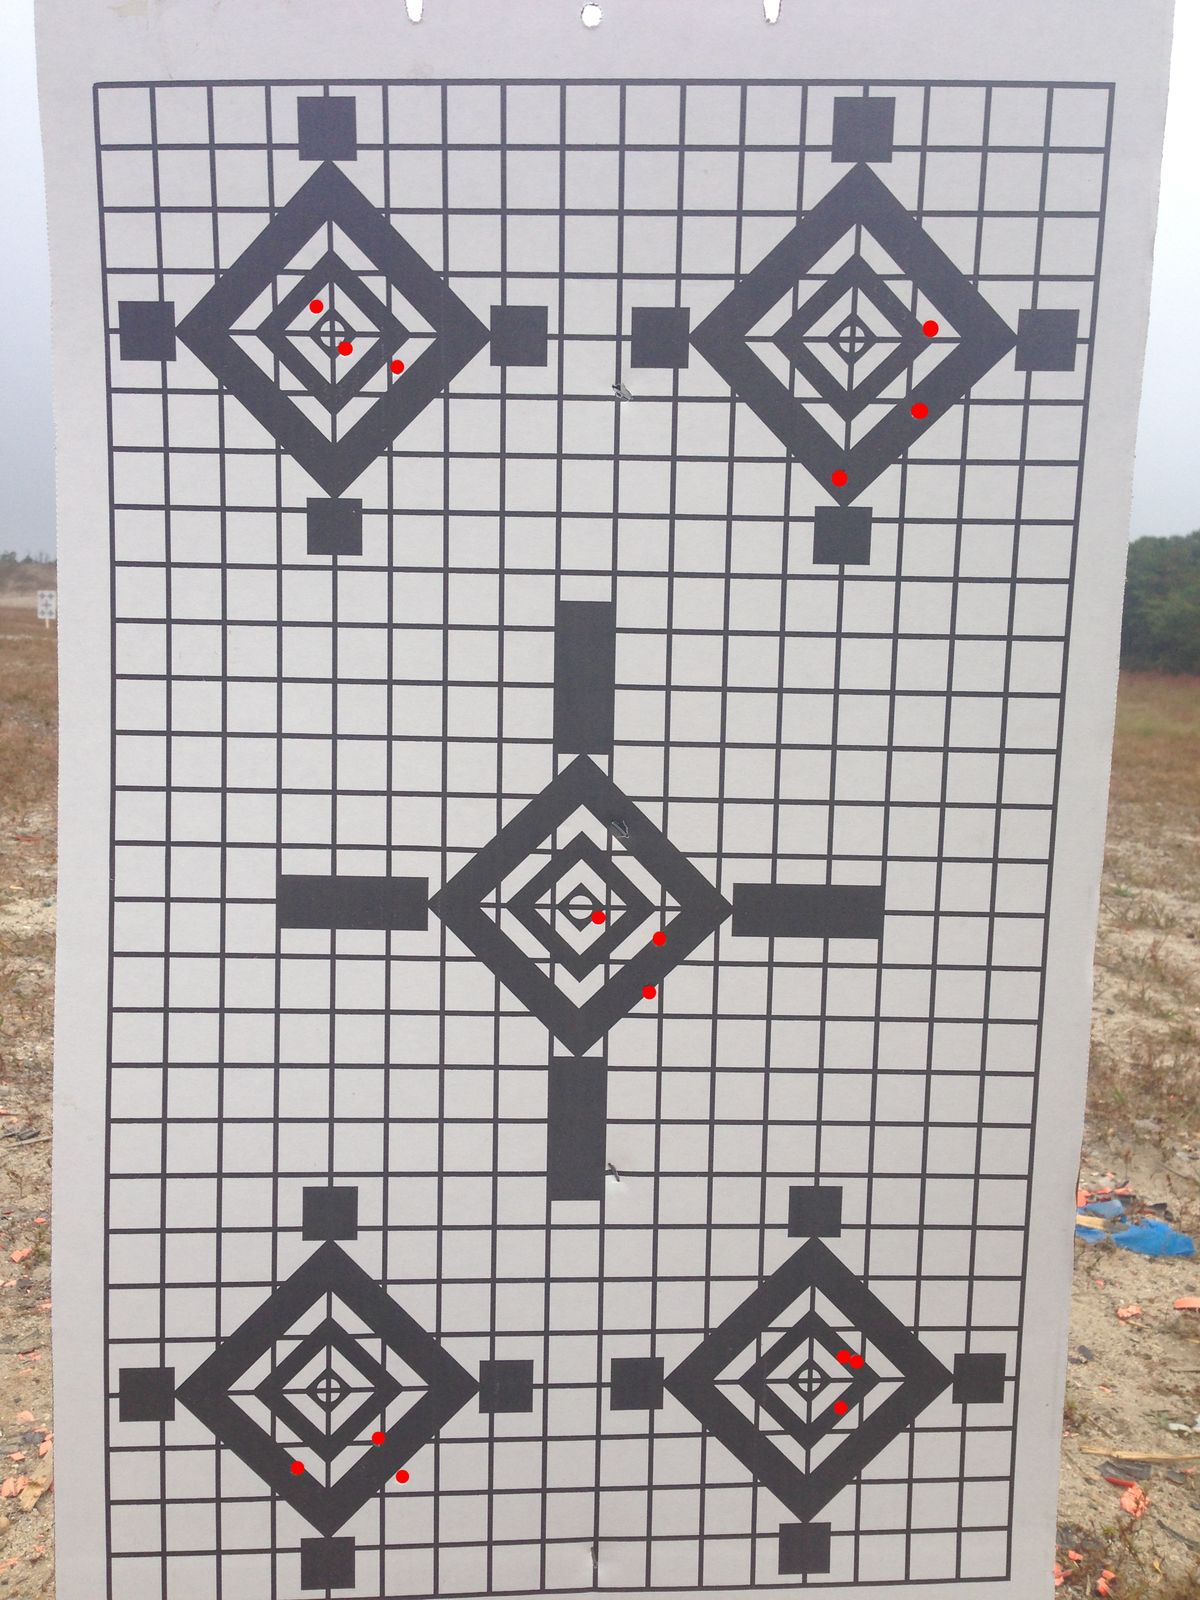
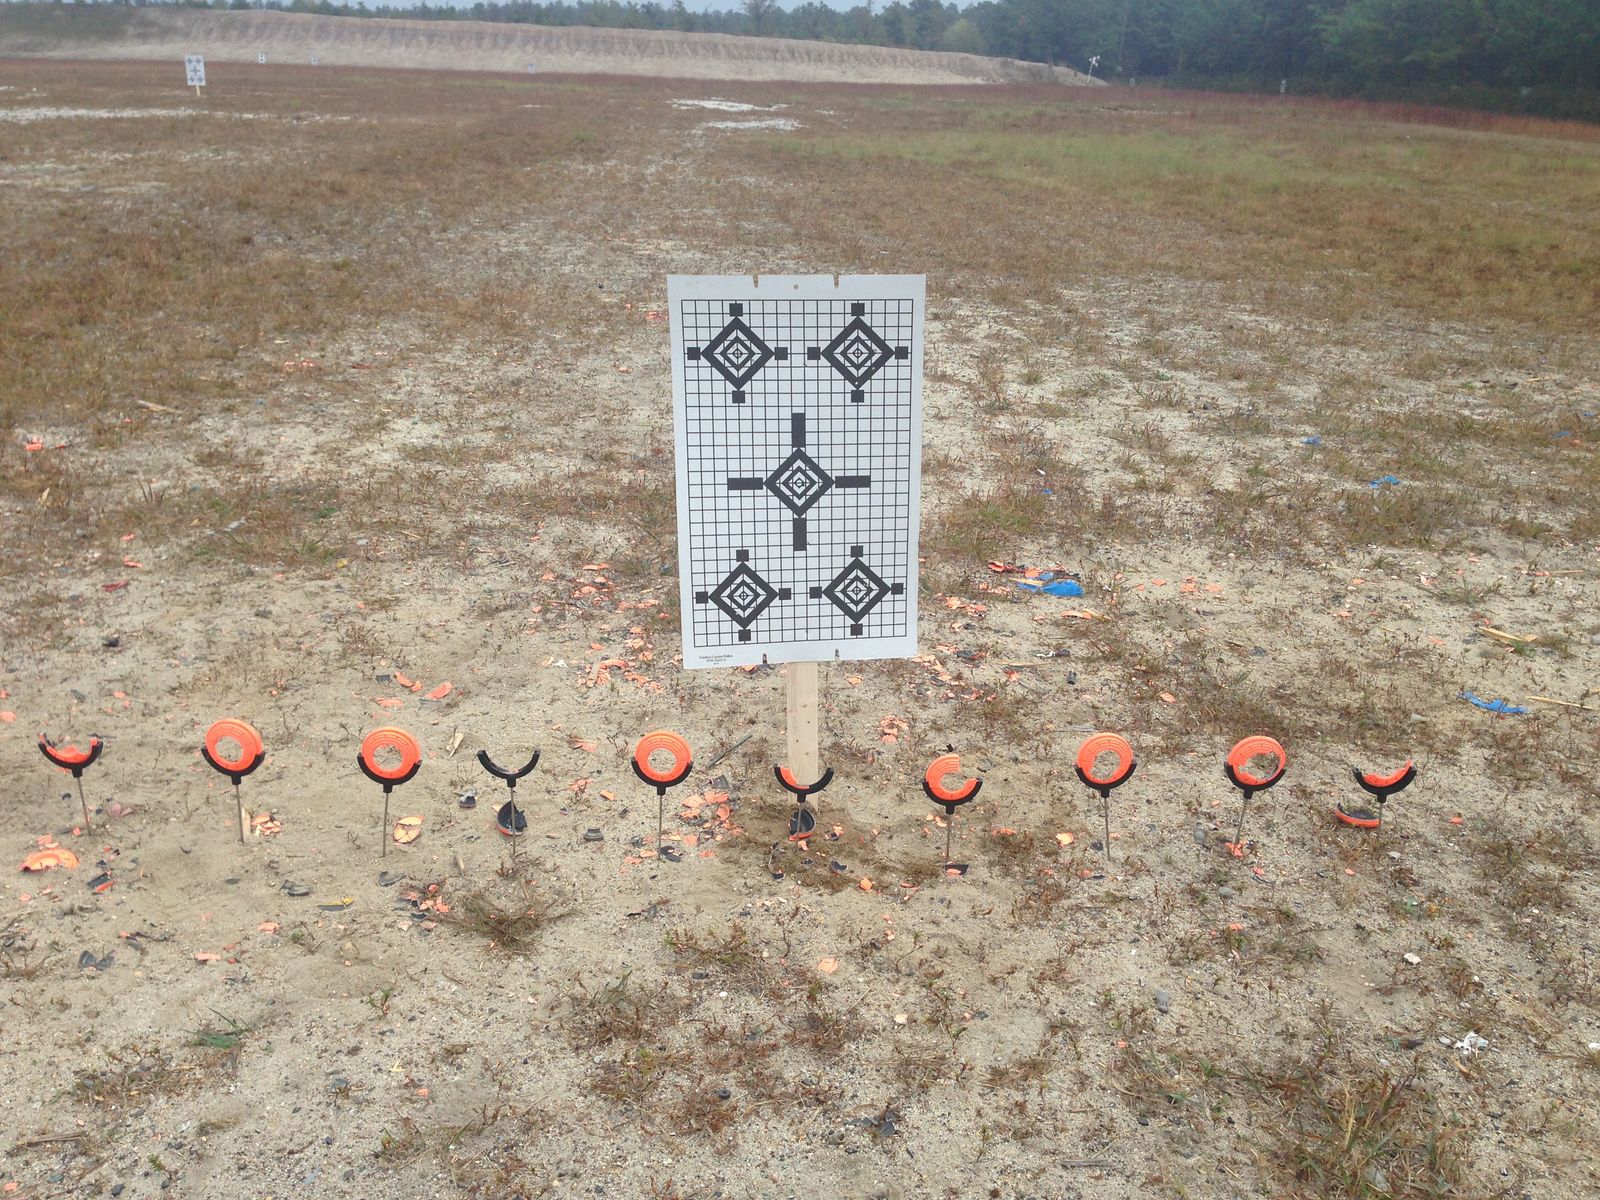
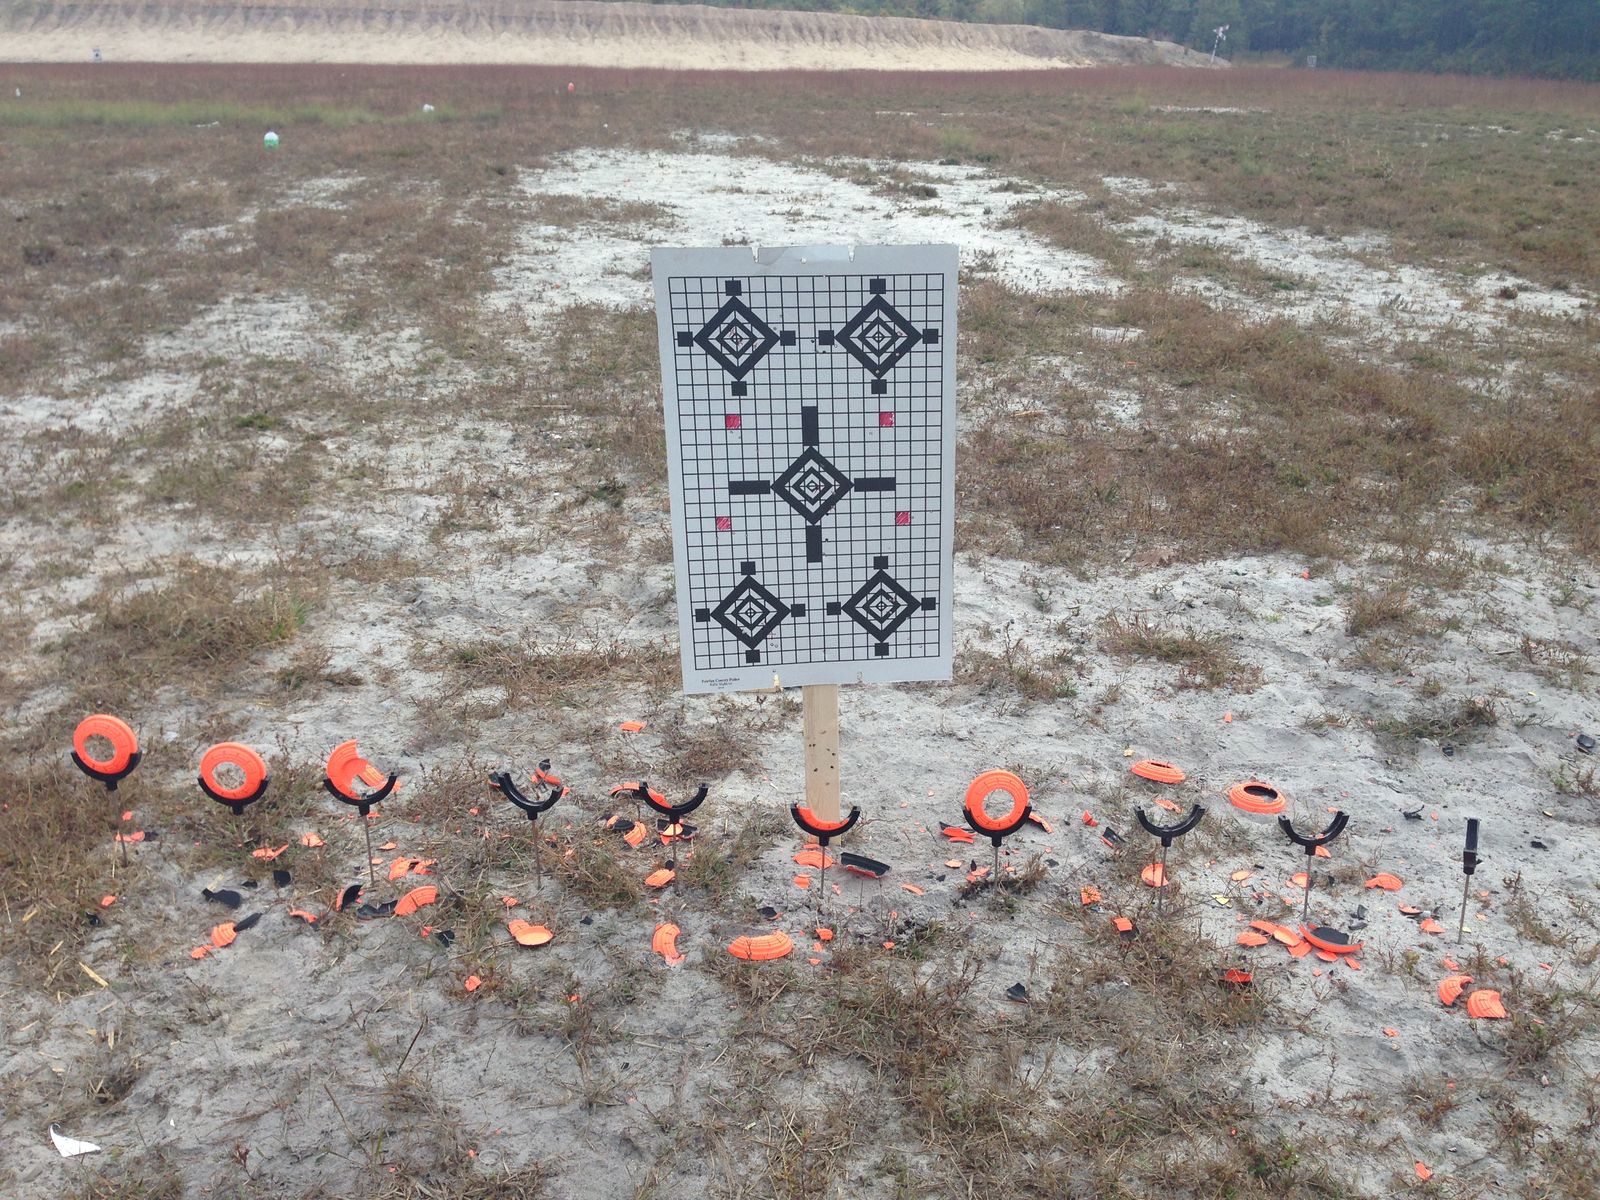
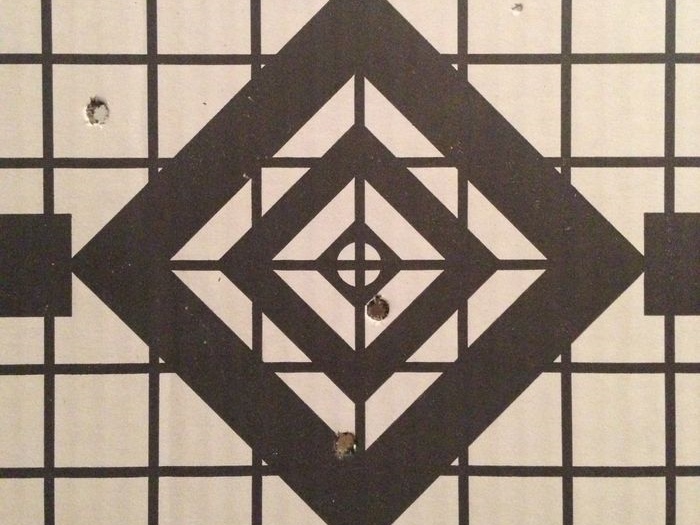
Been a while since the last time I visited the shooting range – I was digging out of my pack ammo I had bought back at the beginning of July! Weather was cool but muggy out with tropical moisture moving in from the south, the wind was barely a breeze and the sun stayed behind overcast clouds the whole time I was there. Stuck to the same format I used on my previous trip, a posted target and 10 clay pigeons at 50 yards with the .556 and 1-6x scope for the first firing session, then out to 100 yards with the 6-24x scope, then at 100 yards with the .22 and then back to 50 yards with the .22. If I ever get time to stick around for another hour I plan to go out to 200 yards with the .556 and 6-24x scope.
50 Yards .556 1-6x Scope
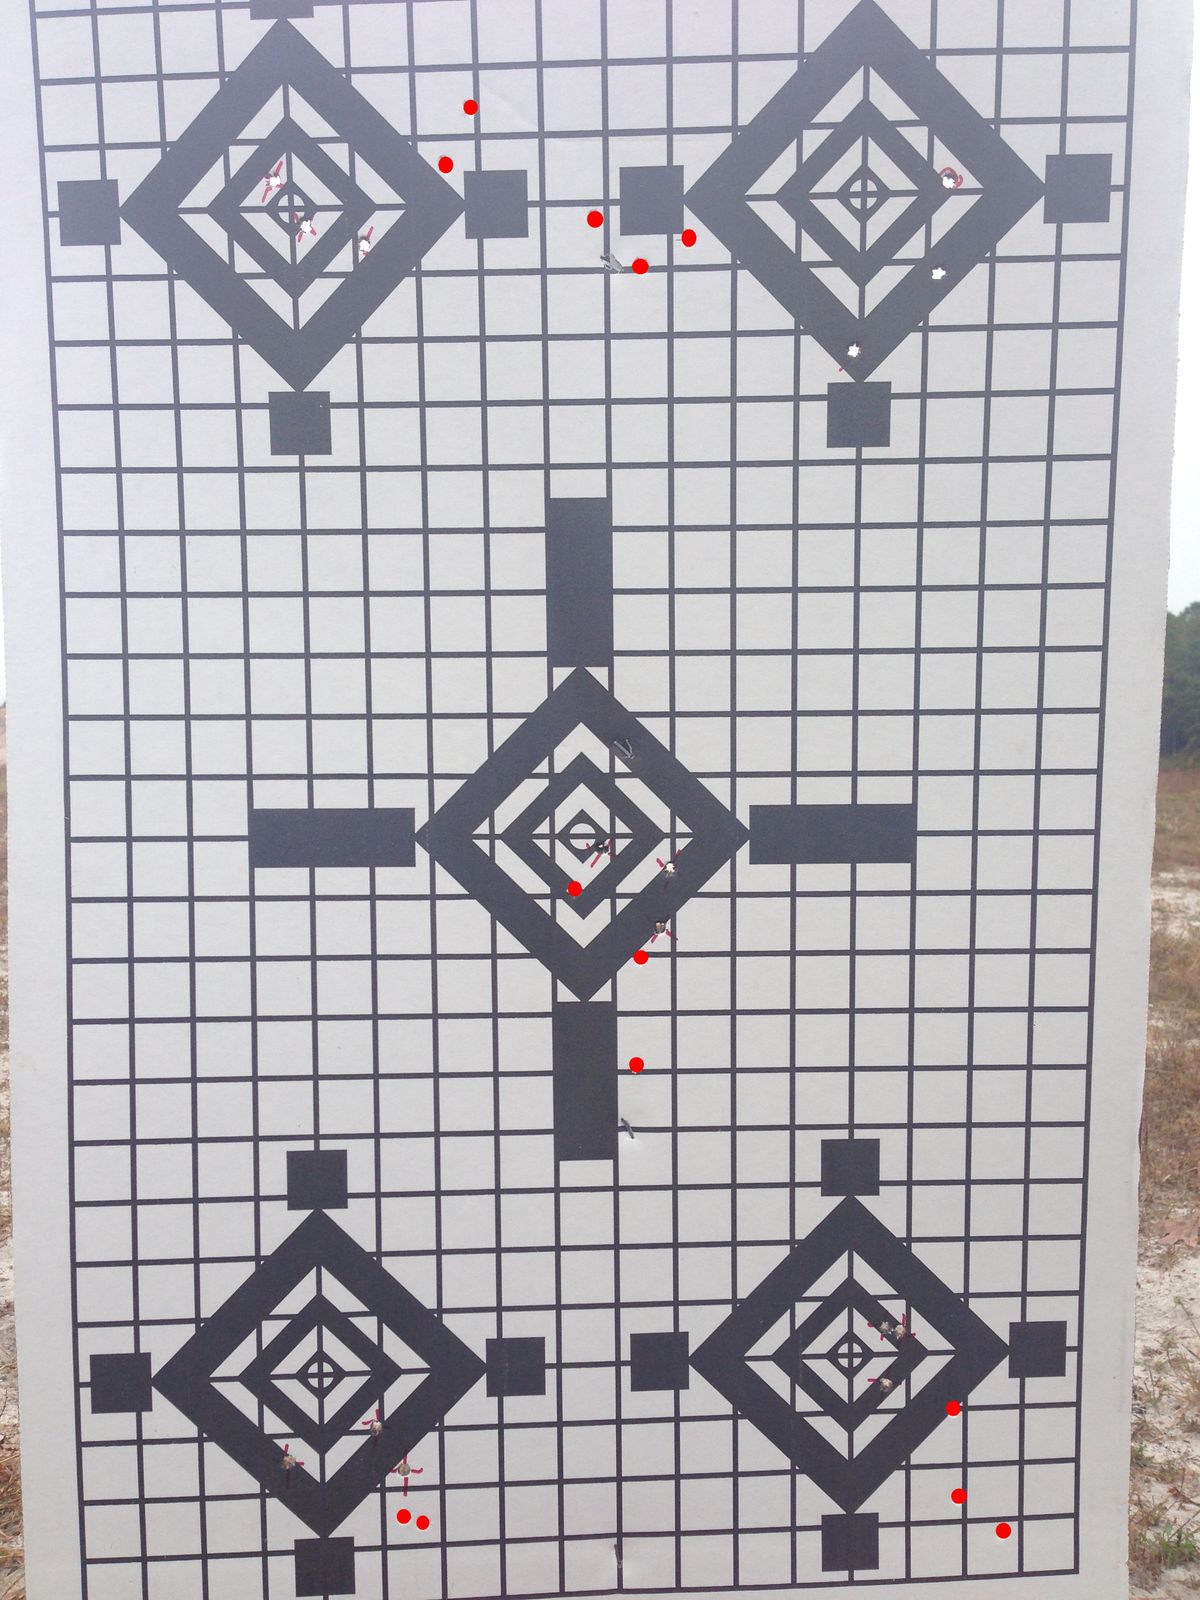
Put a three round group in the center of the posted target to check my scope and found it was off a bit but not enough to bother fiddling with the turrets. So I dropped down to the clays and began holing them out. I was achieving consistent hits but wasn’t able to place my shots accurately enough to knock the centers out of all the clays. The worst is when you punch a bullet through the middle but don’t take away the whole center – it’s kind of like getting a split in bowling instead of a strike. Then you have to really aim to knock out what’s left without damaging the rest. I finished up the clays before the end of the firing session and went back to put 4 more 3 round groupings into the posted target. Below the groupings are marked and then there’s the result of the clay shootings.
100 Yards .556 6-24x Scope
Next I mounted the Vortex scope and checked out my zero at 100 yards. It was dropping far and away to the right enough for me to spend some time fiddling with the turrets and putting out 4 more groupings before settling in to start picking away at the clays. I started off awesome but then deteriorated down to hitting them but not precisely. In fact there was one point where I sent about 8 rounds downrange and didn’t hit the clay at all. I have no idea what the fuck I might have been doing, but I couldn’t even see the bullet impact in the scope like it was landing short or just long O_0 anyways this led to me running out of time before I could get all 10 clays – in fact I shot the second to last one just as the range master was calling for a cease fire.
100 Yards .22 1-6x Scope
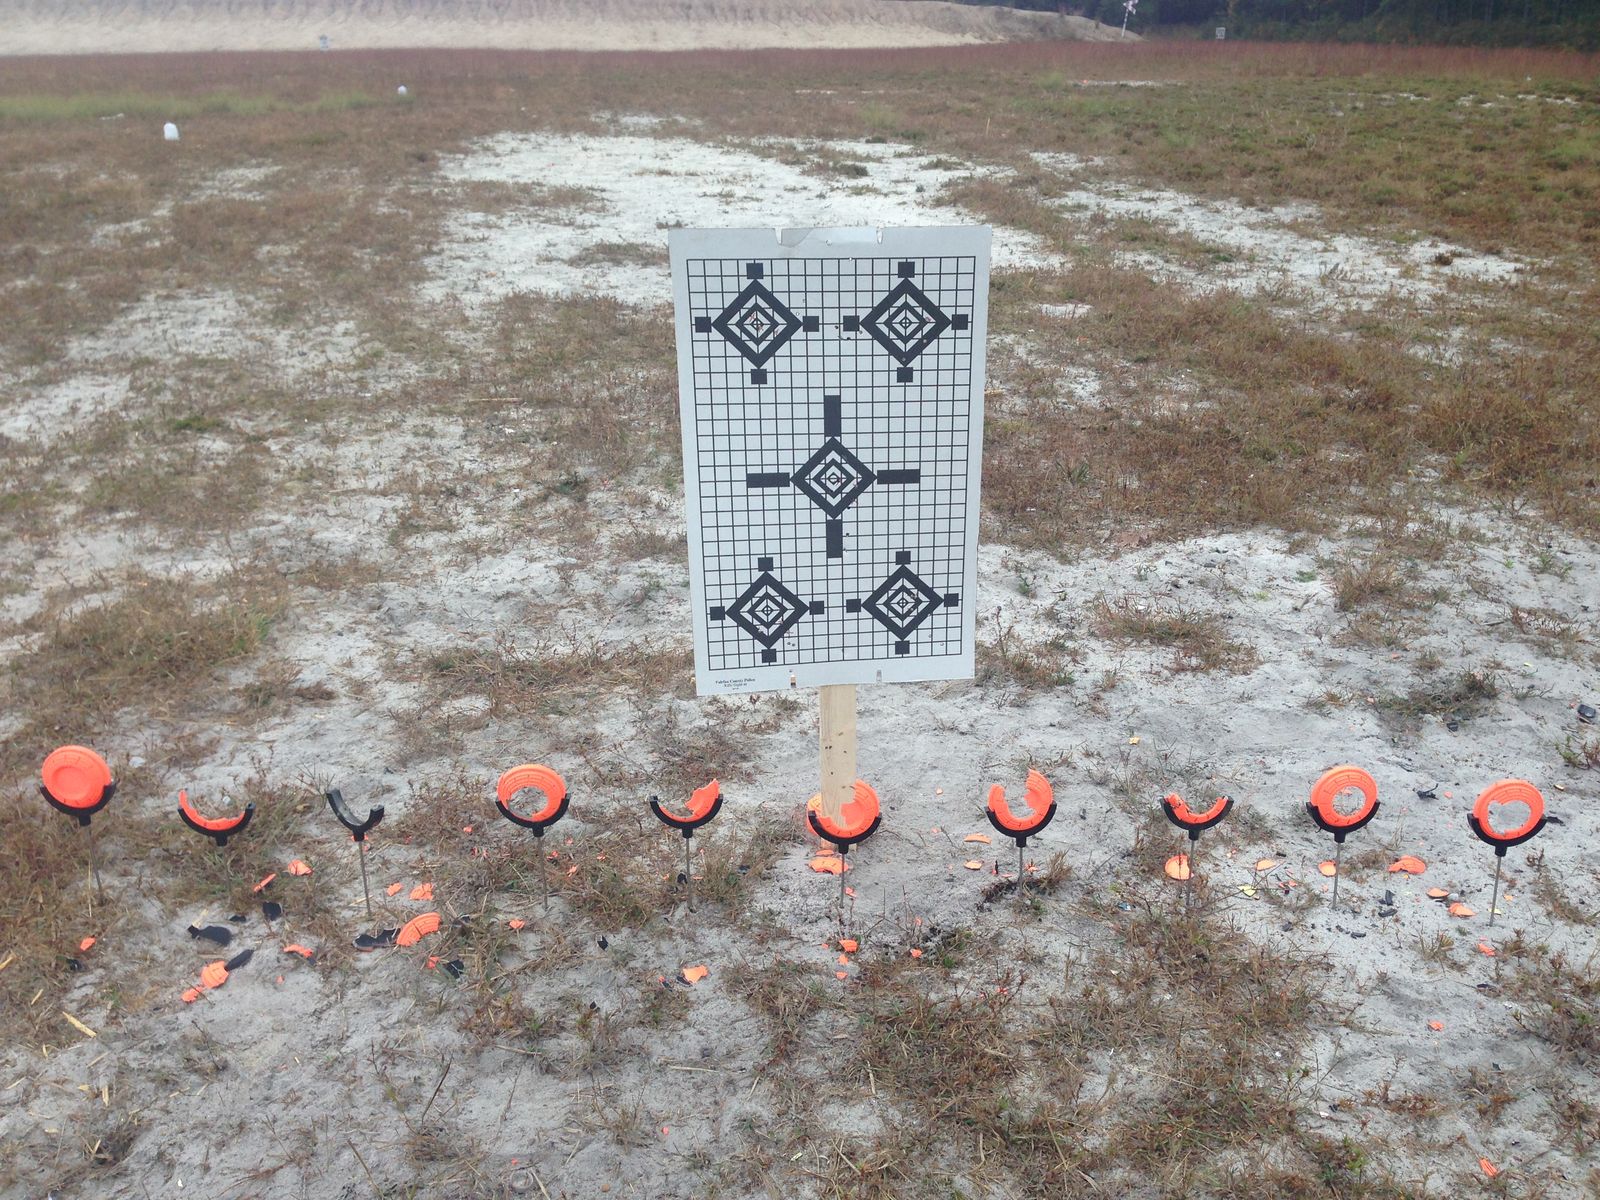
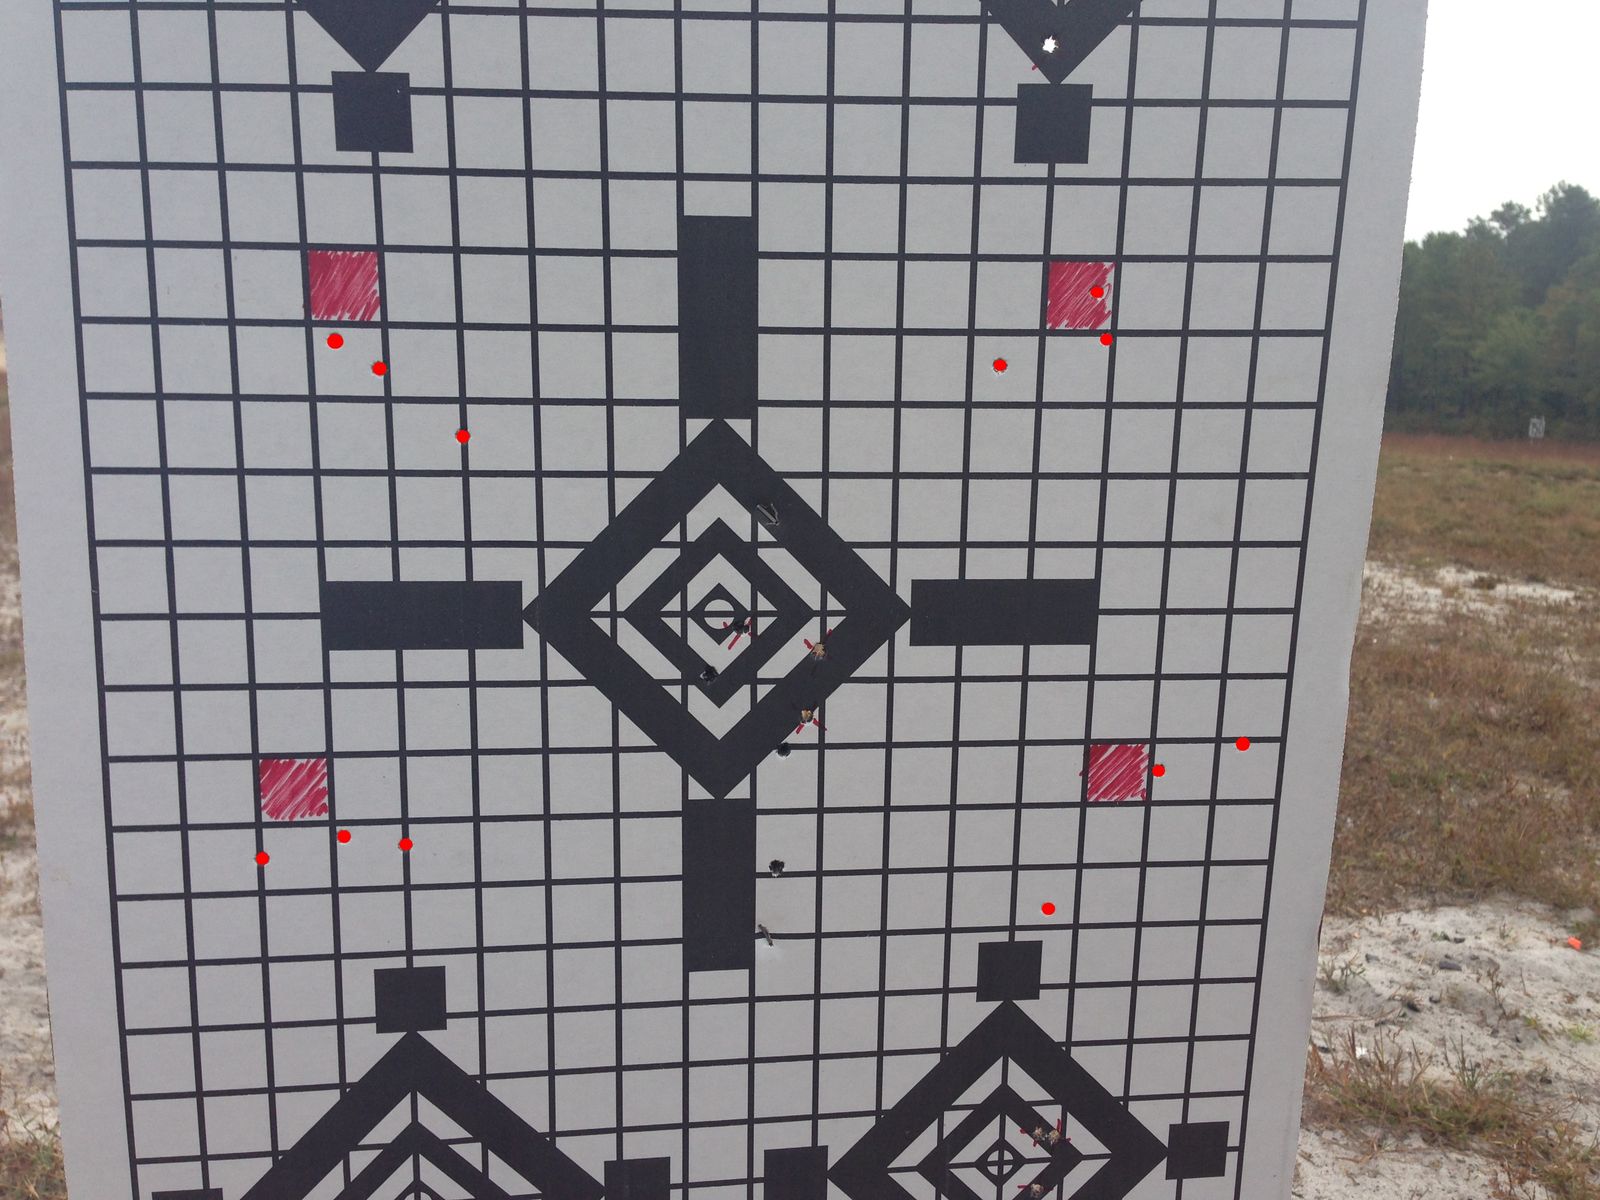
I colored in some squares on the target I could use as an aim point to make use of some clean space to put the smaller .22 holes in – also away from the black areas that hide the holes rather well. I remembered how to offset my aim for 100 yards and put a group out to check. Then I dropped down and started picking away at the clays. I’m still having a lot of trouble getting comfortable behind this rifle – the eye relief I think is the problem and I need to adjust the mounting of the scope, which will be a pain in the ass but will certainly save me from an aching back because of how I have to lie in the prone to get a proper sight picture. It was a rather disappointing run on the clays to be honest, I thought I could hole more than I did. Hopefully the scope adjustment will help. I finished the clays early again so put three more groupings into the target.
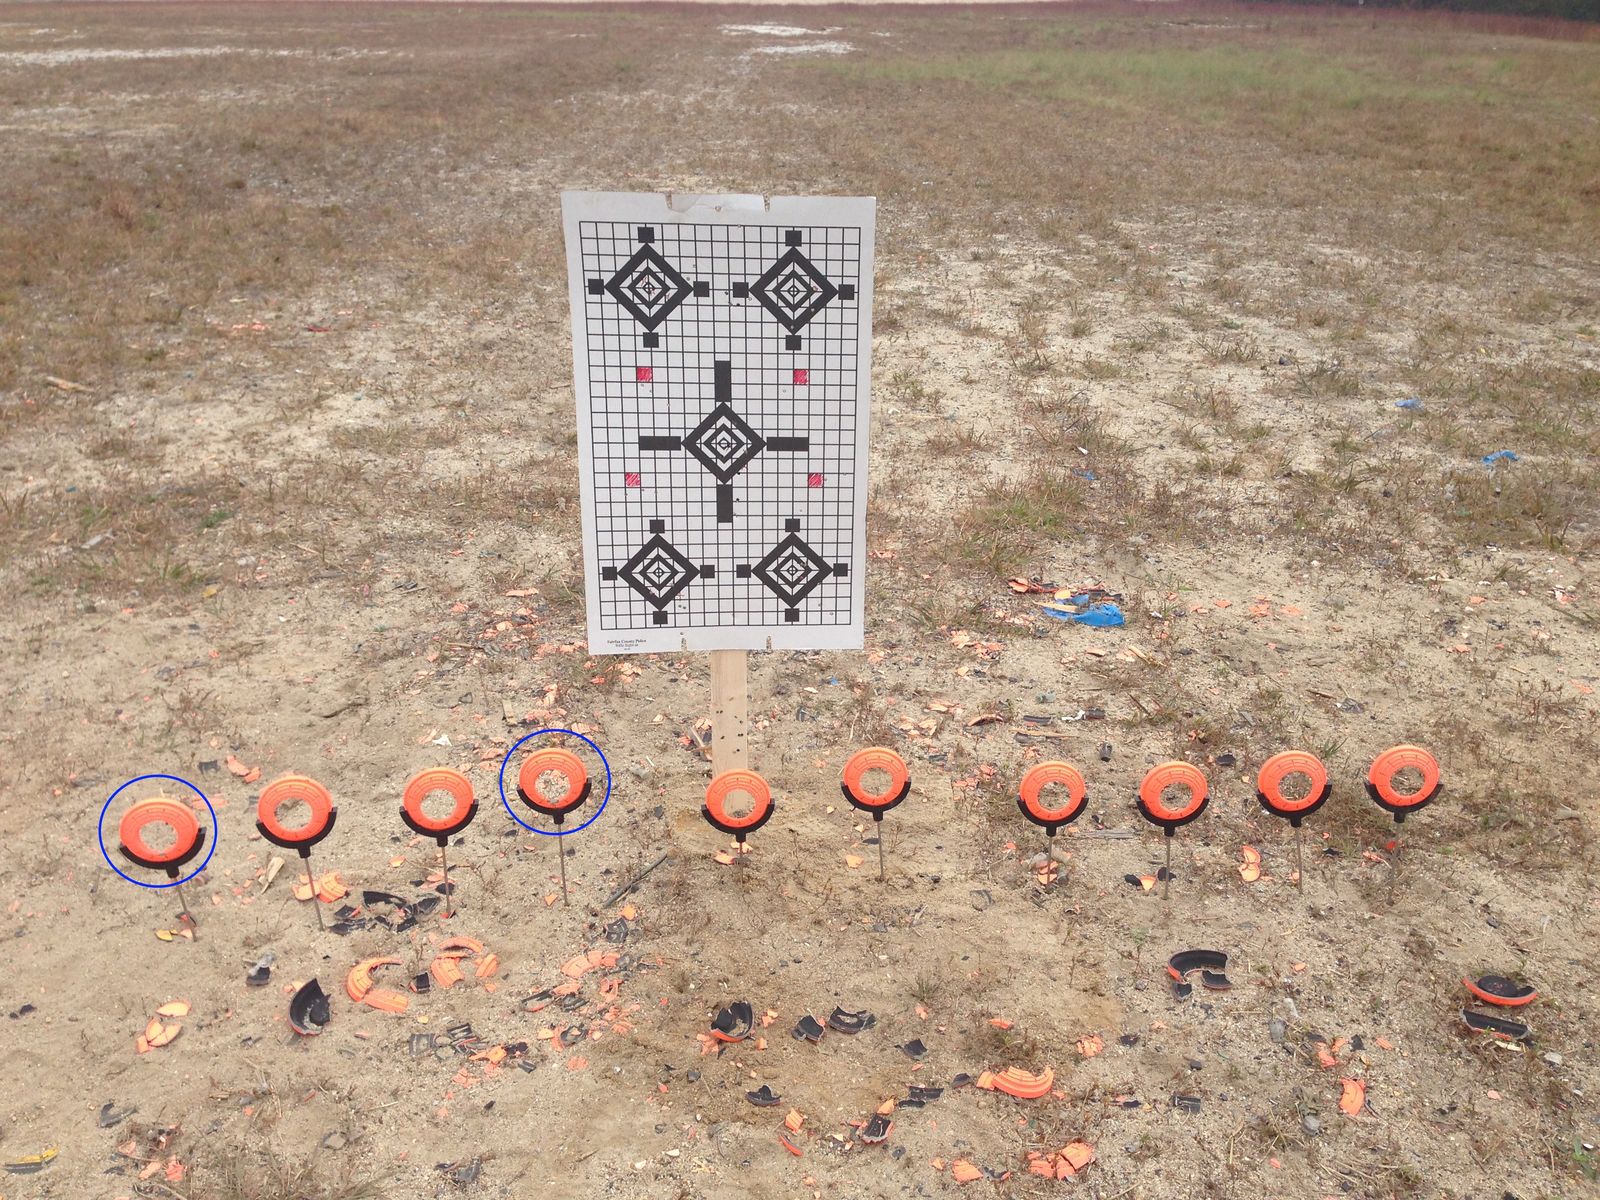
50 Yards .22 1-6x Scope
Here I didn’t even bother checking the posted target since I was using the same scope. While I still have to work on my aim at 100 yards my accuracy at 50 yards is much more improved and I almost, almost had a perfect run on all 10 clays. However if you look closely at the big version of the below image you’ll see the bottom of the ones I circled have chips in the ring. And that’s pretty much all there is to say about that…
That horrible landing from my last flight really bothered me (despite the fact that it’s been a year IRL since I landed that aircraft), so I hopped back into the cockpit to do some pattern work this afternoon. At first I was a bit put off by the high-wind advisory I saw on weather.com but shrugged – it’s a simulator I’m supposed to be able to just go up and see if I can handle it! However it turned out that the 20kt winds gusting up to 30kts was blowing only a degree off the runway in use, so I didn’t have to fight any crosswind. No big deal, I’d rather just get my basic pattern work polished up first!
My patten was a racetrack pattern, not a rectangular pattern. After 4 attempts I found the best procedure: I take off, then after clearing the runway and raising my gear I throttle back to 75% power and turned crosswind at 800′ AGL, holding my bank all the way around to downwind. By now I was at 1,500 MSL and held that altitude for my downwind leg. The runway was just under my wingtip tank, which put me at a good lateral distance. At midfield I throttled back to 50% power and maintained my altitude, which slows me up enough to drop well under the VLE speed of 145kts. When I hit even with the runway threshold I lower my gear, which is about the same time ATC comes on with clearance to land. I acknowledge then drop my throttle to about 35%, still holding altitude. This puts my speed in the white arc and I lower one notch of flaps and return the throttle to 50%. I’m now fully configured for landing and watch the runway disappear over my shoulder to put me at 45° off the threshold and I begin my bank through base and roll out onto final. I then reduce throttle to 25% and nose down to begin descending towards the runway. Crossing the threshold I level out and cut throttle to idle and let her settle.
The first attempt I tried without flaps, and couldn’t get the plane to slow and settle – I floated over half the runway. The first two attempts I rolled out onto final past the runway and had to S-curve in. The last two attempts I rolled out early and did a 45° approach before turning a short final. Each attempt brought me closer to the touchdown marks which I finally nailed dead center on my fourth and last attempt.
The turn coordinator on the Bonanza is a bit… basic. It’s actually hard to tell if I’m banked to a standard rate of turn or not as the needle doesn’t seem to go past the mark – which means I could be turning faster than I want. Really the only thing I couldn’t get consistent was my turn from downwind through base with a roll out to final aligned with the runway. If I can be sure to turn at the same rate I turned crosswind onto downwind, I should line up perfectly. But getting a consistent turn rate has proven difficult. I also haven’t had much practice with coordinated turns lately so holding altitude was a challenge but by the last attempt I was staying at 1,500 MSL +/- 100 feet the whole pattern.
I will revisit this pattern again this week when the winds are calm and see how the Bonanza behaves without such a strong headwind in effect. Still, it was very pleasing to totally grease that last landing dead between the touchdown marks.
I can’t believe it’s been an entire year since I last flew the V35B. What the hell. Where has the time gone? This really puts things in perspective and makes me want to try to get back to spending some more time flying in the sim, especially since I recently upgraded my graphics card from an HD5870 to a much newer HD7970 – it’s been 4 years since I upgraded my graphics card, and most likely another 4 before I do it again. There’s been more too – FTX Global has been released, NYC 2013 X has been released, and before that I had installed Buffalo airport and Buffalo city/Niagara Falls scenery. All this together has made for an awesome flight, though not without its issues. I actually had to try three times (over three separate days) to get through this flight!
The first problem came when flying past Manhattan. The scenery by Drzewiecki Design is fabulous, don’t get me wrong but it was unfortunately made for FSX systems with DX10 Preview enabled. It’s frustrating that developers are building products that rely heavily on code Microsoft never finalized for the FSX platform, but there it is. My biggest complaint was that the company never made it known that DX10 Preview was (for all intents and purposes) required to run this add-on although you can run lesser-resolution textures and sim graphical settings to not get Out Of Memory (OOM) errors under DX9. Last ever day-one purchase I will make from that developer, that’s for sure! I’m not satisfied at all with DX10 Preview and so while I thought I had the sim tweaked properly to use the scenery under DX9 the sim start giving me warning chimes flying past the city – but didn’t crash. I muted the system volume in the mixer so the warning chimes wouldn’t bug me and flew on – but 3/4 of the way to Albany my entire computer hard locked.
The second problem came from an add-on I’ve had installed for a while, A2A’s Accu-Feel. It’s never given me any problems and has lent a lot of added ambiance and realism to my sim, but on my second attempt of this flight it screwed me over bad. I was about halfway up the Jersey shore and the weather was beautiful – light winds, little clouds. The aircraft was trimmed out perfect at 1,500 feet and I only had one hand on the yoke. Suddenly I started to get a bit of chop that escalated in another two seconds to severe turbulence. Just as I grabbed the throttle lever to yank it down FSX reported that my aircraft had been overstressed and destroyed! I deduced this was Accu-Feel’s “clear air turbulence” at work, which can sometimes bump you around with pockets of turbulent air in otherwise calm conditions.
The third try, I did my best to ensure nothing would go wrong. I had done a few test flights around Manhattan with some new scenery textures and settings. I had toned down the turbulence levels in Accu-Feel. I even stuck a fan next to my case to help blow off hot air exiting the back just in case that hard lock the first flight had actually been my computer overheating. And I crossed my fingers!!
Because I did three flights, I used pictures captured from all three in my album above – the weather and flight paths were essentially the same.
You can get the flight plan and the breadcrumb file from here.
The flight kicked off okay. I taxied out to Runway 35 under the direction of ATC and departed, turning south and picking up the Delaware river to follow to the Delaware Bay and along the southern coast of NJ. This being the third time doing it I was trimmed out and cruising easily. Clouds were scattered up around 2,000 so I stayed at 1,500 and close to the shore in case I had engine trouble. On the previous flight attempts I would take a 12nm DME arc around Atlantic City bravo airspace but decided I really didn’t want to ditch in the ocean if my single engine decided to quit on me so I stuck near the shore and requested clearance through the airspace. The skies cleared up around the Barnegat Inlet so I decided to climb up to 5,000 feet (FL050) for some better views, but that just meant I had to descend again shortly thereafter to slip under the NYC bravo airspace and prepare to enter the NYC SFRA.
No airframe-rending turbulence so far, and now I had to try and make it past Manhattan without tripping an OOM. But even though I knew better I wanted some good pictures and while panning around to get angles I started hearing the warning chimes. I muted the system volume, kept my eyes forward and just flew on. A few dozen miles up the Hudson and I began to relax since the sim was still running smoothly and wasn’t giving me hassles with taking screen captures, something that tends to fail when things are unstable. Still, I was worried the whole rest of the flight given that I had triggered the warning chimes.
Following the Hudson River was easy, although I did zone out a bit and not realize I was low enough to be passing through some Class D airspace along the way – I had planned to be flying higher but the weather had other ideas. Pretty sure I was through and out of the airspace by the time I realized it but FSX still gave me the option to request a transition so I did, then reported clear like a minute later. Oh well. Speaking of the weather, it was crummy as I approached Albany and for the rest of the flight. It’s unfortunate given that my first two attempts had great weather along the entire route. I was hesitant of even trying the flight but careful study if the METARs and TAFs as well as referencing weather.com led me to believe the weather would remain within VFR minimums and I would not have to divert along the way. I was right (*phew*).
Reaching Albany I made my first navigational blunder. I was supposed to follow I-89 to I-90 but instead ended up along I-88 for a short while before realizing that I was heading too much due west. I should have really just been looking out for the Mohawk River running along I-90 rather than trying to pick out the road itself! Light rain had started by now and visibility was down to 7-8 miles – I wish I could have climbed higher to get a better view of the roads but the clouds were just too low. Regardless once I picked up the river following I-90 all the way out to Utica wasn’t a problem. Of course once I there I once again failed to properly navigate via roads and decided instead to follow a boat canal towards Oneida Lake – ironically it turns out I was indeed following the road I was supposed to be following (Rt 69/13) before I turned off to follow the canal!
But whatever, I made it up to the shore of Lake Ontario and from there it was pretty much smooth sailing navigation-wise. I was able to identify the towns of Oswego and Rochester as I flew by them, and picked up the Robert Moses Parkway that led from the shore of the lake inland towards Buffalo. The sun was approaching the horizon and lights were coming on – which makes things a lot more confusing if you are not familiar with the area. All the lights make it hard to pick out roadways – and airports. The default FSX airports are very easy to see since their runways stick out from the surrounding terrain. The KBUF scenery was part of the terrain textures and didn’t have the “hard edges” other airports do that make them more visible. Also, the lighting of KBUF at this time of day was very dim compared to the rest of the scenery. I was too low to really see the darker patch of land very well, and had to practically fly over the airport to recognize it. Not too different from real life really – have you ever looked out a plane window and tried to find the airport when you know you should be able to see it? Harder than you think! I had expected to guide myself in along I-290 but once again my road navigation messed me up. I was cleared right pattern to runway 23 and marked it with my heading bug on my compass, but still got completely disoriented approaching the airport.
I managed to make the right pattern entry to runway 23 – I actually ended up pretty well lined up – but in the process I completely lost sight of the airport again!! So I thouht I had taken too long to turn base and final and the airport was off to my right, so I turned that way. Then I saw it out to my left and turned back to line up, not realizing I had looped around. Trying to pay attention to my compass and find the airport at the same time was just too much – I spotted a runway and went for it! Of course I made things even worse by floating over pretty much the entire 7161 feet of runway before finally landing and braking hard to come to a stop just before the start of the opposite end threshold. Fortunately I didn’t have to suffer any rebukes from ATC for landing on runway 14 instead of runway 32 and they gave me taxi directions to the general aviation stalls on the other side of the airport. So after a while taxiing I finally pulled into a stall and shut down.
Geeeezz
Learned some interesting things on this flight. Better to trust rivers than roads, and do some better planning for visual approaches to new airports. Overall I’d say the flight went well – I mean I did (finally) make it in one piece! The entire trip took a little over 4 hours, which makes it both my longest and farthest continuous flight that I have logged here in this journal. I plan to spend some time choppering and flying around the Niagara/Buffalo area as well as upstate NY – then I’ve decided to move on to Chicago… hopefully before next year!!!
Oh and as a bonus, I had time this evening to take a quick hop in a new Bell 206 livery.
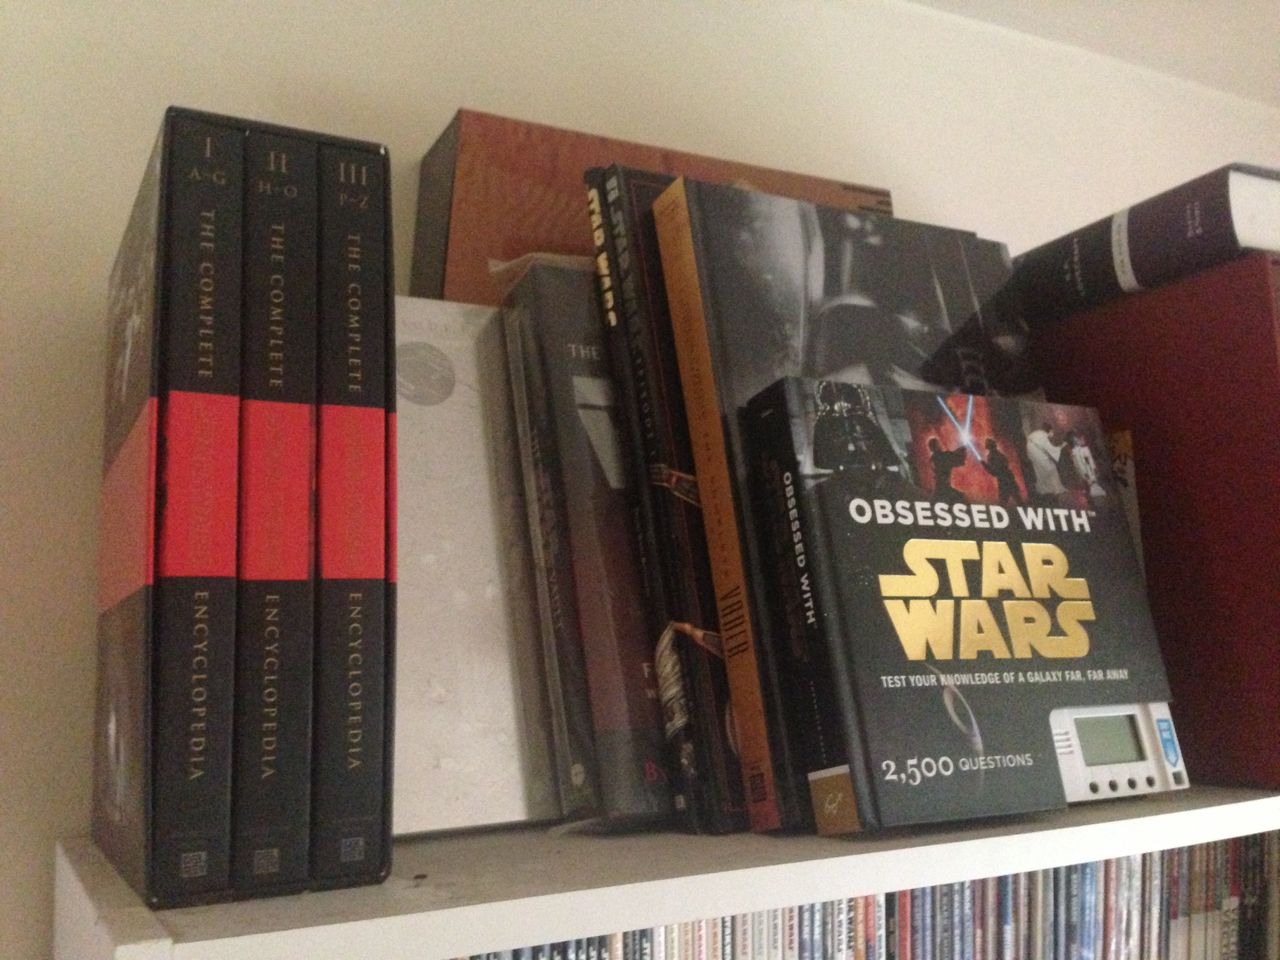
The library at the time of this picture and post numbers 334 pieces of literature (all in chronological order)
I was a young reader, so although I was only 10 years old when Timothy Zahn’s “Heir to the Empire” came out it was only a few years later that I picked it up and started reading more about that galaxy far, far away. I can’t remember exactly when, but by then the whole trilogy was out so it was when I was around 13 years old or so. I was, obviously, already hooked on Star Wars by this time and being able to escape into that universe without having to use the TV and VCR (very restricted pieces of technology in my household when I was younger) was incredible, especially considering the epic adventures Han, Leia, Luke and the extended cast of the expanded universe were having. I have been steadily purchasing Star Wars literature since that time, always focusing on the adult novels. Everyone now and then I would have enough allowance or grass-mowing money to pick up one of the big compendium books like an “Essential Guide” or “Visual Guide” or “Making of”, but my primary focus were the adult novels.
About 5-6 years ago the expanded universe began to become a lot more organized and there started to appear many more references and characters from other mediums, including young adult novels and comics (nowadays the TV shows like Clone Wars are also making appearances in the literature – I’ll be solving that issue shortly). Having read none of these, I began to include young adult novels and comics in my regular purchases. About a year ago or so I finally admitted to myself that despite the fact that I was reading this material to escape into the Star Wars universe, I was also collecting them. This kind of puts a whole new perspective on things, especially considering a lot of the young adult novels and comics I missed when I was only reading adult novels have since gone out of print. Before, I would balk at taking the time to hunt down used copies and pay more than the original price to get a book in good condition. Now, I need to have that book for my collection so yes – I did pay $60 for a trade paperback comic (that was rare to begin with – but still).
An angled look at the top shelf and the stacked oversized volumes
However I’ve not gone so far as to have the “gotta collect everything!!” attitude. Although in some respects I want to have as many individual pieces in my collection as possible (more is always better when collecting things right?) my main purpose is to have all the individual Star Wars stories – whether they are bound up in a compendium or as individual books/comics doesn’t matter to me. The best example of this would be the fact that I don’t collect individual comics, but always wait until a trade paperback version is published. Even though the Star Wars Omnibus collections include a lot of comic material I already have in TPB form, they still include otherwise unpublished material and thus will be included in my collection despite the overlap in material. Some comics that were released as single-issue I have also tracked down and bought. Because not all novels are published in hardcover, and because of the size of the hardcover versions requiring extra space shelf (not to mention the price) I also always wait until the paperback version of a book is released before adding it to my shelf – despite the fact that this usually takes at least a year to happen. I used to just sit and read the hardcover versions in the bookstore cafe, but now I buy the ebook version which added to the price of the paperback is still cheaper than a hardcover. Dark Horse comics also has their iPad app that lets me follow comic series issue-by-issue without waiting for the next TPB if I want.
I did screw up once – the Young Jedi Knights series, of which I had all 14 novels in their original edition, released a compendium that (I thought) reduced the series to two books. Eager to get more shelf space I started to sell off the books to replace them with the two compilations – only to realize these two books collected just the first 6 of the series! So I ended up having to buy used copies of the books I managed to sell that weren’t part of the compilation novels. Since that debacle I haven’t bothered to sell anything else even if it was included in some other edition I purchased.
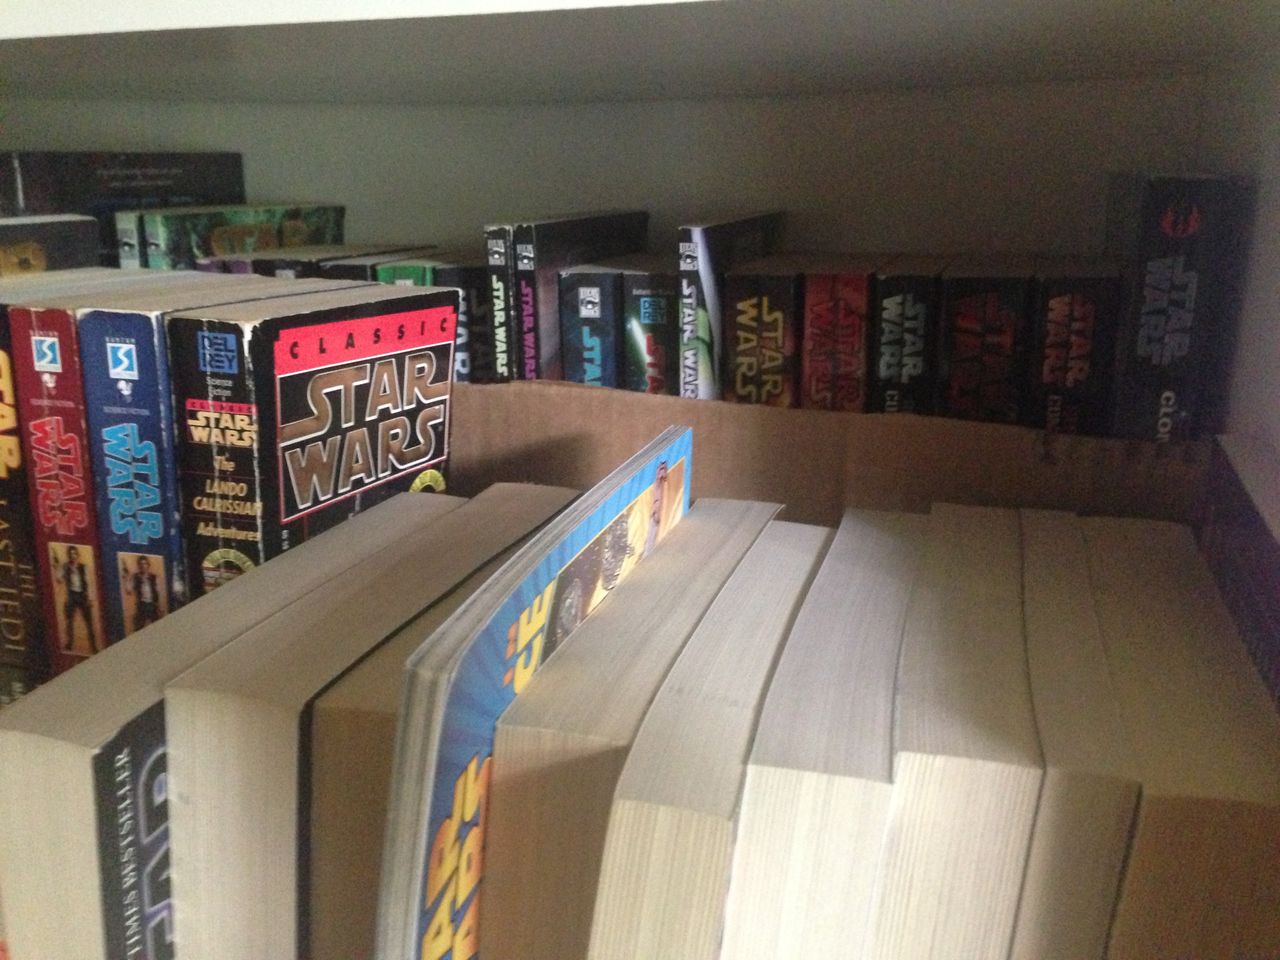
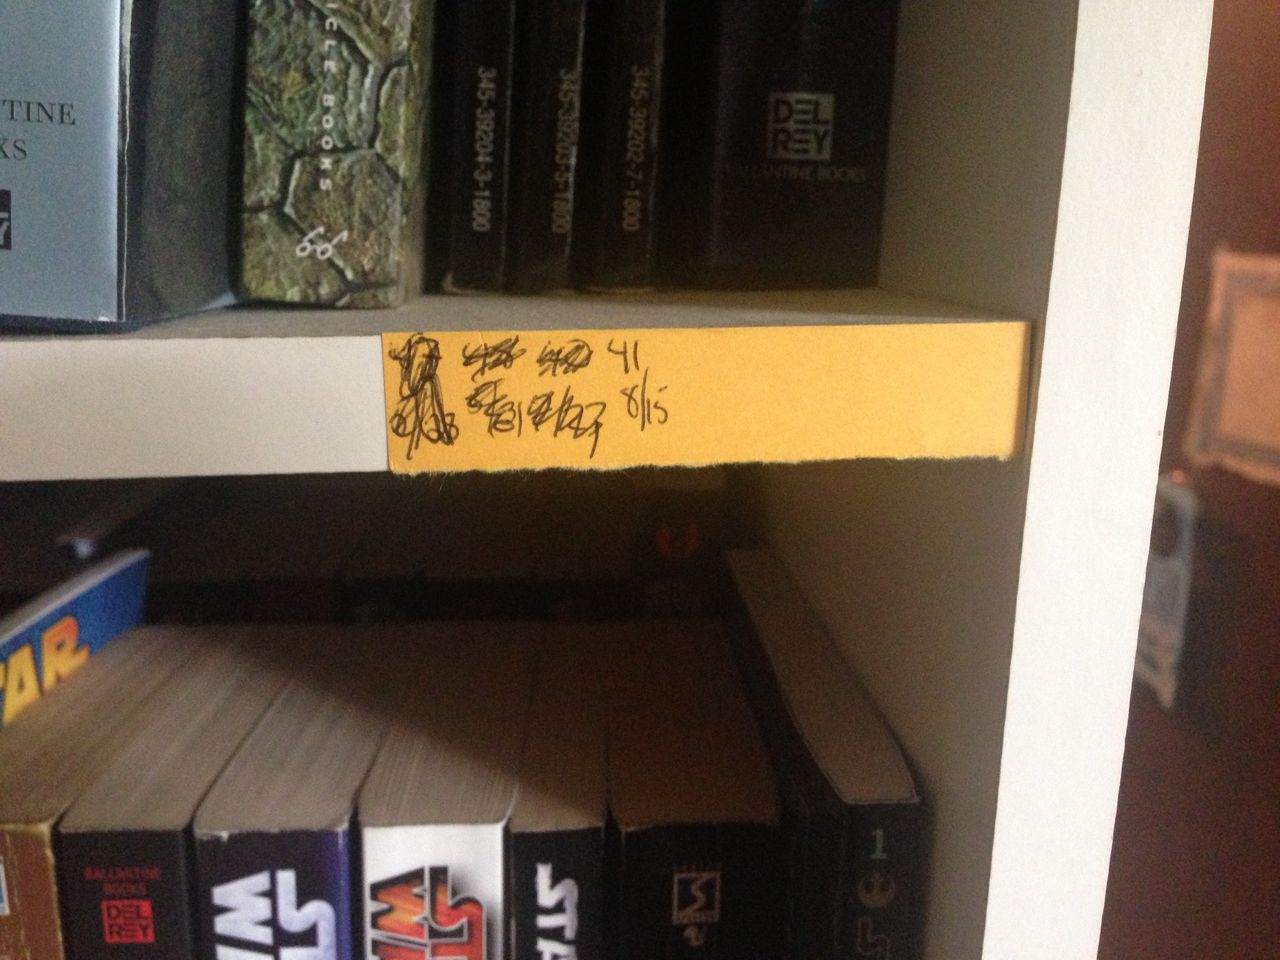
Most shelves are two-deep. A cardboard divider helps keep alternating book dimensions from messing up the front row
Right now, as of this writing, my library (collection, call it what you will) stands at 334 individual pieces of literature related to the Star Wars universe. There are currently 166 items in my Amazon wish list that comprise all the remaining literature out there I need to collect according to the Wookieepedia timeline of books and comics (this list does not include related tomes like visual dictionaries, essential guides, and other related material that reference the expanded universe but don’t focus on expanding it themselves). 73 of those items are out of print, which means I need to hunt for copies in good condition and often have to order individually from separate suppliers with individual shipping costs. To avoid this moving forward, I keep a close eye on those items I know are on the cusp of going out of print – it’s unfortunate that Amazon offers no service to notify you of when items are about to go out of print.
How I keep track of how many books are on a single shelf as they are shuffled around
No idea when I will finally get fully caught up with the now-gigantic publishing machine that is Lucas Licensing but now that I am dedicating monies towards that goal it shouldn’t be long. I hope that by next year I have my wishlist pared down to just upcoming works, rather than backlogged with out of print and previously-published ones. The best part is that along the way I will get to diver ever deeper into the universe that is Star Wars. Episode VII? I don’t need no Episode VII!!
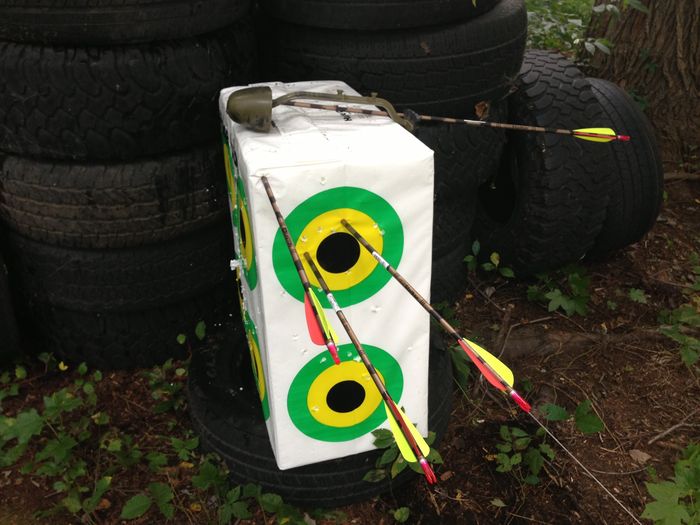
Well I finally got around to setting up the range outside. It only took me all summer, but given my penchant for procrastination it’s not very surprising. At all. Anyways, I deviated some from my original plan since it turned out to be more of a hassle to gather up tires than I figured it would. Twice my mechanic at the shop would let me know that there were tires outside and both times I showed up the next day and some fucking junk scavengers had hauled them away earlier in the morning. So I made only 5 trips in total and called it quits, dumping the tires in the back woods. I started to build them up a few weeks ago and realized that I was thinking a bit wrong about the setup – I didn’t need such a wide or tall backstop. If I was going to miss, it would be by no more than a foot. Additionally, while I had originally planned to post the targets at chest height, I realized I could just set them closer to the ground so any missed shots far to the side would just end up in the dirt a few feet beyond. I found I had just enough tires for the configuration below:
It works well. I went back to 60 feet and fired off several quivers, missing more often than not. Nothing missed far enough to not hit a tire. Of course hitting a tire didn’t quite have the effect I had hoped for. Apparently the target tips are not sharp enough to let the arrow embed into the tires, so they bounce off. The good news however is that the tires do flex enough to prevent the arrows from getting horribly bent when they do hit them. Or at least, if they are being bent then I can’t tell looking down the shaft. One out of the dozen or so I shot into the tires did bend enough for me to see it. And these are aluminum shaft arrows too, not carbon fiber!
I don’t know if it was because I was aiming down rather than straight like I used to when shooting in the garage or basement with the target at chest height, or if it was just a change in my release, but I was hitting consistently high when using my original aim mark. I penned in a new line above it to drop my aim and ended up more on target. I’m pretty sure it’s my release, as there were a few good shots that I could feel were good the moment I let the arrow fly. I’m very good at body movement so if I practice more, I will be able to make my release technique more consistent to in turn produce more consistent hits on target. Practice more – that’s the tough part 😛 Just gotta get up off my ass and do it…
Here are a few good hits at 60 feet. In the first image the middle arrow was aimed at the bottom, all the other arrows are near the target I was aiming at. I generally hit with 3 and missed with 2. I haven’t measured it out but at the angle I’m shooting from, I could be able to go back as far as 100-150 feet. I’d need to use my spotting scope, haha!
I made a day-one purchase of Drzewiecki Design’s New York City X product, which I had been salivating over for months, and ended up with a scenery add-on that brought my computer to its knees with the dreaded Out Of Memory error, which is what happens when too much is loaded into FSX at once and it runs out of the ability to address enough virtual memory to keep up. Turns out the product, as shipped, required the use of DX10 Preview mode, which is an aspect of FSX that Microsoft never fully developed before dropping the software. Therefore there are a number of issues with using DX10 but over the years these issues have largely been solved, enough so that a good portion of FSX users now fly with DX10 enabled all the time. I was not one of those people. Note the past tense.
Rather than fight for a refund I decided hell with it, lets see if I can get DX10 mode up and running. It took me a while but I finally figured out everything I needed to do to make it work on my system. I have updated my Install Log with details on the steps and techniques I put into action to get things working. It’s not something I will want to use for anything but helicopter flying around Manhattan, but at least I can now do that with this new product. I suppose I will also need to run DX10 if I decide to fly and aircraft up/down the Hudson as well past NYC – I plan to make a few more tweaks and test that on my next flight, which is a 5 hour trip from KPHL to KBUF.
Anyways, I’m going to refrain from day-one product purchases from now on. Despite getting DX10 working I’m still rather annoyed the developer didn’t bother to mention at all that the scenery was pretty much incapable of being run under DX9. It wasn’t intended to be a DX10-only product but then it should have been delayed in release if the developer didn’t want to have it only run on DX10 systems.
Alright enough ranting – let’s talk about the flight. I spent a little over an hour in the air, taking the Coney Island and South Shore routes from Floyd Bennett Field (NY22) then patrolling the harbor, up the East River, across Central Park and down the Hudson to the West 30th St Heliport (KJRA). I tried to aim for a pad on approach but I still can’t time my hover to happen over the pad – instead I ended up a few feet over the water just off the pad and tried to creep forward but couldn’t stay steady and after a minute or two of futzing around I just put her down wherever I could. I at least managed to pull off a good 1.1 ft/sec landing when the wheels touched down. A short break (didn’t even bother throttling back the engines) and it was back up and down the rest of the way to the tip of Manhattan, a short hop to the Downtown Heliport (KJRB). Again, my approach ended up short of the pad – but close still so I’m getting there. A bit less futzing, but I rushed the landing and ended up taking a good bump at 2.1 ft/sec. Down safe though, so I shut down on the pad – I should have taxied to a parking spot really.
Nothing too exciting, just an excuse to spend some time flying around the scenery to see if there were any issues. I got no OOM error box popping up and forcing me to shut down the sim but after landing at KJRB whenever I looked north I would get an occasional system chime warning me that I was dangerously close to generating an OOM error box.
Lost my drivers license for the third time in July, but I don’t really care to go there. Long story short, I managed to delay the suspension so it took effect during the warmer time of the year for a change and thus instead of having to bother my father, mother or sister for a ride to work and back I could hop on a bicycle and just get there myself. The question really was whether I would have a bicycle to do this with, as the bike I’ve had since I was a teenager had been sitting unused and untouched in the basement since… I was a teenager. And, being my lazy procrastinating self, I didn’t bother to dig it out until like the day before my suspension went into effect. Fortunately it still seemed to be functional – the brakes worked (well enough) the tires seemed to be able to hold air, the rear wheel was still slightly mis-aligned but at least wasn’t rubbing against the frame/brake pads, the chain was pretty rusty but still turned the wheels… yea, functional. My mom bought me a new helmet and I was all set to go.
Next problem was my route. The most direct way to get to work that is viable on a bike (which I also take in my car) is over a small bridge spanning the Swimming River. Because the universe mocks me so, this bridge is currently under construction to refurbish the structure and thus is closed down to one lane barely wide enough for cars to get through, let alone a bicycle unless I wanted to pedal in traffic. It’s not so bad though, as the route I have to take instead is barely a mile longer. Looking at it, you may wonder why I don’t go out the opposite (northern) end of my development and use West Front St before Half Mile Rd. The problem there is that section of West Front St is very hilly and also has some blind corners/hills that isn’t great for biking. I used to take that road to the nearby park and my mother would scream at me for doing so – never fully comprehended her concern until I drove on it myself for the first time. Okay mom, you were right. I know. They always are. *sigh*
So the first attempt to get to work didn’t go so well. I had packed a battery-powered air compressor in my PNW packable backpack in case my tires lost pressure after the trip, but that was the only thing I thought to bring. So when I stood up to pedal hard to try and beat a light and my rear axle popped out of the frame I was quite unprepared to fix it. Luckily too when the tire hit my frame and ground me to a sudden stop I had barely hit the intersection and was able to back up on the sidewalk. Casually, of course. Then too was the light rain that had begun to fall. So I called my dad and had him bring me a crescent wrench and also pick up me and the bike and take me to work as no way was I getting there on time now. Leaving work I was able to re-mount the axle and got back home in one piece. The next day however I realized that my front tire tube was pretty much done, as I could feel the air leaking out of the valve. Still, I figured packing the air compressor I could get to work, do a refill before I left to get home, and be good. Instead I ended up stopping twice on my way to work to refill the tire. Crap. So while I made it to work okay this time I had to leave the bike there and have my dad come pick me up, then drop me off the next day so I could walk my bike a short ways down the road to a bike shop and have the tube replaced. The next day I finally made it both to and from work on the bicycle. Success! It takes me about 30 minutes each way.
Although by this time I was wishing that while I was at the bike shop I had picked up a comfier seat. I have no idea how I dealt with this seat when I was younger – maybe I was just so much lighter or my ass was smaller – I don’t know. Bottom line is my rump was sore as hell to the point where every little jolt in the road was uncomfortable. I told my mom and she bought me a new seat, but it was kind of like the seats you see on beach cruisers rather than road/mountain bikes – but it looked big and cushy. Unfortunately I didn’t have time to install it and get to work so I packed it in the back and took off. Once again I didn’t think anything of tools, got to work and discovered I needed an alan key to raise my seat, as it was too low after installing the new one. Thankfully I managed to scrounge one up of the right size at the gym and made the adjustments. Riding home though was horrible – the seat was indeed comfy but totally wrong for my bike! I couldn’t sit properly to pump the pedals efficiently so I was overworking my legs the whole way home. I took it off as soon as I got home.
The next day I rode back to the bike shop to look at new seat options – and of course they were closed. So I went back the next day (OMG MY ASS HURTS) and bought a seat gel pad cover. That definitely helped although by this time my poor butt was so beat up it hardly mattered. But I still had a few days left of riding before my license was returned to me so I just had to deal with it!
Oh, did I mention that the last week of bicycling the heat index was above 100°F? Yea, we were in the midst of this horrible high-pressure system induced heat wave just sitting over the eastern seaboard. I dug my old Under Armour shirt out of the closet so I wouldn’t suffocate on my way to work – coming home it had cooled off enough to be somewhat pleasant. Heading into work at around 5pm wasn’t as bad as if I had to bike there around 2-3pm but it was still pretty fucking hot out at that time. I will admit that the very last day before getting my license back when the heatwave was at its worst I walked outside, said “fuck it” and got into my car, cranked the A/C and drove to work. I figured that if I can’t make it to and from work without getting pulled over then I don’t even want to fucking drive anymore. But I made it and the next day I went to MVC and got my license reinstated.
Despite having my license back I’ve put enough money and time into refurbishing the bike that as long as it will carry me I’ve decided I’ll still use it to get to/from work when 1) the weather is nice 2) I don’t have any errands to run and 3) I don’t have to be there in less than 30 minutes. I don’t really do much of anything else for exercise so this will count as something. The ride is pretty enjoyable and not too taxing – I can get to work and stand around coaching without feeling like my legs are going to give out on me. I’ve definitely gotten stronger and can pedal in higher gears for longer now but I generally don’t gear up past mid gear, as this keeps my pace manageable throughout the entire ride.
We had a massive heatwave this past week and it broke on Saturday. I got my license back on Friday so decided to celebrate with a trip to the range. I was accompanied by my stunt buddy Bobby and his wife Ewelina (both pictured above). While the heat was only in the 80’s there was on occasional cloud cover and as fate would have it this was the first time they assigned me a booth outside of the covered area. I figured it was because I told them I would have 2-3 people accompanying me and there was more room out there. I was tempted to ask them to change it but just sucked it up. You can see how my pad is sitting out there in the sun – and the air inside it gradually got so hot I had to lay a towel down under my bare arms because I thought they would get burnt.
Bobby and Ewelina mainly shot with Bobby’s pistols, a .22 Ruger semi-auto and a .22 revolver at clay targets they had set up on the ground 25 yards out. I started with my AR15 at 50 yards with the 1-6x scope, checked to make sure it was still sighted in properly and then proceeded to demolish 5 of 9 clay pigeons I had set up. I left the last 4 for Bobby and Ewelina to take care of. Next firing session I moved the target and clays back to 100 yards and attached the 6-24x scope. Again used the target to make sure I was still sighted in properly and then began taking out clays, leaving the last few for my friends. Ewelina hadn’t shot prone with a rifle before through a scope but she still managed to hit clays at both 50 and 100 yards.
Next I set up the CZ .22, still at 100 yards and used my dope from the last range trip to check my shot grouping on the target. I didn’t see any holes after shooting so tried again, aiming higher up on the target board and finally saw some holes way down towards the bottom. I had remembered backwards (I’ve since gone back and corrected what I wrote in my previous range report to hopefully avoid future confusion). Once I corrected my hold it was easy pickings. I love, love the trigger pull on my .22 and have to add to my AR15 ToDo list getting a trigger like that – the break on my AR trigger is really abrupt while the .22 rifle is a smooth pull all the way back. Once we cleared out the clays at 100 yards the next fire session I had them moved back to 50 yards. This close it’s like taking candy from a baby so the challenge I like to set for myself is shooting out just the center of the clay pigeon. You can do this purposefully if you nail one or two shots right in the center, so it’s a good test of marksmanship. For two of the clays I put a hole dead center, then had to shoot again to actually pop out the middle. Afterwards you can continue to test your aim by picking away at the outer clay ring.
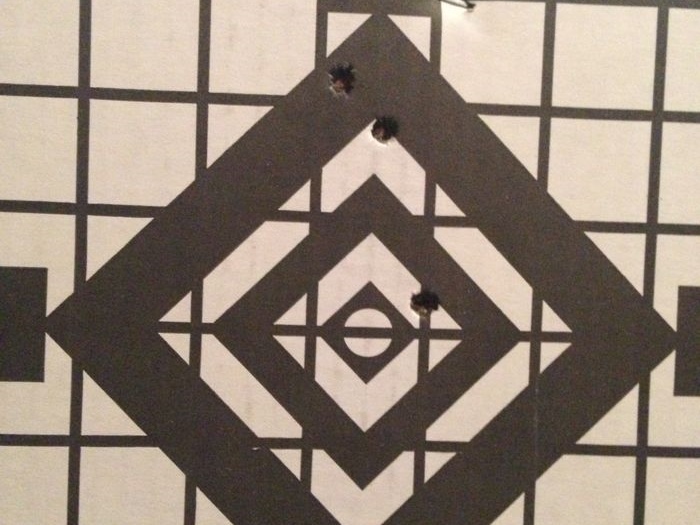
Hopefully a better trigger will help my aim with the AR – I really don’t like how it breaks I feel like I’m jerking it almost every single time. Below are the targets for my 3-shot groupings at 50 yards and then 100 yards. I wouldn’t really call them groupings tho, heh heh. You can see both times I nailed a good shot, had an okay shot and had a bad shot. That’s about how it is for me in general, 1 out of 3 shots is dead-on. At 50 yards I would have hit a clay pigeon all three times, at 100 yards I would have missed once. Not too bad, but I know I can do better.
Going 50 to 100 on the AR and 100 to 50 on the CZ worked perfect for the two hours that we had to spend at the range that day, something to keep in mind for future group trips or trips where I only have two hours to spend myself. I still have a box of .22, and around 200 rounds of 5.56 and just over 100 of .223 – Dick’s made their ammo purchase policy even stricter by allowing you to only walk out with a single box of .22, .223, 9mm or 5.56 (more calibers too, but in this case the only ones I care about). The upside is that if you wanted to you could buy one for all 4 calibers, so in a sense the policy is a bit more lenient than just allowing you to walk out with three boxes of anything, period. Luckily since my rifle can shoot both 5.56 and .223 that means I can get twice the ammo for it at once, and Dick’s had some 100-round boxes of American Eagle .223. Booyah.
Still have a lot of work to do with the weapons. Haven’t got around yet to having my P22 checked out at the gunsmith. I need to get a new end-piece so I can fit the longer barrel on without it sticking out looking dumb. Also still have to look into a strap for the AR and now a lighter trigger.