
Transposed from Gaiiden’s Scroll
It’s time I shared the story of what’s been keeping me occupied these past few days – besides the funeral and the consoling of friends and all that un-fun stuff – and that was building my new computer. I’ve been saying for at least a decade now that I would buy the parts and build my own rig. Being the master of procrastination that I am (or the fact that I’ve just been a poor and cheap bastard until like, last year) it’s taken me this long to do it, but it’s finally done.
I started on Wednesday night, because I knew I had to a) clean up my room so I would have floor space to assemble things and b) clean up my desk so that I could set up all the new equipment. (Note that from here on out I’m just going to say what I did in the order I did it and not mention dates cause I barely slept so I have no clue what day was what when I did stuff :P) Cleaning the room wasn’t so bad – the desk was a bit tougher because I had to clear off all the electronics, all the wires, dust and then wipe it down. But hey it certainly looked cleaner than it has in a long time 😛

Once I cleaned and dusted off the surface I placed everything back where it belonged and also put back most of the wires that I would be hooking up later. Yup, quite the mess down there, but I would be cleaning that all up much later.
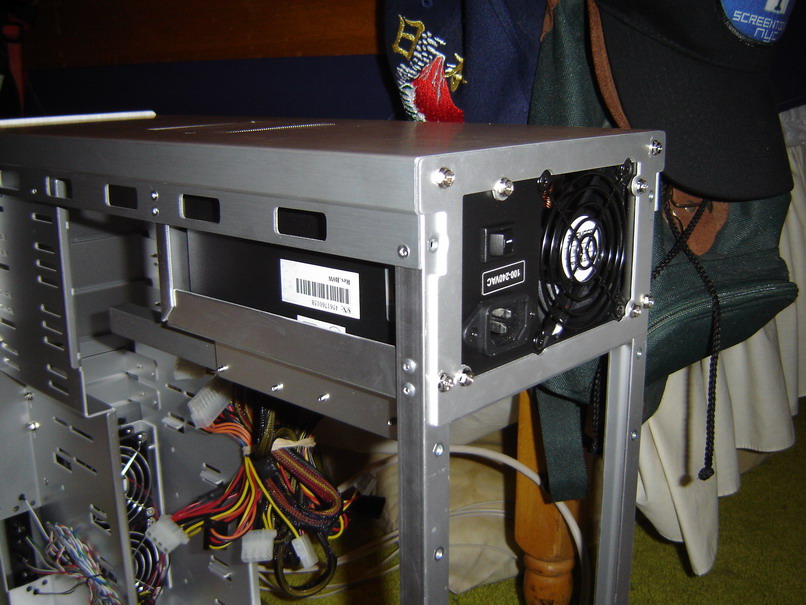
So the next night one of my old friends, Mike, came over, one who had built many computers himself, and assisted me in getting through the rough first stages. I already had a lot of the stuff unpacked, and so we took apart the case – the two side panels, the motherboard tray and the PSU cover. In trying to get the PSU in Mike helpfully told me that they usually go in with the power rating label beneath the switch right-side up. So, okay – what do I know – we try fitting it in, but there’s this little bracket on the side that’s not letting it slide all the way in. So Mike manages to peel off the bracket with his bare hands (I knew I had him there for something) and the PSU fits all the way in. Wheee! Uhm… not? Now we can’t seem to line up the plate that goes over the back and screws onto the case to hold in the power supply. Why? Cause it’s in upside down!! Yup, let that be a lesson to you, kids. See? Upside down is right side up…
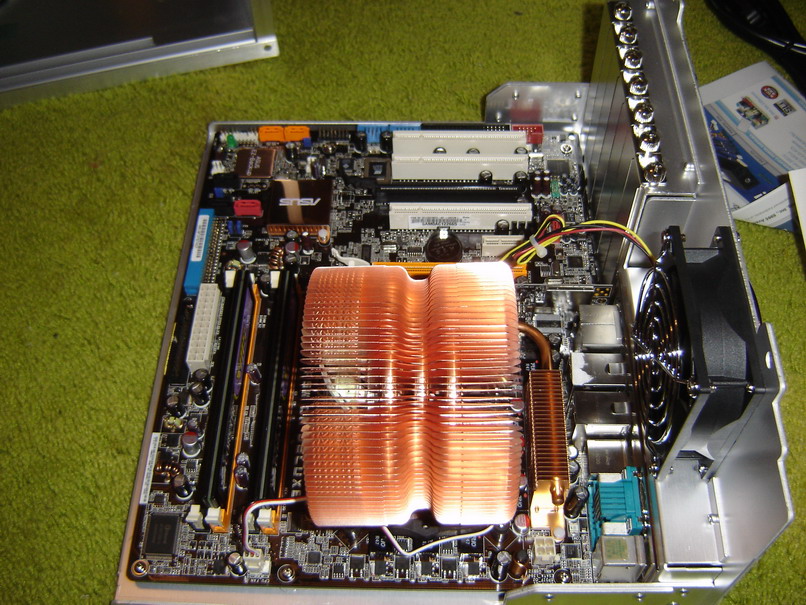
Sooo next step was to take the motherboard tray and screw in my standoffs. You have to screw in the standoffs by hand and Mike forgot his tightener tool so he had me take a Needlenose plier to twist the standoffs down a bit more so that they wouldn’t come loose when screwing and un-screwing the motherboard later down the road if need be. Then I screwed down the brackets that would hold my heatsink/fan over the CPU and screwed the ASUS P5H-D motherboard onto the tray.

So next we went to the bathroom to apply the cleaning solvent Mike brought over to the heatsink and CPU core to make sure we got the best transference of heat from the core to the heatsink as possible. After that we came back to my room and dropped the Core 2 Duo E6600 2.4GHz CPU into the socket and tightened down the latch, applied the bb-sized dab of thermal paste, then mounted the huge-ass Zalman on top and ever so carefully screwed it down. Then we connected the heatsink fan and rear case fan to the mobo power slots. Oh and then we also slotted in the two 1GB Corsair memory modules.
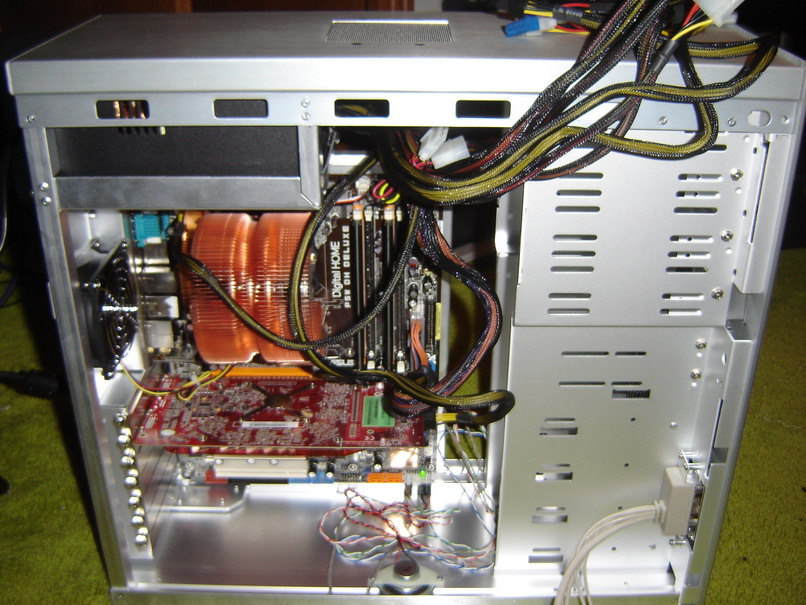
The next few steps consisted of sliding the mobo tray back into the case and screwing it down (yey thumbscrews!), slotting in the Sapphire Radeon 1900GT, attaching the power, reset, LEDs and case speaker to the mobo, and plugging in the main mobo power cable, the PCIx power cable for the card and the additional mobo power connector by the rear case fan.
After all that – the moment of truth. We plugged in one of the monitors, plugged in the power supply, crossed our fingers and hit the power button. And PRESTO!!
We had lift off! Once we reached the error screen because there was no OS to load we shut her back down and I gave mike a hearty slap on the back and shook his hand for getting me up and running so quick – less than two hours – I don’t even want to guess how long it would have taken me by myself. Just cause I’ve been reading for years about assembling computers doesn’t mean I think I can actually do it without screwing up the first time.
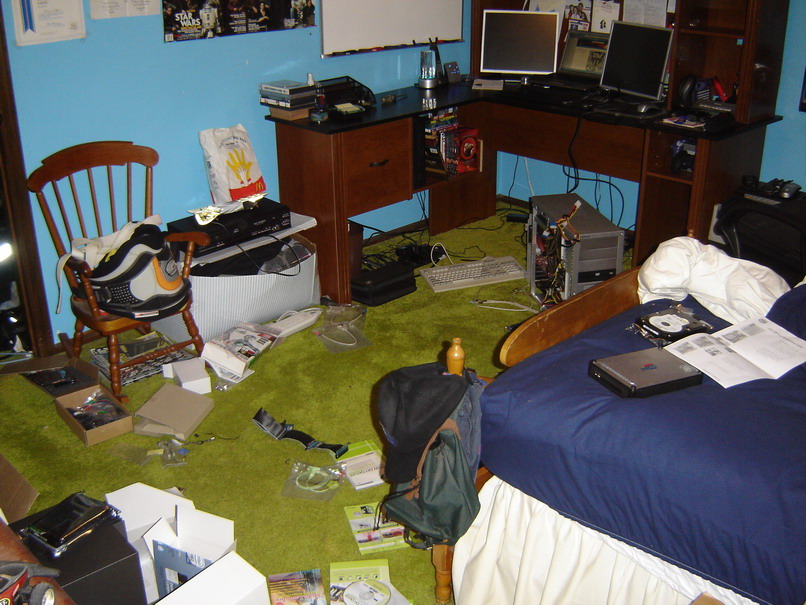
So yea – this is what my room looked like a few hours later, after I had the Sony DVD-ROM drive installed along with the SATA Western Digital 150GB 10kRPM Raptor so that I could install Windows XP Pro. At first the Sony drive was in the top bay, but then I realized that the IDE cable labeled CD-ROM didn’t actually fit into the Sony’s IDE connector, and I instead had to use the cable labeled HDD. Uh oh. This meant I had to place the DVD drive in the bottom-most bay and pray the slave connection on the cable reached the top-most hard drive bay, since I had planned on installing one of my IDE hard drives. Yeesh. Next I pulled my PS/2 keyboard from the closet and hooked that up along with my USB travel mouse for input. At first I partitioned my Windows install, because I wanted to minimize the damage should Windows crash on me, but Mike told me later that portioning a hard drive like my Raptor wasn’t the best thing to do, so I wiped XP and reinstalled – I kinda had to anyways since I made the XP partition too small. Cause I’m retarded like that. Small set back.
So I again loaded XP and then began installing drivers galore, starting of course with my motherboard, then video card. Next I installed the SATA Plextor DVD/CD writer. Thank god I decided at the last moment to get the SATA version – I wouldn’t have had an extra IDE connector for my hard drive! After installing those drivers I installed the SoundBlaster X-Fi card and then raided an old PC I had lying around for the audio cable that connects the DVD drive to the sound card. Loaded up those drivers and then installed my second hard drive, an IDE Western Digital 150GB Caviar. I had to tilt the drive up slightly so that the IDE slave connector would reach it but I screwed it down in the front so it’s stable.
By this time I had also hooked up the rest of the case fans – one up top to blow air up and out and two in front to suck in air over the hard drives and towards the video card(s). These took regular molex connectors and didn’t plug into the mobo, which kinda sucked because now I can’t control them with a fanbus or an application like Speedfan. Oh wells. I also plugged the firewire and USB cables from the front I/O panel to the motherboard, and installed the extra 2 USB ports in the second x16 PCIx slot.
Now here’s where I almost had a heart attack. The connectors for the USB cables (there are two) on the mobo are colored blue, as is the color of the cable connector running from the extra 2-port USB panel. From the case’s front I/O planel there was a blue and a black connector. Without thinking to check the wiring diagram from the case, I plugged the blue connector from the front I/O shield into the blue USB connection on the mobo along with the one from the rear panel, and the black connector to the firewire connector on the mobo. When the front I/O USB wouldn’t work, I tried switching the cables, but the front I/O still wouldn’t work. That’s when I looked at the cable diagram from the case guide and realized I was plugging the front I/O’s firewire cable to the mobo’s USB connection – something which in both the case and mobo instructions is labeled as a BIG NO-NO YOU WILL RUIN YOUR CONNECTION ON THE MOBO!!!
Luckily no damage was done, and I plugged the cables into their correct ports and everything was fine… well I still haven’t been able to test the front firewire connection. But – oh well, heh. We’ll just assume it works (please?).

So of course the next step was to get the WiFi up and running so I could keep installing apps and drivers, oh and I also hooked up my external drive as well since it had all my backups and I had run out of IDE connectors. Bah! 😛 I plugged in my second monitor and left my case open should I run into any problems. Hooked up the speakers too to test the sound card.

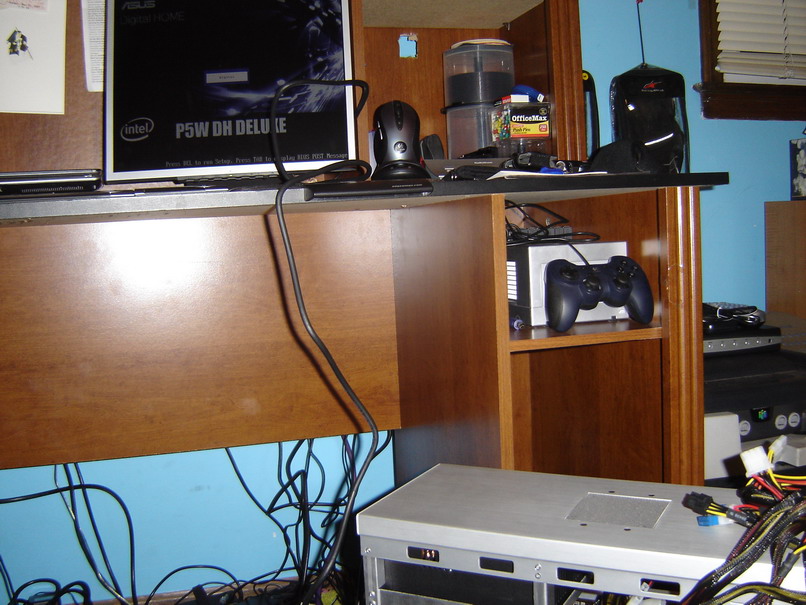
Finally satisfied, I slid the mobo tray all the way back in, tied up some loose case wires and packed the unused power connections up on top of the disc drives to keep the way clear of the two front fans so my video card didn’t choke on it’s own hot air.

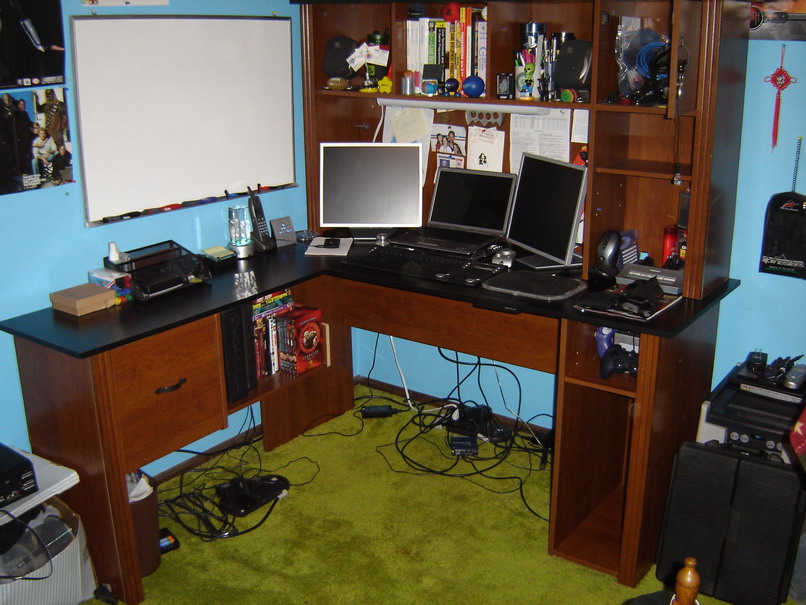
Many hours later, after organizing my cables with velcro-ties (those things are teh shiznit) This was the scene I beheld. Ahhhh… so beautiful.
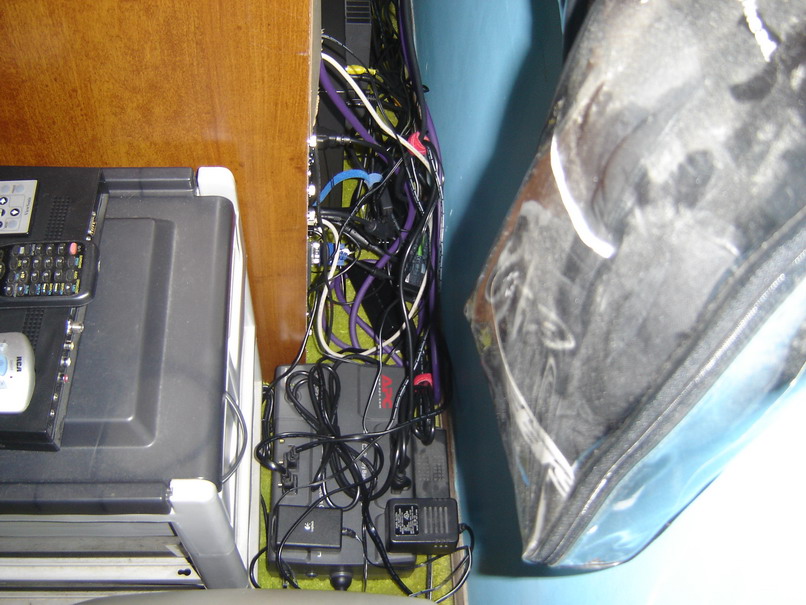
I had to cut away the back paneling of the cabinet because the tower was too deep, but that’s okay because it’s easier now to reach behind and fiddle with stiff should I need to. Looks ugly I admit but everything is bundled up so it’s quite easy to find stuff. I have my external hard drive, computer and both monitors plugged into the APC battery backup, which should give me at least 6 minutes to back up and shut down. Plus my UPS is connected to my PC via USB to manage shutdown should I not be at my computer.
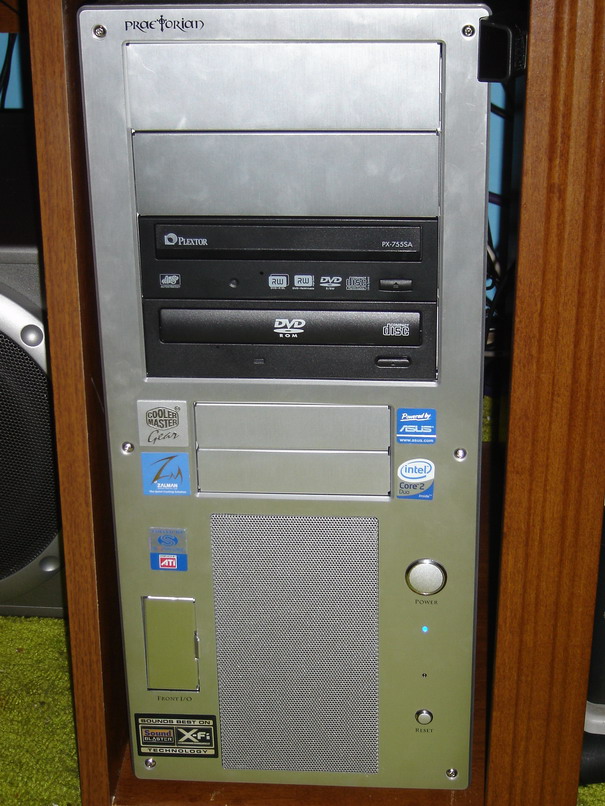
Here’s a shot of the case all badged’ out. Yea baby. The external drive is way back partially covering the top fan to help keep it cool.
So that’s pretty much that. I have a few kinks to work out still – MaxiVista isn’t all I hoped it would be, though I’m hoping I can get the issues resolved. I think it may be the ATI Catalyst panel screwing things up, but everytime MaxiVista loads up the extra display it appears to the right instead of the center where I had it last. And sometimes I can’t see anything but the background, sometimes it makes my window placement act funny, and when I log off to secure the computer (user-switch back to the main login screen) it kills the extended desktop, which means when I log back in I have to reconfigure it again. Bah. I’m thinking I might just use Remote Desktop and run some apps from my laptop instead and have it network-drived to the desktop so I don’t have to sync up files.
But for now I’m happy, can’t wait to get back up to speed with other things enough so that I can fire up some games on this puppy and really kick back!  Wheeeeee!!!
Till next time…
EaW is still my bitch… mostly // Dec 15, 2008 at 5:33 am
[…] I finally set up my Gamer account in XP on the new computer. I have a separate user account that I use to play games, because my main account loads up a whole […]
Doch nicht jeder hat die Möglichkeit, in die Stadt des Glücksspiels zu reisen, um
sein Glück zu versuchen. 7️⃣ Einige Online-Casinos bieten auch Sportwetten an,
darunter das Westgate Las Vegas, William Hill und das Mirage.
1️⃣ In Las Vegas gibt es über 150 landbasierte Casinos, von denen einige auch Online-Plattformen anbieten.
Las Vegas Hotels bieten das weltweit beste Preis-Leistungs-Verhältnis.
Und die umliegenden Berge und Seen bieten alle Arten von Freizeitmöglichkeiten.
Sie finden einzigartige Events und eine unvergleichliche Liste
von Shows und unzählige andere Aktivitäten.
Der Willkommensbonus ermöglicht Ihnen ein Bonusguthaben von bis zu 1.500 € sowie 150 Freispiele verteilt auf die ersten drei
Einzahlungen. Das Paket, welches einen maximalen Bonus von 1.500 € + 150 Freispiele verteilt auf drei Einzahlung aktivieren kann, steht allen neu registrierten Nutzern zur Verfügung.
Besonders hervorzuheben sind die großzügigen Bonusangebote für Neukunden,
die mit einem 4-teiligen Willkommenspaket bis zu 8.000 € und 500 Freispiele erhalten. Ich habe in Echtzeit Klassiker wie Online Blackjack, Poker,
Roulette online und Online Baccarat gespielt und war begeistert.
Wenn du jedoch lieber Live-Casino-Spiele, Tisch- oder Kartenspiele sowie Videopoker spielst, beachte bitte, dass diese
nur mit 10 % bzw. Bei der ersten und vierten Einzahlung werden die Freispiele in fünf Tagen verteilt, jeweils in Paketen mit 40 Spins pro Tag.
References:
https://online-spielhallen.de/royal-casino-deutschland-eine-detaillierte-analyse-fur-spieler/
Melden Sie sich über unseren exklusiven Link an und fügen Sie $15 oder mehr hinzu, um einen 200%-Bonus
bis zu $1.000 zu erhalten, plus 100 Freispiele für Ihre erste Einzahlung.
Um dieses Angebot sowie bis zu €2.000 an Bonusguthaben und weitere 200 Freispiele
bei Einzahlung zu erhalten, erstelle einfach dein neues Konto über
den folgenden Link! Zusätzlich kannst du bis zu €1.450
an Bonusguthaben und weitere 225 Freispiele auf deine ersten Einzahlungen erhalten.
Alles, was du tun musst, um diesen Willkommensbonus zu
erhalten, ist ein neues Konto über den bereitgestellten Link zu erstellen (kein Bonuscode erforderlich).
Zusätzlich kannst du ein riesiges Willkommenspaket auf deine ersten vier Einzahlungen beanspruchen – mit bis zu €3.625 an Bonusguthaben sowie 350 Freispielen. Um diesen kostenlosen Willkommensbonus zu
erhalten, registriere dich über unseren exklusiven Link und gib den Bonuscode „NFSND“ im Anmeldeformular ein.
Melden Sie sich noch heute bei SlotyStake Casino an und sichern Sie sich 50 Freispiele
ohne Einzahlung für den Slot Gates of Olympus mit dem Promo-Code SLTYNDB50.
Um diesen Willkommensbonus vom Casino zu beanspruchen, registrieren Sie heute
ein neues Konto über unseren exklusiven Link und bestätigen Sie Ihre E-Mail-Adresse.
Treten Sie heute dem RockstarWin Casino bei und sichern Sie sich 50 Freispiele ohne Einzahlung für den Hit-Slot
Gates of Olympus von Pragmatic Play.
Manche Echtgeld Boni ohne Einzahlung kann man auch für Tischspiele
einsetzen. Sie bietet eine spielerische Methode, um sich Freispiele und andere
Gewinne zu sichern. Ein Glücksrad zu drehen, macht immer Spaß – ganz besonders,
wenn es Freispiele ohne Einzahlung zu gewinnen gibt! Wussten Sie, dass viele der beliebtesten Spielautomaten unbegrenzte Freispielerunden enthalten? Bestimmte
Spiele enthalten weitere Freispiele ohne Einzahlung,
die Sie gewinnen können, um Ihren Gesamtgewinn zu steigern. Interessant ist auch der Book
of-Bonus, bei dem du 100 Freispiele gewinnen kannst.
References:
https://online-spielhallen.de/verde-casino-50-freispiele-ohne-einzahlung-fakten/
Mindil Beach Casino Resort is an ultimate travel destination for discerning guests seeking a truly five-star beachfront
experience in Australia’s extraordinary Top End.
Visit the Lucky North® Club desk located at the
casino main entrance to join for free today. Whether it’s a casual catch-up with friends or something a
little more special, experience some of the best dining options in Darwin. As well as a range of unique function and conference spaces, we also offer stylish hotel rooms and suites, restaurants, bars,
and casino. You must be 18 years or over to enter the casino.
Pop the sunnies on and pamper yourself with a day blissfully lounging on a sunbed, swimming
in the glistening infinity pool, and grazing on beachy bites.
Each room also includes a private patio, offering spectacular
garden or ocean views. Located on the ground level of the hotel, these spacious rooms are fully
equipped with a Japanese-inspired spa bath and a separate spacious corner shower.
Superior Spa Rooms offer guests the ultimate relaxation experience.
All rooms feature a private balcony, stylish ensuite
bathroom, complimentary WiFi and a state-of-the-art flat screen television. The
Garden Grand Suite offers guests an experience to remember.
Use your points for Xtra Credits, dining, hotel stays and more.
References:
https://blackcoin.co/betcity/
This list acts as a testament to PAGCOR’s commitment towards ensuring the highest standards of fair play and security
in the online gaming industry. These regulations protect not just the players, but the integrity of
the gaming industry in the Philippines as well. Yes, all
casinos listed on this page are licensed by trusted international regulators and use encryption to protect player data.
At Gambling.com, he leads the casino review process with
a strong player-first approach and a focus on transparency,
game quality, and secure payments.
For example, if you deposit ₹1,00,000 while claiming a 100% matched deposit bonus, you’ll receive an extra ₹1,00,000 in bonus funds, giving you ₹2,
00,000 to play with. They often take the form of matched deposit
bonuses, and can also come with other rewards, such as free spins and
cashback. These promotions are only available to players who are joining the casino for the first time and are typically the most generous promotion available at the site.
The Parliament upgraded the country’s online gambling
ban through the Interactive Gambling Act of 2016.
If they did not, players would quickly find somewhere else to
play. Whenever you access one of these casinos, it will immediately scale to the preferred resolution of your device.
Some Aussie casinos may be available through their own specific mobile applications.
References:
https://blackcoin.co/top-online-casino-bonus-offers-2025-claim-your-free-bonuses/
You’ll be able to please your sports wages at this casino site,
and you’ll be able to catch all big games on the huge LED screen at the comfortable Theatre.
There are also other games such as the spinning wheel and casino War,
which the players can try out. Queensland does
not have many casinos; however, they intend to increase the number of gambling establishments to attract tourists.
We take a look at the gambling laws of the top casinos in Queensland and online gambling in the state.
Islands, reefs, sundrenched beaches that go on forever.
The playful spirit of modern Australia comes to life with world-class cuisine and
entertainment in lush tropical surrounds at The Ville.
For those who want a residence, not just a hotel room, the spacious Corner Suites make for a
luxurious retreat. Check out our How to Play Guides if you
want to know more about our games.
References:
https://blackcoin.co/complete-list-of-las-vegas-casinos/
In May 2022, Crown Resorts was fined $80m for illegally accepting Chinese bank cards in its casino in Melbourne.
When earning lifestyle points, every dollar spent on hotels, restaurants,
bars, retail, or events earns 5 points. Therefore a soft opening of several restaurants,
and accommodation facilities resulted in the
final days of 2020, with more opening in the new year.
Crown Resorts Limited is an Australian gaming and entertainment group that owns and operates three integrated resorts, including Crown Melbourne, Crown Perth and Crown Sydney.
Yes, our Bell Service Desk team can securely store your luggage before your room
is available on the day of arrival and after your check-out
on the day of your departure.
An easy day trip from Melbourne, Victoria’s coastal region is located within reach of Crowne Plaza guests with day tours and shuttles running regularly from the Melbourne CBD.
A short walk from our hotel, Southbank features some of the city’s most popular bars and eateries.
Providing a unique and immersive experience, Melbourne Zoo is home to
over 320 species from around the world. If you’d like to explore
something more upbeat, Melbourne has all the best attractions and experiences to get your heart racing.
Melbourne is the perfect destination for a fun-filled family holiday, romantic getaway, business trip, or weekend escape.
For more information on applying for Jobs and how to
set up Job Alerts, please visit our FAQ page.
References:
https://blackcoin.co/mind-boggling-facts-you-didnt-know-about-online-casino-gaming/
online pokies australia paypal
References:
the-good.kr
online casino for us players paypal
References:
https://realhire.co/employer/online-casino-mit-paypal-einzahlung-die-top-casinos-im-vergleich/
online pokies australia paypal
References:
https://getjobs.company/employer/pokies-deposits-with-paypal/
us online casinos that accept paypal
References:
http://www.uocharon.com/bbs/board.php?bo_table=free&wr_id=440