
Time to start sharing some of my airport development experience and I might as well start with this topic as it came up in a thread on FSDeveloper. This tutorial will cover several things:
- Creating rows of parking tees like actual airport parking areas
- Using ADE guidelines
- Preventing AI spawning in certain parking locations
- Placing static aircraft and communicating taken parking locations to the user
- Recognizing limitations of this method
Let’s dig right into it. The main focus here is to create parking as depicted in this image:
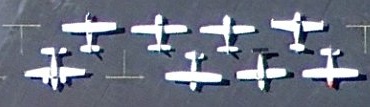
Creating the basic parking stalls
You can see that aircraft are backed into their parking locations and are jigsawed together to fit as many as possible into a given area. These aircraft are generally positioned as such after they have been taxied near to the parking location and shut down, being rolled back by their owners. To recreate this in FSX, open up Airport Design Editor and follow along:
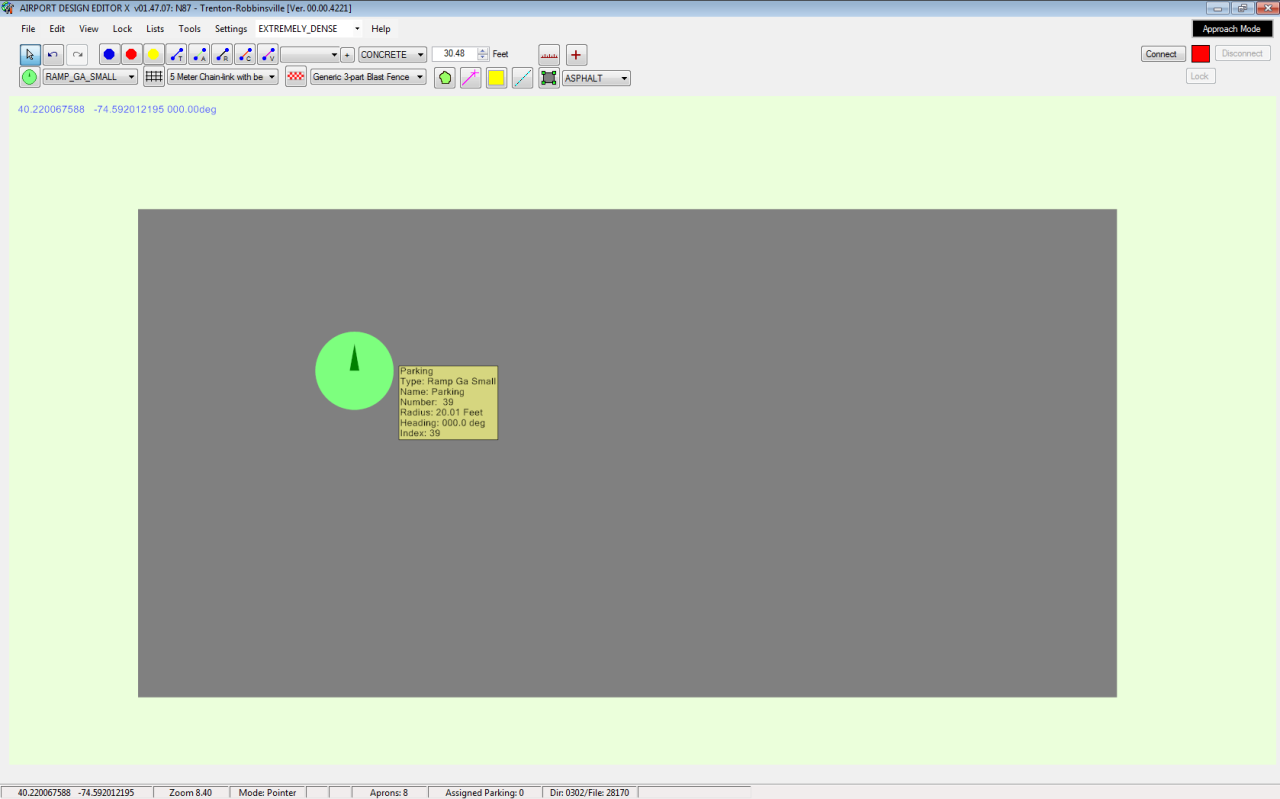
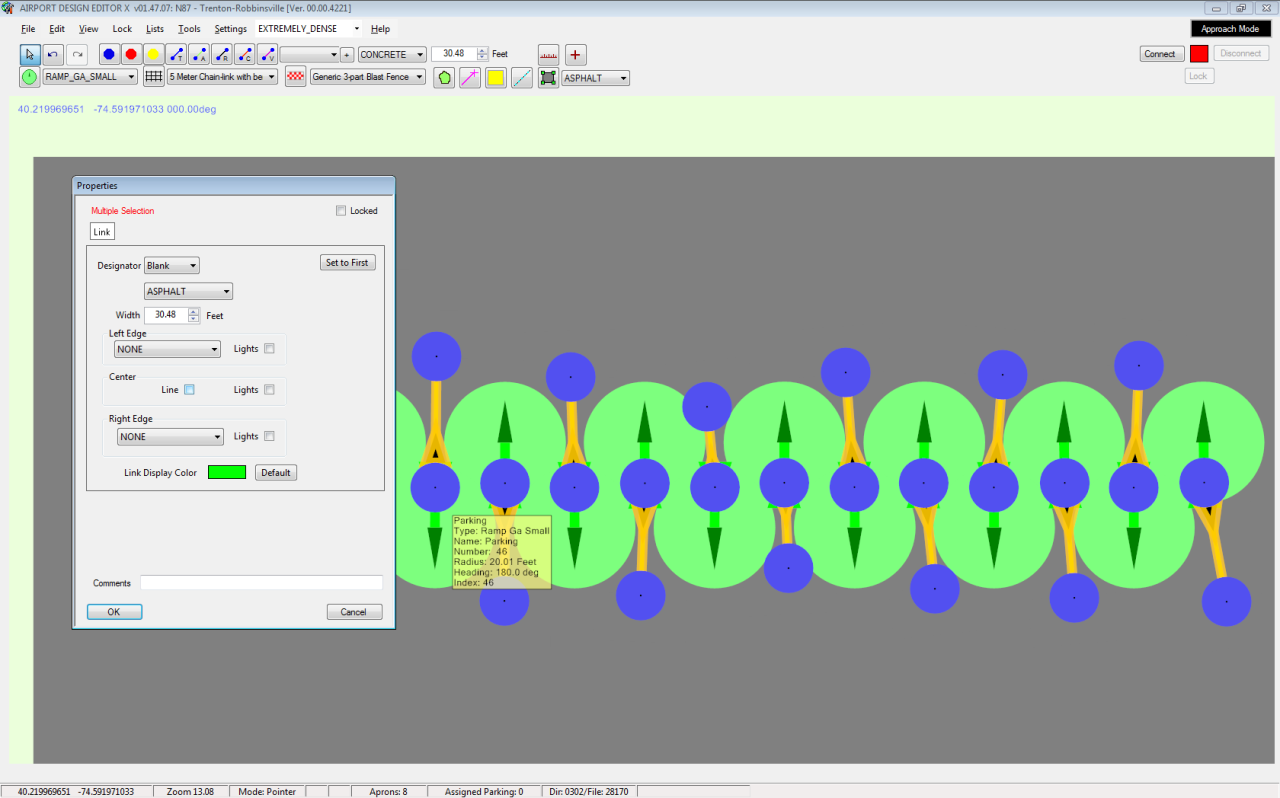
We’re going to start with a single parking location. Nothing fancy, just select the default RAMP_GA_SMALL parking stall and plop one down on your tarmac area. Align it whichever way is proper for your parking arrangement and then open up its Properties window. In the upper-right, select the Locked check box. In the Radius box, change the width to 20 feet (If your ADE settings are in meters, you’ll have to adjust your measurements accordingly). In these parking arrangements, you commonly won’t find room for any aircraft with wingspans much larger than 40 feet. Close the window.
Next, select the Guideline tool and draw yourself a line +90° from the heading of your parking spot. Use the Properties window to make the Heading of the guideline exact if needed. Airports can have slightly varying amounts of space between their parking tees, so be aware of this. For our tutorial though we’ll space these tees 46 feet apart – which is pretty much the common spacing in my experience so far. In the Properties window of the guideline, set its Length to 46 feet.
Now select your locked parking spot and Copy it. With the locked parking spot still selected, press the Delete key. Nothing will happen of course, because the object is locked and immune to deletion, but you’ll find that this object will remain selected even while you’re fiddling with other airport elements. (This little trick works with other airport elements too like Aprons and Objects – experiment!). We’re going to use this to align our guideline. Grab it with your mouse and drag it over so the flat end of it aligns with the center cross on your still-selected parking space. Zoom way in for finer movement so you can place it perfectly. Now place your mouse cursor on the head of the arrow (the pointy part) and Paste to plop down a replica of your first parking spot (thankfully ADE does the job of incrementing the parking spot number for you!). It may be a bit off-center – no worries just unlock it and drag it to align with the end of the guideline.
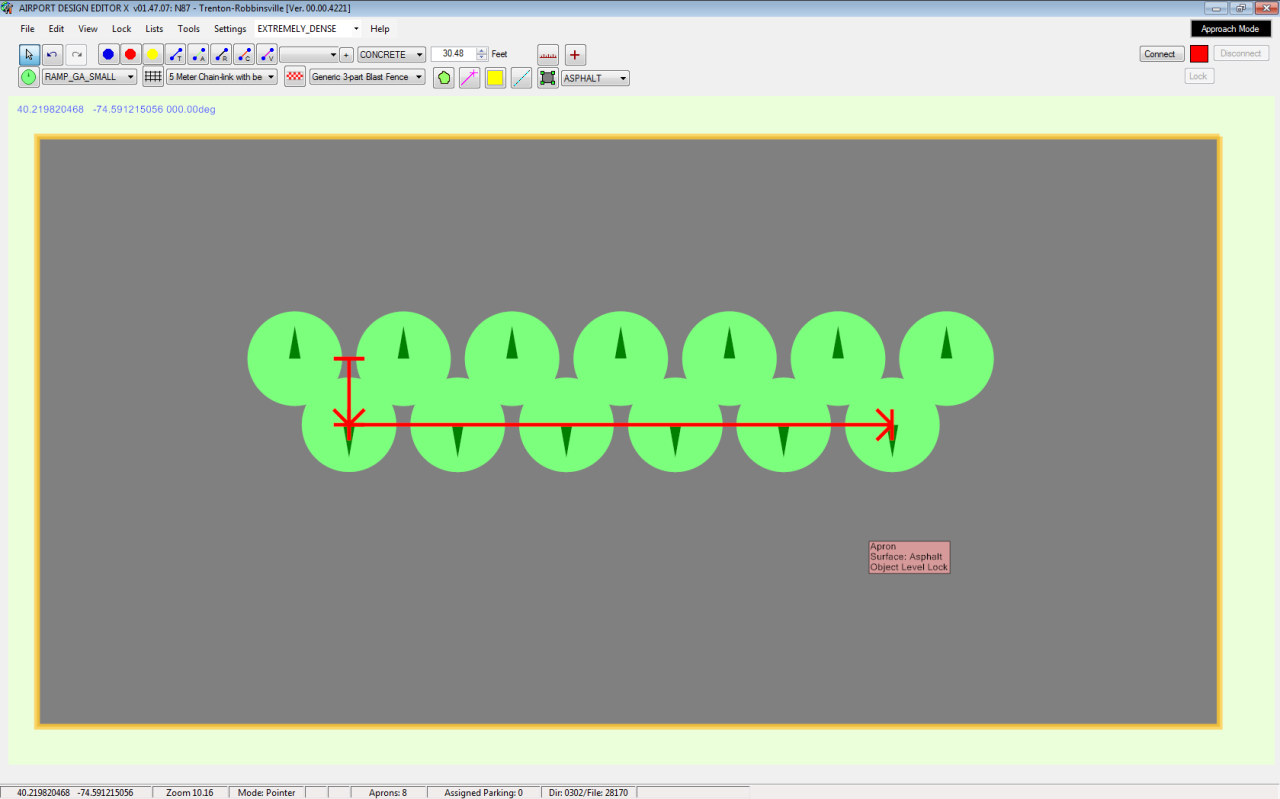
Now click on your still-highlighted parking spot and then click off it anywhere else on the screen and it will deselect. Your screen should now look like this (I left my parking spot selected so you could see the alignment of the guideline):

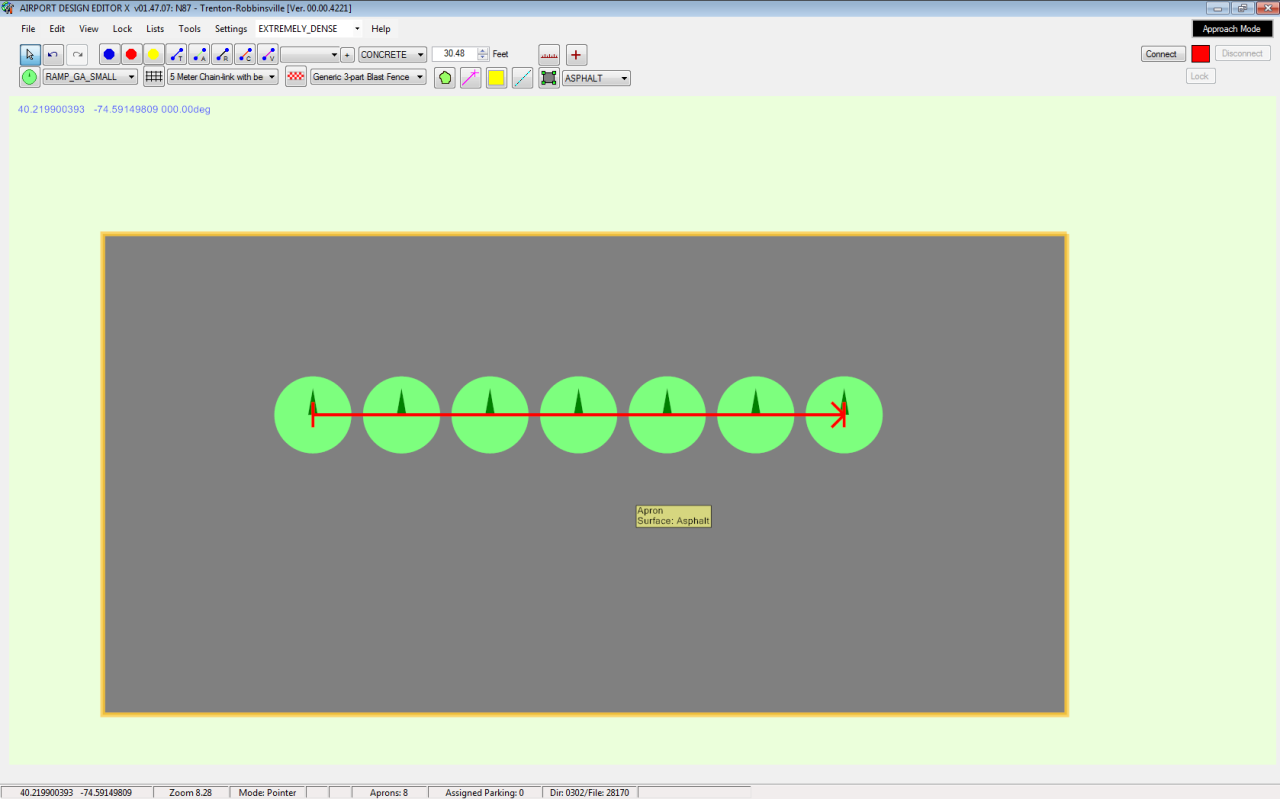
Now let’s move on down the line and create 5 more parking locations. To do this we simply first open the Properties window of the guideline and double its Length – 92, 138, 184, 230, 276. After each extension of the guideline we Paste another parking spot. If you pay attention to where you place your cursor on the arrow when you paste, you can get the hang of plopping them down without needing to align them afterwards. You don’t need exact alignment. A few inches won’t hurt anything. After you’re done you’ll have a nice even row of parking spots:
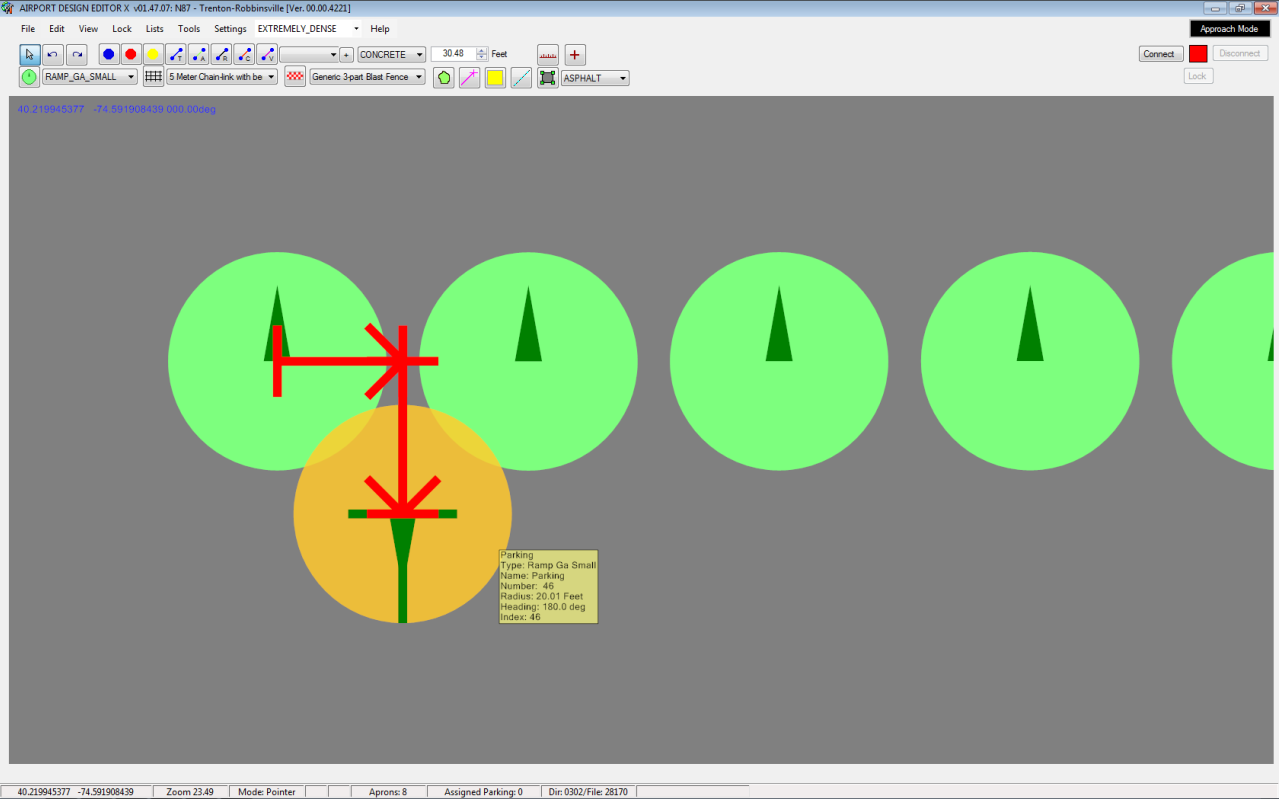
Sweet! Okay now let’s handle the bottom row of parking. First, we need to locate the midway point between our parking spots. What’s half of 46? Open your guideline’s Properties window and change its Length to 23 feet. Now create a second guideline, set its Heading to be +180° from the heading of your parking spots and its Length should be 28 feet (again, this distance can vary slightly, but unless you’re looking for an exact match based on satellite textures, this is a good distance for general use). Now align the base of the second guideline so it forms a cross with the arrow end of the first. Paste another parking spot at the arrow of the second guideline and rotate that spot to align with the heading of the second guideline. You now have the first parking spot on the bottom row:
Now move your first guideline down to align with the bottom row of parking – you can either use the lock and delete trick with the first bottom spot or just align the guidelines themselves. Extend the Length of your first guideline back to 46 feet, Copy the bottom row spot to preserve the heading and begin the process of Pasting 5 more parking spots in this row just like you did for the top row. In the end it will look like this:
All right! Now it’s time to create the Tees themselves, which is a default texture created by FSX whenever you attach a Path to the parking spot that has a Line enabled. Conveniently (in this case) ADE automatically enables the Line attribute to all Paths connecting a parking spot. Most commonly, you’ll be using an Apron Path to connect to parking spots, so select the Apron Link tool from the toolbar and connect Paths to all your parking locations. Because the bottom of parking Tees orient towards the Path and not the heading of the parking spot, make sure they all come out on the opposite heading of the parking spot, so the broad top of our Tee is facing in the same direction:
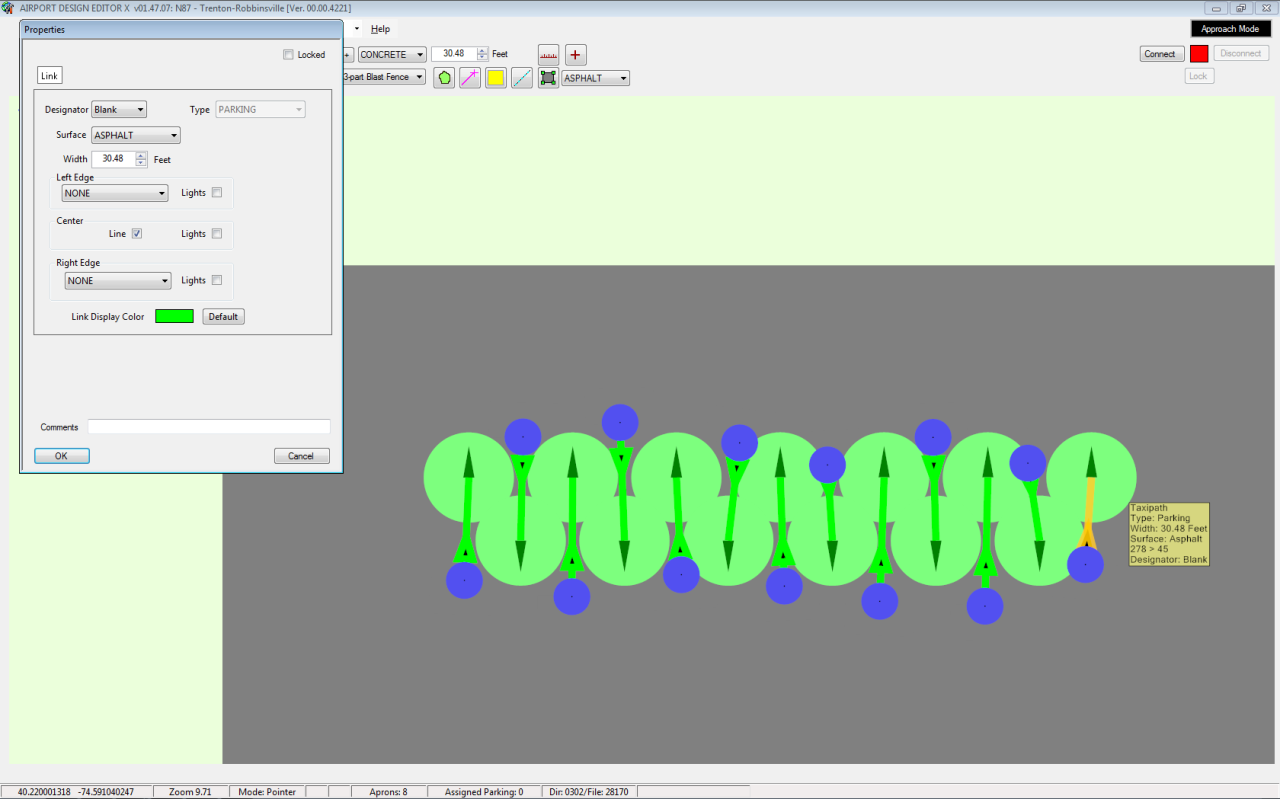
Opening the Properties window for any of the Paths you’ll see the Line property is checked. You’ll notice I kind of placed the Paths a bit haphazardly – that’s because we need to fine-tune their placement anyways in this next step. Grab a Node with your mouse cursor and drag it over the parking spot it’s attached to until the enlarged edge of the Node just touches the bottom of the triangle within the parking spot, making sure the Path is a well-aligned as possible opposite the parking spot’s heading. Seeing this in action is best so look below to see an already-placed Node (left) and a selected Node (right) in the process of being placed:
The length of the lines extending out from the bottom of a Tee are directly related to the length of the Paths coming off of a parking spot. Placing our Nodes this close to the center of the parking spot means that the line will be so short it won’t even render and we’ll see just the Tee parking texture, assuring a consistent size. Continue to align the Nodes all the way down the row of parking spots.
Now we come up against some problems: 1) our AI aircraft are starting in this parking spots facing away from the Path. We want them to depart straight out from the parking spot, not turn around. 2) we don’t want any taxi lines showing on the ground.
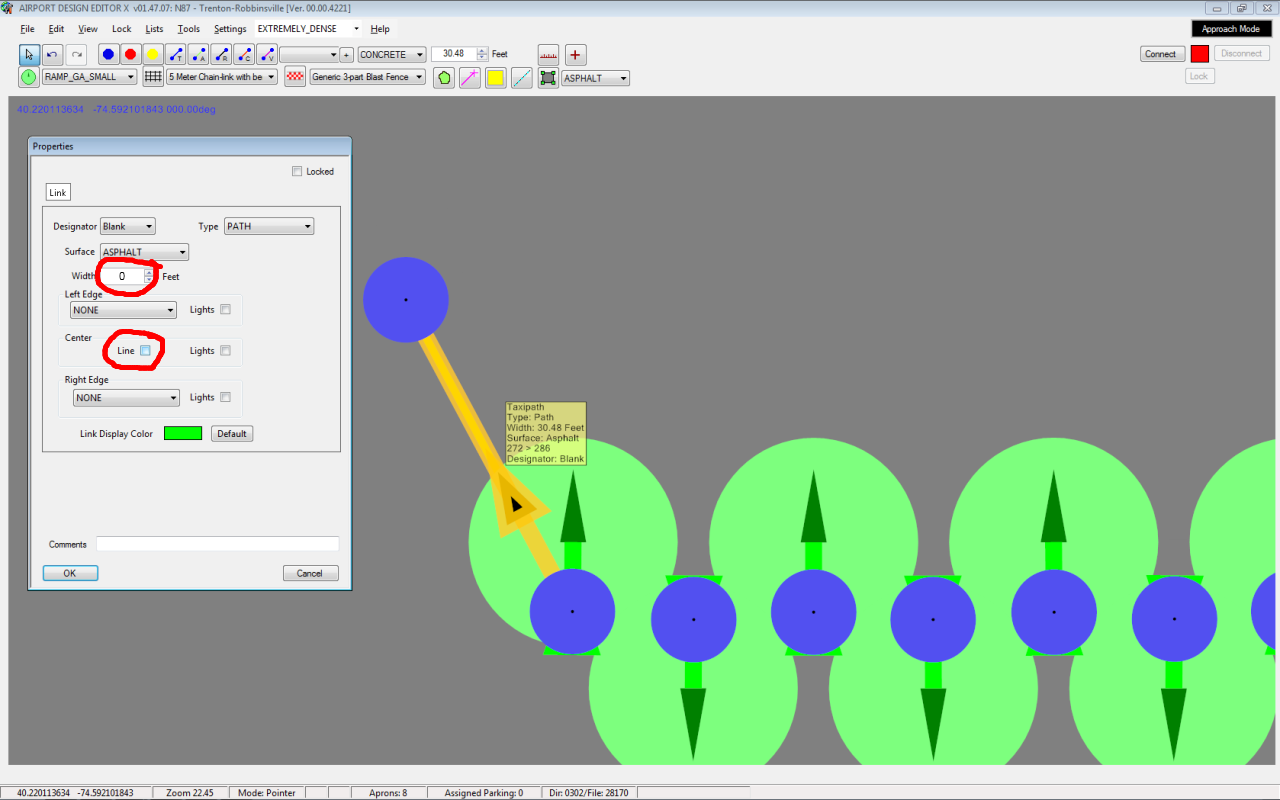
To solve these problems, we need to create a second Node with a Path we can set to not display a taxi line. That way, the Tee texture will be drawn, but the rest of the Path will be invisible to the end user. Make sure that in addition to turning off the Line property of the Path you set the Width to 0 feet to ensure that the line terminates at the node and does not bend to follow the Path away from the parking spot:
When you do the other parking spots, it’s best to tackle their second Nodes all at together so you can use the multi-select feature of ADE to turn off their Lines all at once:
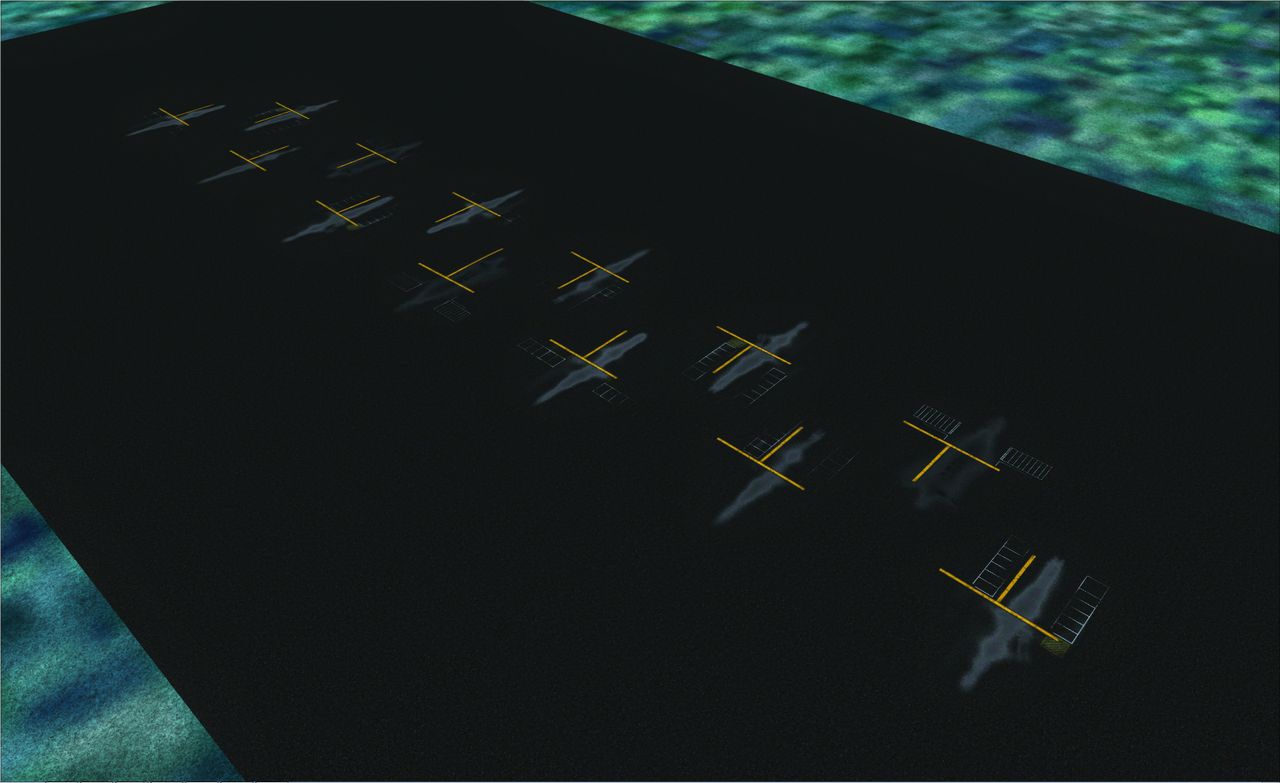
And we’re done!! Compile it out and load up FSX to see the results of your handiwork:
Ut oh 🙁 What happened? We seem to be missing a parking Tee. Luckily this is a common problem that is easily solved. Identify the parking spot(s) that is missing and slightly tweak the position of the Node attached to the parking spot to either side of center. Recompile and you should be good to go:
Restricting AI spawning
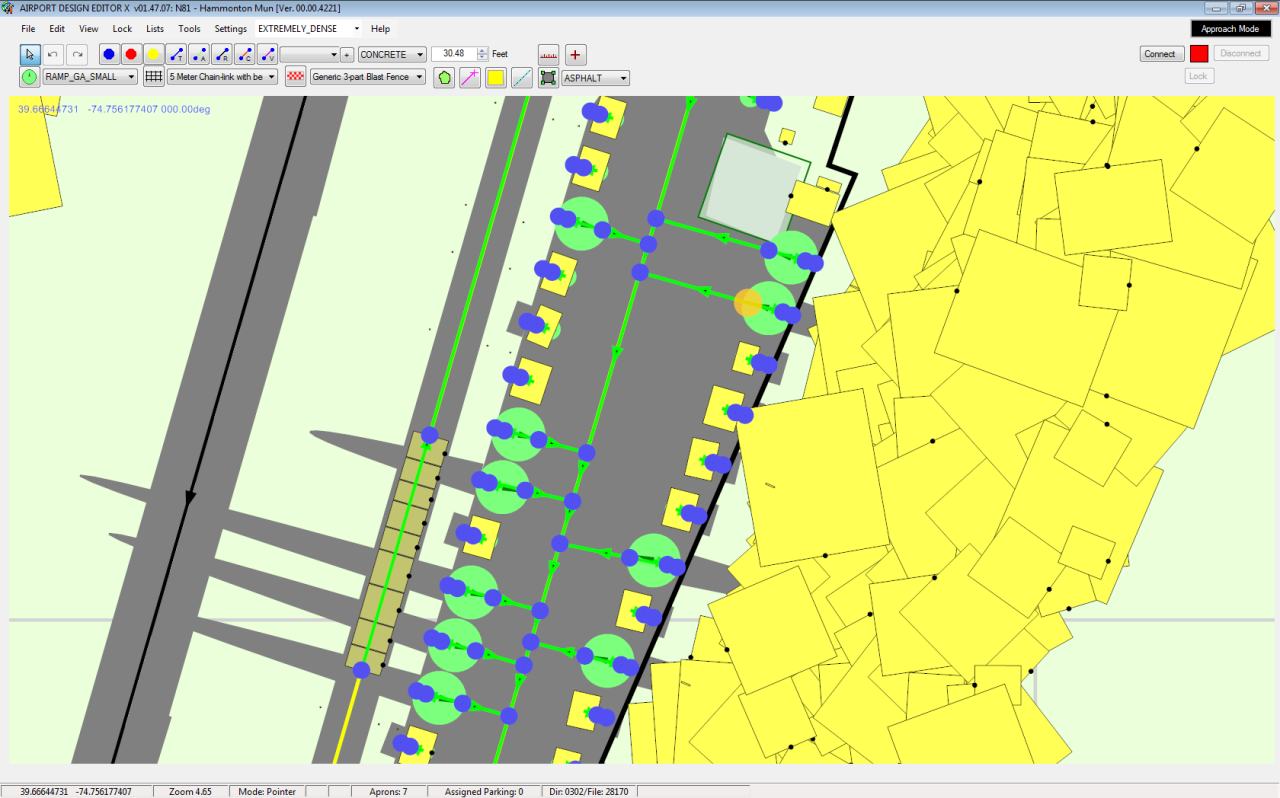
Now let’s get a little fancy. These parking setups, as they are arranged at some airports, can be quite compact. And numerous. You can have one row of stalls set up right across from another row that’s across from another row… when you start laying down AI paths it can all get a bit overwhelming. And why should you need all the parking spots for AI to spawn in? Anyone who runs enough AI to fill all the spots in the figure below, for example, would need a super computer!
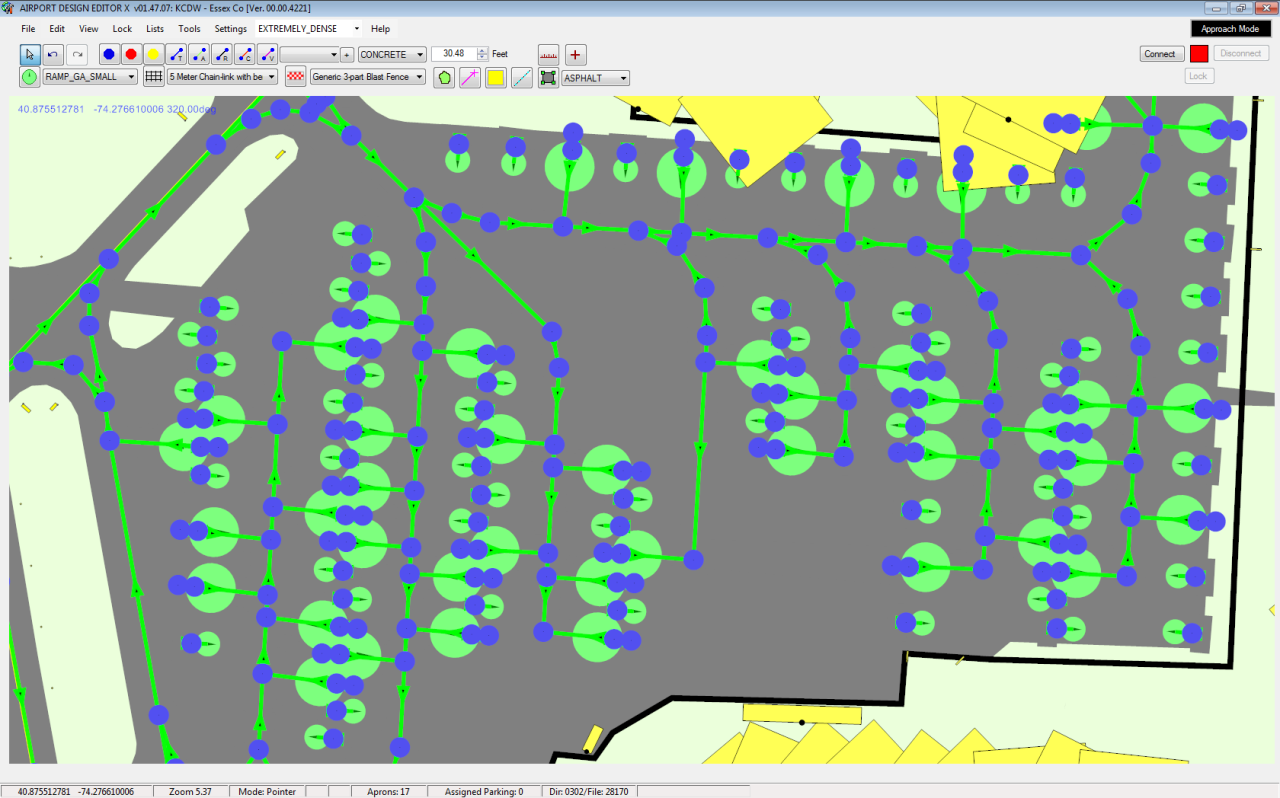
Hopefully that didn’t explode your brain. I removed a lot of elements to help make things clearer. What you see above is an accurate rendition of some of the parking at KCDW in NJ. (which appears to have recently been expanded!)
So what’s going on in the image above? You’ll notice some of the parking spaces are smaller than the rest. One of the reasons for this is to help reduce clutter in the AI Paths that could result from attempting to connect every single parking space to the Path network. Instead, given the fact that there are more than enough spaces to handle any sane amount of AI, I reduced the radius of the majority of parking spaces down to 10 feet. Because of the way FSX works, AI aircraft will not park or spawn in a parking space that has a diameter smaller than their wingspan. I mean, makes sense right? Now how many planes do you know of that have wingspans less than 20 feet? Even the default FSX Aircreaton Trike has a 33 foot wingspan. So you’re effectively creating parking spots that no AI craft will use. Well wait then why bother have the parking spots at all? Remember that we need them to draw the Tees for us. Fortunately, the size of a parking Tee is constant and reducing the Radius of a parking space will not in turn reduce the size of the parking Tee. You’ll also notice that the reduced parking spots only require a single Node to draw the Tee. Reducing the Radius of parking spots does not prevent the player from choosing them either.
Using static aircraft
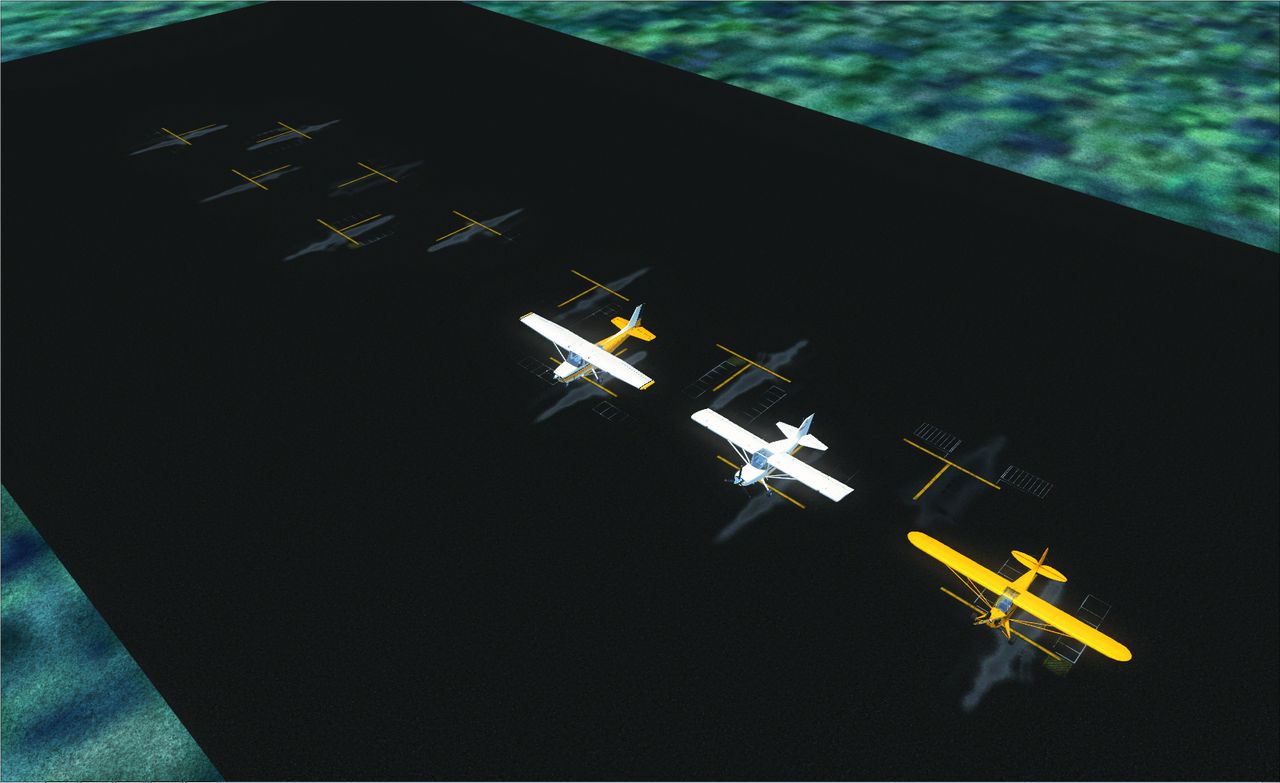
Okay let’s take things one step further. So we have a crapton of parking Tees now – it would look a bit desolate if only a few AI craft took up residence on them. There are a ton of static aircraft libraries out there… sorry, correction – there are a few static aircraft libraries out there that contain a ton of various aircraft you can place on the smaller parking spots to fill in your scenery and make it look more like a real airport. Problem: How do you let the user know that a space is occupied by a static aircraft? As mentioned earlier, the user can still choose any parking space to start in – any AI aircraft will load after the user but any static aircraft will load before the user. To help prevent a user from starting inside another airplane (I hear that doesn’t end well) we can use the Type field in the parking spot’s Properties – I like to use the generic RAMP_GA designator to denote parking spots occupied/blocked by static aircraft/objects, while using the RAMP_GA_SMALL designator to tell the user the parking spot is open for small aircraft. Of course this doesn’t mean the user can’t start inside a static aircraft, but if you place this information in the ReadMe there’s a good chance the user will see it. To be on the safe side, I always check the Do Not Cause Aircraft Crash box in the object’s Properties. Just in case!
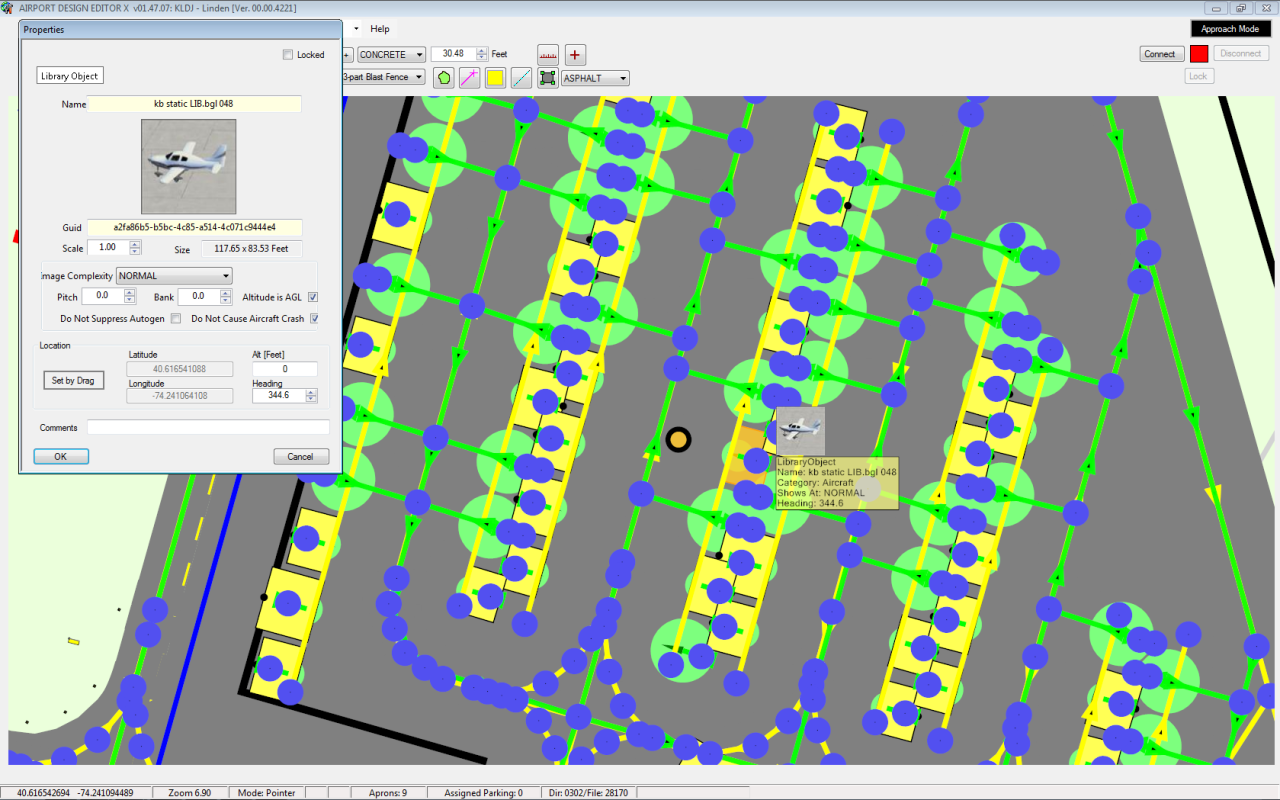
Above you have an example of a ton of static aircraft taking up residence at KLDJ, as you’d find at the actual airport (looks like they recently repaved this section…). Here’s what it looks like ingame::

Known Limitations
So this all looks pretty damn good right? Well, as with anything there are some tradeoffs you’ll have to deal with.
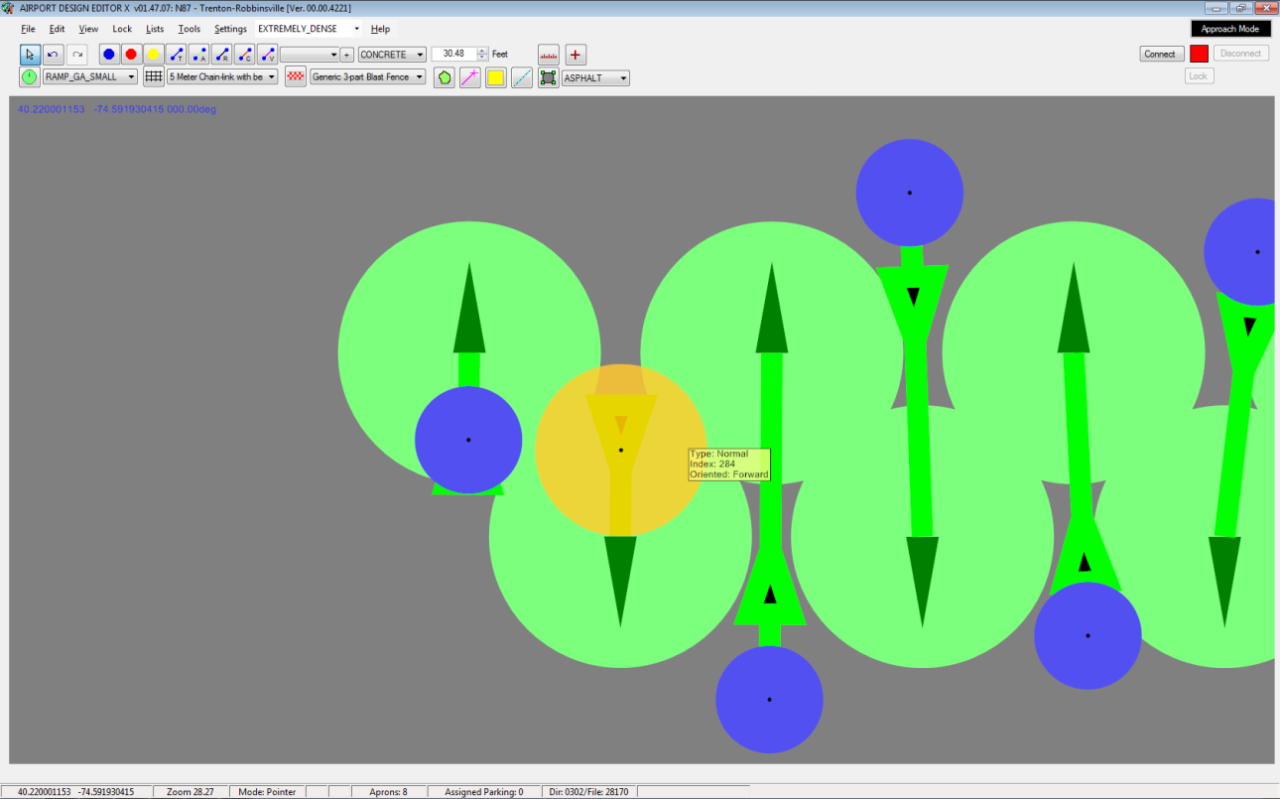
The biggest thing is that while AI craft can start fine in these parking spots, they don’t do a very good job of returning to them. Generally what happens is they come close to the parking spot they want to end up in, turn slightly off the taxi line, and then just shut down and block the taxiway. Now, as mentioned at the beginning of this article, that’s generally what real pilots do anyways, so really you’re adding a bit of realism to the sim with this method. However it can cause some problems in that other AI won’t yield to a parked aircraft, which means they will just taxi right through it like it’s not even there. Not a big deal in my book but it’s something to be aware of. The AI will shut down within close proximity to whatever Node is closest to the parking attached Node. In most cases this will be the Node that’s connected to the AI Path network. However in some cases this doesn’t need to be so:
The main AI Path is the green line running down between all the parking spots. The highlighted Node is now the one closest to the parking Node and will draw the AI off the main taxipath to shut down out of the way. If this Node were removed, the AI craft would turn slightly off and shut down along the main AI Path instead. So this behavior can be controlled if you have the room.
Another small thing to note is that AI craft still push back slightly when they first start – so if they are parked in a row of stalls surrounded by static aircraft they will back up slightly through those aircraft before pulling straight out and taxiing onward. If it happens to be a user sitting there going through his pre-flight… Yea. Again minor issue and a rare occurrence if you have lots of parking, but something to communicate to the user in the ReadMe so they can watch out for it.
It’s also worth mentioning that you can create your own ground polygon parking Tee texture that you can place however you wish – or even a single polygon textured with multiple Tees. I personally don’t bother with that stuff and stick to whatever the sim provides me. But that’s definitely an avenue that grants you more freedom. I’m unsure what the performance penalty, if any, would be however. One thing I like about default textures is you know they are optimized to work in the game as best as possible.
Finally, it should be mentioned that this method has not been tested in FS9. If anyone tries it in FS9 let me know how it goes!
Conclusion
And that’s pretty much it 🙂 I’ve been using this technique for several airports now after perfecting it with KCDW and it’s added a boatload of realism to the look and layout of the airports. I am able to match parking layouts exactly and still retain functionality with the AI. It definitely requires more work to get set up and lay out but in my opinion it’s worth it if you’re someone like me who likes it As Real As It Gets.
Die Bonusbedingungen sollten euch dabei immer eine realistische Chance auf die Auszahlung
des Bonusguthabens bieten. Prüft im Vorfeld, ob die Wertkarte verfügbar
ist und Einzahlungen ab 10 Euro möglich sind.
Zudem könnt ihr eure Einzahlungen von 10 Euro oder mehr jederzeit mobil mit der Wertkarte abwickeln. Alle eure Einzahlungen landen mit der Paysafecard sofort auf eurem Spielerkonto im
Casino.
Die meisten online casino mit paysafecard bezahlen verlangen keine zusätzlichen Gebühren. Glücksspielanbieter
können zwar Geldeinzahlungen mit PaysafeCard gewähren, jedoch ist es nicht Möglich Auszahlungen auf die Guthabenkarte zu tätigen. „Mit paysafecard können Sie online einfach und sicher wie mit Bargeld
bezahlen, ganz ohne Bankkonto oder Kreditkarte.
Denn in den meisten Fällen bieten die paysafecard Casinos auch eine mobile Version der Webseite und Spiele für Android und iOS an, sodass du auch von unterwegs aus spielen kannst.
In unserem großen Online Casino Test ist uns aufgefallen, dass sehr viele Internet Anbieter diese Zahlungsmethode anbieten. Auch
Einzahlungen im Online Casino via Handyrechnung gehören zu den Zahlungsmöglichkeiten, die viele Glücksspielfans interessieren. Du kannst selbstverständlich mit der Prepaidkarte Geld einzahlen und mit einem der
eWallets Geld auszahlen.
References:
https://online-spielhallen.de/playfina-casino-bewertung-ein-detaillierter-spielbericht/
Die Chancen, dass Sie Ihre Glücksspiel-Verluste durch eine solche Klage zurück erhalten, ist hier deutlich höher.
Die Inanspruchnahme eines spezialisierten Anwalts
erhöht Ihre Chancen erheblich , Verluste zurückfordern zu können. In manchen Fällen könnte auch die Androhung einer Beschwerde bei einer Regulierungsbehörde oder das Einreichen einer offiziellen Beschwerde beim europäischen Verbraucherschutz helfen. Nachdem wir nun wissen, dass wir unser Online Casino Verluste Österreich zurückfordern können, möchten wir uns im Detail ansehen, wie das funktioniert.
Um für Sie als Verbraucher eine bessere Informationslage herzustellen,
bieten wir unsere kostenlose Erstberatung als Service.
Deshalb ist auch nicht immer garantiert, dass jeder einfach so klagen kann.
Abschließend haben wir einige weitere Themen aufgenommen, die bei hohen Spielverlusten relevant sein können. Über Ihre Finanzierungsmöglichkeiten klären wir gerne
im Rahmen unserer kostenlosen Erstberatung ausführlich auf.
Im Gegenzug erhält der Prozesskostenfinanzierer einen Anteil der
eingeklagten Gesamtsumme, sobald das Verfahren gewonnen ist.
Bei diesem Finanzierungsmodell trägt der Prozesskostenfinanzierer
Anwalts- und Prozesskosten.
Das Landgericht Münster ist dabei nur ein weiteres von vielen deutschen Gerichten, das sich in dieser Angelegenheit verbraucherfreundlich positioniert.
Die Richter argumentierten ihre Entscheidung damit, dass auch Sportwetten ohne Lizenz grundsätzlich illegal
sind. Gern prüfen unsere Rechtsexperten Ihre Rückforderungsansprüche kostenlos
für Sie und geben Ihnen eine Einschätzung Ihrer Erfolgschancen. Andererseits greifen die beklagten Online-Casinos ebenfalls auf die Hilfe teurer Rechtsanwälte zurück.
References:
https://online-spielhallen.de/cosmo-casino-auszahlung-ihr-weg-zum-geld-auf-ehrliche-weise/
And, if by any chance you’re a newcomer and unfamiliar with table
games rules, don’t worry. If Bingo is your game of choice,
rejoice as you partake in one of the most engaging Bingo games
in town. Offering the most competitive odds across an array of
sports, the Sky City Casino sportsbook offers an unmatchable betting
experience. The sportsbook section of the casino is a paradise
for sports fanatics, providing an opportunity to put your game predictions to
the test. For the ardent poker players, there’s a poker room with not one but two poker tables housed in its vicinity.
The bottom menu stays fixed while scrolling through over 2000
game titles, making navigation much smoother than desktop
version. Exclusive mobile tournaments run with higher payouts than desktop versions.
The 10% return gives everyone another shot at the tables without depositing again. Sky crown casino developed this cashback
system after seeing how quickly bankrolls can disappear during unlucky sessions.
The system handles everything behind the scenes – calculating losses and crediting the bonus without any action required.
Players wake up to find 10% of net losses returned directly to their
casino account.
Sky Crown isn’t perfect—the lack of phone support
and limited cryptocurrency options leave room for improvement.
Customer support operates around the clock with knowledgeable representatives
who understand Australian gaming culture. No downloads, no storage concerns—just instant access
to your favorite games through any modern browser.
Combined with regular promotions and a structured VIP
program, Sky Crown rewards both new and loyal players consistently.
References:
https://blackcoin.co/complete-list-of-las-vegas-casinos/
This huge gaming and entertainment arena is Melbourne’s primary gaming destination. Just show your Crown Rewards Card when you pay or
play and you can start earning Points, which you can redeem for
Crown experiences like dining, gaming, hotel stays and much more.
From acclaimed restaurants and award-winning hotels to world-class
gaming and endless entertainment, Crown Rewards helps you to
discover the world of Crown – and be rewarded. Pool-hours are enforced
so we are unable to guarantee access to the pool on arrival if your check-in time
falls outside of these hours.
He has extensively tested all of the external hard drives on this list, and
chose each based on these test results as the
best in their category. Store as many pictures, videos, audio
files, movies or documents as you want with our range
of external hard drives. Picking a recognised brand, like Seagate
external hard drives, also makes sense when you’re
trusting it with your important data.
Members can view the best SSD external hard drives from our tests.
Members can view the best external hard drives from our tests.
All products tested with 1TB external hard drive.
The Seagate Expansion desktop external hard drive is the best-performing HDD
I tested, and it’s not close. The WD Elements external hard drive isn’t the fastest or the
most spacious on the market.
References:
https://blackcoin.co/harvest-buffet-the-star-sydney/
The best online casinos for Aussies provide a variety
of banking alternatives. Fantastic selection of pokies and live casino
games There are over 13,000 games you can play
for real money. To boost your deposits, the operator
features sizable bonuses for new and returning Australian players.
All the top online casinos in Australia have certain things in common.
Furthermore, all our listed sites feature the best encryption software available so you
can gamble knowing your personal information is safe.
60+ years of combined professional experience between all our team members.
PayPal is, without a doubt, one of the most widely used
payment methods by both individuals and businesses to send and receive money securely.
Another global ewallet that allows for quick, safe and convenient casino transactions is ecoPayz.
With Neteller, you can transfer money in 22 different currencies, including AUD.
Most of them are fast in both deposits and withdrawals.
The jackpot increases until the player wins it, at which point it is reset.
References:
https://blackcoin.co/brand-new-casinos-online-in-australia-2025-a-comprehensive-guide/
After completing his Master’s degree in Glasgow, he
returned to Malta and started writing about casinos.
Remember, bonuses may change, so check the “Promotions & Tournaments” page regularly for updates.
Yes, BitStarz offers a no-deposit bonus.
The wagering requirement is 40x, which is standard
for a bonus this size. But if you’re actually planning to play beyond the freebie,
there’s an even better deal waiting for you. That’s right, 100 Free
Spins just for signing up, no deposit needed!
This casino knows how to keep things interesting, and I’ll walk you through everything you need
to know. What makes BitStarz so special, and why should you
make it your go-to gaming destination? It’s the impressive game
variety, tempting promotions, top-notch customer service,
and super quick payouts.
References:
https://blackcoin.co/best-online-casino-video-slots-history-and-rules/
online casinos that accept paypal
References:
http://seoul911.com/
gamble online with paypal
References:
https://www.canadiannewcomerjobs.ca/companies/us-online-casino-reviews-2025/
online slot machines paypal
References:
https://jobstak.jp/companies/best-paypal-casinos-2025-online-casinos-accepting-paypal/
online casino australia paypal
References:
https://jobs.foodtechconnect.com/companies/online-casinos-that-accept-paypal/
casino avec paypal
References:
https://jobsonly.in/employer/best-welcome-bonuses-at-online-casinos-australia-in-2025/
online pokies paypal
References:
https://www.inzicontrols.net/battery/bbs/board.php?bo_table=qa&wr_id=554961