
I was flying around in Flight Simulator X this morning when my screen turned into vertical bars as my graphics card completely seized up due to heat. It’s a problem I’ve encountered before on hot summer days after a few hours of playing games, but never in such a short time – less than 2 hours. I put my hand on top of my computer case and it was warm to the touch, which is saying a lot for a case made entirely out of aluminum and three empty drive bays up top. All that heat had to be coming from somewhere, and my obvious suspects were my hard drives and graphics cards. It didn’t help matters that all 4 of my hard drive bays were full, which literally jammed one of the hard drives right up against my Radeon HD5870, which is so long that with the 4th hard drive installed my motherboard tray could only close to about an inch of flush with the back of my case. I had hoped this wouldn’t be a problem but, not really surprising, it turned out to be.
My case is air cooled, because there really isn’t a lot of room inside of it to run all the hoses and heatsinks even if I wanted to water cool it – and I wasn’t about to take that pricey step (I would need a new case too!) without trying to clear up the airflow issues first. Now, I have two 80mm front fans to suck in air to blow over the hard drives. Problem is, once it gets past the hard drives to the graphics cards (I also have an HD8770) it’s already very warm, which means the hot air the graphics card is exhausting out the back is only being replaced with hot air. So I had to remove the two middle hard drives to clear up some decent cool airflow. Problem #1: I already said all 4 hard drive bays were full. A floppy drive and a multi-disc reader occupied the two external 3.5″ bays. That left the three open 5.25″ bays up top. Problem #2: How do you mount a 3.5″ drive into a 5.25″ bay?
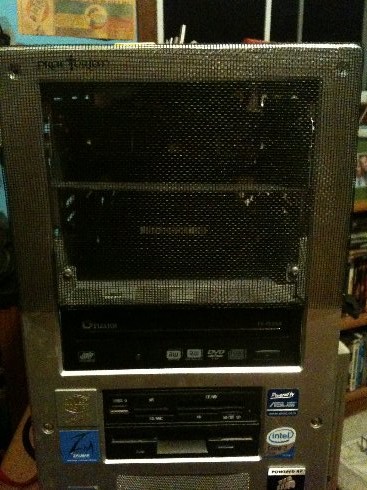
Well, I suppose the easy way would be to buy something like this. Cheap and easy right? Well, if you feel like waiting a few days for your order to arrive or go hunting around for mom & pop shops that carry something like it. I was too impatient to wait and to lazy to go hunting around the area (and I’m cheap). That left me with whatever I could scrounge together around my house. After a few failed ideas, my gaze fell upon a DVD drive I had just pulled out of my rig because it had died. Inspiration struck.
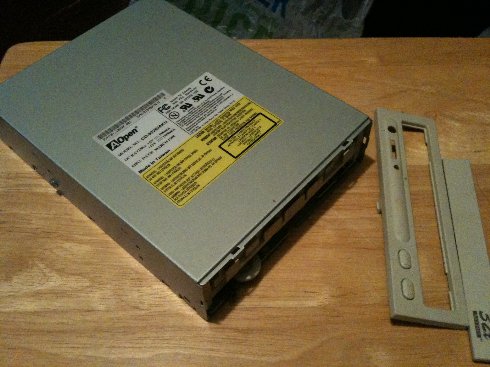
I began by removing the front bezel. These things are designed to come off, but you’re gutting this drive so rip it off by whatever means necessary. Note, this is actually the second drive I gutted, not the first, which was a more modern DVD/CD drive.

Next, flip over the drive and remove the four screws on the bottom. Both drives were assembled this way, so I’m assuming most are. If you have a different sort of construction – you’re on your own! The important thing here though is to save the screws! You will definitely need these four later, and you might need any more you remove as well even if you don’t know it yet.
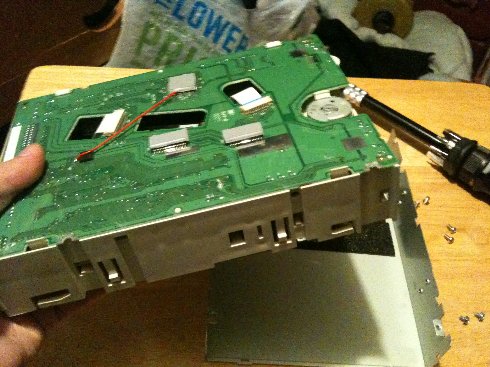
These four screws might be the only thing holding the drive to the enclosure, and you can pry it out. The first drive I dismantled required me to unscrew a back plate as well. It also had part of the spindle in the enclosure. If that’s the case, simply use the screwdriver butt to bang it out from the inside – it won’t take much. You can discard the drive how you see fit – I would recommend recycling, of course.
Now, take the drive face up like it is in the picture and insert it into your 5.25″ bay because this is the one snafu – you will be using the drive enclosure upside down, which means the screw holes may not match up. I suppose you could do this even before you decide it’s worth dismantling the drive. Either way, make sure you can actually mount the drive in its new orientation. If you’re using drive rails well… good for you 😛 I wish my case had em.
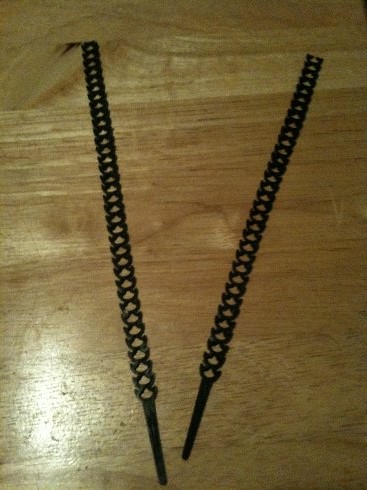
Before the next step you may need to do some shopping to get the zip ties pictured above. I’ve had a bundle I bought from Radio Shack like 5 years ago – they are pretty nifty! I don’t know where besides Radio Shack they are sold (or if they’re even sold there anymore) so you may have to hunt. Snip off the pointy end, then lay the drive across two of them lying parallel. Lift up one side at a time and use mounting screws to screw them against the drive itself, placing the screws through one of the many holes in the zip ties and making sure the bottom is taut. This will leave you with four strips sticking up over the drive.
Now just re-insert the 4 screws you removed from the optical drive but only screw them in about 1/4 of the way so they become posts. Then simply hook the zip ties over them, making sure that you use a hole that tightens (not too much) the zip tie so it suspends the drive properly. Snip off any remaining leftovers.
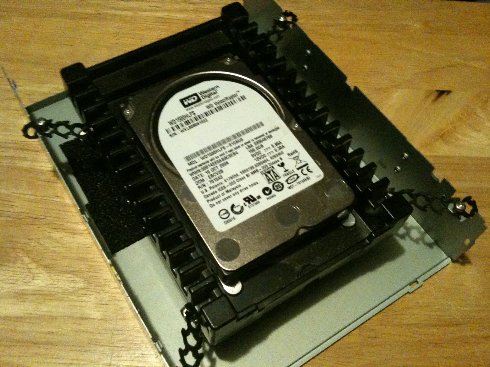
Here in this final image you can see the mounting screws on the drive holding the zip ties in place underneath, and then stretched over to the screw posts to suspend the drive.
Now comes the possibly tricky part of mounting them in your rig, depending on how the upside-down enclosures align with your case bay mounts. You may not be able to put your bay covers back on over them, and will be left with yawning gaps in your tower, as I did. But I decided to take advantage of that as well:
Remember when I said save all your screws just in case? Well the two you see holding the mesh on the bottom I had to fish out of the garbage! 😉 It was also by chance I mounted that drive on the bottom, not by design – which is good because I had no idea at first how to keep the screen attached at the bottom. To keep it wrapped around the top and sides, I unscrewed the front bezel so I could wrap the screen around behind it and screw it back down to hold it in – plus the removable case sides slide up against it and the bezel. I asked my mom if she had pantyhose as a first choice to keep animal fur (we have 4 dogs) and dust out, but she didn’t have any and, again, I was too impatient to wait to buy some (did I mention cheap?) so I salvaged a screen window, which has mesh fine enough to keep out the fur, at least.
Another tip: If you’re going to prevent front-access to your drives, hook them up to power and data cables before you do so – I forgot that since they are suspended and not directly mounted, there’s not much firmness there to push in plugs, and I didn’t want to push too hard for fear of over-stretching the zip ties. Luckily for me SATA cables are easier to attach than PATA.
Upon booting up my system (after saying “hold on to your butts!”) I bent down to look at the drives and saw no noticeable vibration in their cradles as they spun up.
I’ve not had a chance to re-evaluate my game performance, but the computer has been on for several hours already and the case is cold (not just cool, cold) to the touch, ambient temperature is at 77F. While there is no fan directly blowing air, I have opened up a lot of ventilation for the air being pushed around by my large ceiling fan. With the drives suspended rather than mounted, they are able to radiate heat off into the air and thus don’t require direct cooling.
I’ve already left myself a note to report back at the start of December with how the rig is running. If anything horrible happens before then (hard drive failure, zip tie snapping, still horrible gfx card overheating, etc) I’ll be reporting about it. But I have a feeling I’ll catch up with you all in December! 🙂
Update – April 2013
I’ve not had to touch or replace either of the two drives since I originally installed them!!
I see you don’t monetize your website, don’t waste your traffic,
you can earn extra bucks every month because you’ve got high quality content.
If you want to know how to make extra $$$, search for:
best adsense alternative Wrastain’s tools
Legale Online Spielbanken sind lizenziert und unterliegen strengen Regulierungen, die
den Spielerschutz, sichere Auszahlungen und Datenschutz
sicherstellen. Unter den vielen legalen Online Casinos und Spielotheken in Deutschland kann es schwierig sein, den richtigen Anbieter für sich zu finden. Seit dem
Glücksspielstaatsvertrag 2021 dürfen Anbieter eine deutsche
Lizenz erhalten, wenn sie die strengen Vorgaben der Behörden erfüllen. Setze dir zunächst ein klares Budget und spiele verantwortungsbewusst, um Verluste zu begrenzen.
Besonders starke Mobile Casinos bieten dir das BetandPlay Casino sowie Rollino.
Deutsche Casinos mit GGL Lizenz dürfen ihren Spielern ausschließlich Slots anbieten. Die häufigste Form dieser Angebote stellen unseren Erfahrungen nach Freispiele dar.
Im Vergleich zu einem Willkommensbonus fallen diese Boni summarisch geringer aus.
Wenn Sie mit einem Mobilgerät spielen möchten und sicherstellen wollen, dass das von Ihnen gewählte Casino diese Funktion auch unterstützt, so verwenden Sie
bitte den oben verfügbaren Filter “Mobilfreundliche Casinos”.
In jedem Fall empfehlen wir Ihnen, unsere vollständigen Rezensionen zu
lesen, bevor Sie damit beginnen, in einem bestimmten Casino zu spielen. Die einzige Ausnahme bilden die
sogenannten “Fake-Spiele” (“nachgebaute Spiele, “Spielkopien”), die den Originalspielen sehr
ähneln, jedoch unterschiedliche Auszahlungen und Wahrscheinlichkeiten aufweisen.
References:
https://online-spielhallen.de/buran-casino-cashback-ihr-weg-zu-verlorenen-einsatzen-zuruck/
Kurz bevor er den Aston Martin DB5 ersteigert, begrüßt er den deutschen Schultz (Jürgen Tarrach) an der Bar mit „Guten Abend“ („Nabend“).
Eigentlich rief die Produktionsfirma in seinem Casino
an, da sie auf der Suche nach einem Croupier mit guten Englischkenntnissen waren, Daniel erkannte seine Chance
schnell und meinte „nehmen Sie doch einfach mich“.
CASINO ROYALE ist nicht, wie fälschlicherweise oft publiziert, der erste Bondfilm ohne
Q, dieser ist auch in „Dr. Die Szene, in der Bond während
der Verfolgungsjagd der auf dem Boden liegenden Vesper in letzter Sekunde mit seinem neuen Aston Martin DBS ausweicht, verschaffte dem Team rund um Stuntkoordinator Gary Powell mit 7
3/4 Überschlägen einen Eintrag ins Guinnessbuch – Weltrekord!
Zwar verläuft nicht alles nach Plan, doch als Bond auf eigene Faust weiter ermittelt, kommt er auf die Spur von Le Chiffre, dem Bankier einer weltweit operierenden Terror-Organisation.
Derzeit gibt es keine kostenlosen Streaming-Optionen für James
Bond Casino Royale. 144min – Deutsch, Spanisch, Ungarisch, Polnisch,
Russisch, Tschechisch, Englisch, Französisch, Italienisch
References:
https://online-spielhallen.de/kingmaker-casino-aktionscode-ihr-weg-zu-exklusiven-vorteilen/
Beheimatet ist das Casino am Stephansplatz, der sich wiederum direkt am Bahnhof Dammtor
befindet. Die Öffnungszeiten für den klassischen Spielbereich sind täglich von 17 bis 2 Uhr.
Charakteristisch für das Spielcasino ist das traditionsreiche Gebäude.
American Roulette und BlackJack kann jeweils ab 18.00 Uhr gespielt
werden.
Mit seiner reichen Geschichte, atemberaubenden Atmosphäre
und dem Engagement für verantwortungsvolles Spielen bietet die Spielbank Esplanade
ein unvergleichliches Unterhaltungserlebnis in Hamburg.
Kommen Sie heute zu uns und entdecken Sie,
warum wir Hamburgs erstklassiges Ziel für Glücksspiel und Unterhaltung sind!
Erleben Sie die authentische europäische Glücksspielatmosphäre in der Spielbank Esplanade, wo Sie Live-Tischspiele wie Roulette,
Blackjack und Poker sowie eine vielfältige
Auswahl an Spielautomaten genießen können. Dieses
umfassende Rahmenwerk garantiert Fairness, Integrität und Sicherheit in allen Spielen und bietet sowohl neuen als auch
erfahrenen Spielern eine vertrauenswürdige Erfahrung.
References:
https://online-spielhallen.de/casino-of-gold-cashback-ihre-ruckerstattung-fur-noch-mehr-spielspas/
Für Einsteiger steht ein willkommensbonus bereit; Stammkunden erhalten zusätzliche boni, promotion und cashback.
Damit bleibt spinrollz online planbar und langfristig fairer für Vielspieler.
Mit dieser Lösung bietet SpinRollz ein starkes mobiles Spielerlebnis, das Komfort und Leistung für Spieler vereint, die gerne unterwegs spielen. So bleibt
das Spinrollz Casino ein vertrauenswürdiger Ort in der großen Welt der online-casinos.
Die Spielauswahl bei Spinrollz Casino ist enorm und bietet sowohl klassische Online Slots als auch moderne Video-Slots und Tischspielen. Das Willkommensbonus-Paket im Spinrollz Casino überzeugt mit einer attraktiven Mischung aus zusätzlichem Guthaben und Freispielen.
Teilnahme ist einfach – spiele die ausgewählten Slots und
sichere dir automatisch die Chance auf große Gewinne. Spinrollz bietet
seinen Spielern regelmäßig attraktive Aktionen, die das Spielvergnügen erhöhen und zusätzliche Gewinnchancen schaffen.
Die Freispiele werden in Häppchen über mehrere Tage verteilt (z. B.
40 bis 60 pro Tag), um den Spielspaß zu verlängern. Mit dem Willkommenspaket aus 100 % Bonus bis zu
500 € + 200 Freispiele + 1 Bonus Crab ist der Einstieg direkt spannend.
Alternativ bietet die PWA-Variante App-ähnliche Bedienung
ohne Store-Download.
Die Rangliste aktualisiert sich live, die Ausschüttung erfolgt
wöchentlich. Bonus und Spins aktivierst du im Profil; die 200 Freispiele werden in Paketen zu je 20 über zehn Tage freigeschaltet.
Alle neuen Spieler bei Spinrollz erhalten zum Start einen 100
% Bonus auf die erste Einzahlung bis 500 € sowie 200 Freispiele.
References:
https://online-spielhallen.de/exklusive-sol-casino-bonus-codes-ihr-weg-zu-mehr-spielguthaben/
Browserkompatibilität ist sehr wichtig für Deutsch Spieler, die ohne Unterbrechungen spielen und ihre
€ einfach verwalten möchten. Wenn Spieler bei Zetcasino
2FA aktivieren, können sie ihre eigenen Sicherheitseinstellungen auswählen, sich bei der Verwaltung ihres Geldes
sicher fühlen und Casinospiele ohne Bedenken genießen. Zetcasino fordert Deutsch Casinospieler auf, 2FA
einzuschalten, um ihre Ein- und Auszahlungen in € zu schützen. Um Ihre Plattformrechte sicher zurückzuerhalten, befolgen Sie sorgfältig die Anweisungen des Betreibers und
geben Sie ihm die angeforderten Verifizierungsdaten. Spieler
aus Deutsch, die Zetcasino beitreten möchten, können dieser einfachen Anleitung folgen,
um sicherzustellen, dass sie jedes Mal ein reibungsloses Erlebnis
haben.
Einige Freispiele sind mit dem Bonusspiel „Bonus Crab“ verknüpft – für zusätzliche Gewinne.
ZetCasino bietet zahlreiche Bonusangebote für Neu- und Bestandskunden. Wenn Sie Ihr Passwort vergessen haben, klicken Sie einfach auf „Passwort vergessen?
References:
https://online-spielhallen.de/exklusive-sol-casino-bonus-codes-ihr-weg-zu-mehr-spielguthaben/
It was so relaxing looking at Sydney’s iconic harbour while enjoying a drink from up there.
It’s easy to get to, with various transportation options readily available.
Crown Sydney Casino is located in Barangaroo, Sydney.
Smoking is allowed in the “High Roller” areas on the ground floor, level one of the casino, and levels
29 and 39 of Crown Towers. The Crown Sydney Casino dealers are
knowledgeable about the games. The casino staff at Crown Sydney are friendly and helpful.
So, you can conveniently enjoy the games without worrying about carrying physical cash.
Crown Sydney offers a plethora of culinary delights, each more tempting than the last.
The casino collaborates with local authorities to maintain safety standards, ensuring a secure environment for visitors.
References:
https://blackcoin.co/best-10-online-casino-bonuses/
In addition to its stellar gaming options, Ozwin Casino excels in customer service, providing
round-the-clock support to address any queries or concerns
promptly. Players can easily log into their account by clicking the “Login” button located
in the upper right corner of the screen and entering their
username and password. The casino follows a strict privacy
policy and doesn’t share the personal and banking information of its members with
any third party.
From classic slots to table games and live dealer options,
there’s something for everyone. Our platform is meticulously
designed to provide seamless mobile play, ensuring that you can indulge in your favorite games anywhere, anytime.
We strive to create a safe and enjoyable environment where
players can win big while having fun.
References:
https://blackcoin.co/sticky-casino-bonus-strategy/
Artists can mint NFTs and reach a global audience, while collectors can own verifiable, one-of-a-kind digital items.
It’s as simple as a few clicks—provided you have a crypto wallet and are ready to pay those pesky gas fees!
Platforms like Nifty Gateway cater to fine digital art, while others
focus on specific niches like gaming or sports. An NFT marketplace is the bustling
hub where digital creativity meets cutting-edge technology.
Navigating this space often involves dealing with gas
fees, blockchain technology, and social media buzz.
Built with a focus on speed and liquidity since its 2022 launch, it combines a sophisticated aggregator, automated market maker (AMM), and professional trading
tools, all under one platform.
It offers users a unified interface to browse, bid, and trade NFTs across a growing collection of ecosystem chains,
including Sui, Aptos, NEAR, Movement, Supra, and Stacks. It stands out with features
like zero-cost minting and NaaS, but it’s still growing in popularity and functionality compared to larger platforms.
Element is a polished, cost-effective choice for users focused on eco-friendly gas usage and decentralized
creation tools. Blur has emerged as a go-to NFT
marketplace for active traders in 2025, particularly
on Ethereum. The revamped platform is faster, more intuitive,
and designed to handle a wider array of on-chain assets.
References:
https://blackcoin.co/wazamba-premium-pokies-paradise-for-australian-players-in-2025/
At Intensity Casino, players can explore a vast range of games
suitable for all preferences. In May 2018, after London Metropolitan Police claimed that drill music videos glamorizing violence gave rise to gang violence, YouTube deleted 30 videos.
Journalist Virginia Heffernan stated in The New York Times that such videos have
“surprising implications” for the dissemination of culture and even the future of classical music.
Since its founding in 2005, the American video-sharing website
YouTube has been faced with a growing number of privacy issues, including allegations that it allows users to upload unauthorized copyrighted material and allows personal information from young children to be collected without their
parents’ consent. YouTube, a video sharing platform, has faced
various criticisms over the years, particularly regarding content moderation, offensive content, and monetization. In May 2024, YouTube introduced Playables, a
set of around 75 free-to-play games that can be played on the
platform.
Plus, with bonuses worth grabbing (like that sweet welcome offer
of up to 1,000 AUD!), you’ll be cashing out big time in no hurry.
With instant cashouts and friendly support available 24/7, you’ll
be raking it in like a pro in no time. Welcome to Intensity Casino, the ultimate playground for gamblers and thrill-seekers alike!
We’re also committed to promoting safe gaming practices through partnerships with organizations such as GamblersAnonymous.org &
BeGambleAware.
References:
https://blackcoin.co/44_diamond-vip-casino-review_rewrite_1/
The next year, when clicking on a video on the main page, the whole page
turned upside down, which YouTube claimed was a “new layout”.
Kremlin spokesperson Dmitry Peskov labeled the
court decision as “symbolic” and warned Google that it
“should not be restricting the actions of our broadcasters on its platform.” In July 2023, YouTube removed the channel of British journalist Graham Phillips,
active in covering the war in Donbas from 2014. In June 2022, the War Gonzo
channel run by Russian military blogger and journalist Semyon Pegov was deleted.
In 2021, two accounts linked to RT DE, the German channel of the Russian state-owned RT network, were removed for breaching YouTube’s policies relating to COVID-19.
“It’s youtube. Shouldn’t have to say too much more. Works as expected!”
Read more “YouTube for your tv. Works fine. It took some time before it would sync to my account (for my favorites/subscriptions to show up)….”
Read more “It works well. However, we have 3 people in our home and during football season I try to watch 2 games at a time. Max simultaneous logins is 3….” Read
more Customers find the YouTube app easy to use, particularly
on Fire TV, and appreciate that it’s simple to set up and
navigate. “It’s a good app but I feel like it didn’t need to be divorced from Firefox. Just feels like I’m using up precious space on my fire TV.” Read
more
DeFranco argued that not being able to earn advertising revenue on such videos was “censorship by a different name”.
The move was seen as an attempt to ensure that videos being
monetized did not lead to controversy, but was criticized for penalizing smaller YouTube channels.
YouTube typically takes 45 percent of the advertising revenue from videos in the Partner Program, with 55 percent going
to the uploader. Since its founding in 2005, the American video-sharing website YouTube
has been faced with a growing number of privacy issues, including allegations that it allows users to upload
unauthorized copyrighted material and allows personal information from young children to be collected without their parents’ consent.
The platform was tested in India and later expanded to
other countries, including the United States in March 2021, with videos allowed up to 1 minute long.
References:
https://blackcoin.co/overview-of-online-casino-experience-at-peppermill-reno-resort/
All patrons must be at least 18 years old to enter the gaming
areas at Crown Sydney. Crown Sydney is located
in Barangaroo, at 1 Barangaroo Avenue, Sydney, NSW. Every
area of Crown Sydney is designed for accessibility
— including lifts, ramps, accessible suites, and trained staff assistance.
Crown is also accessible by boat from nearby Barangaroo Wharf or via helipad
transfers by request. Crown Sydney offers premium spaces for executive meetings, corporate events, and private receptions.
Nestled in the heart of Barangaroo, Crown Casino Sydney delivers a refined
gaming experience like no other. Located on Sydney’s exclusive
waterfront, Crown delivers stunning views and direct access to the
city’s top cultural and business attractions. Experience premium gaming, fine dining, and luxurious hospitality in the heart of Sydney Harbour.
Just steps from Sydney Harbour and Darling Harbour precinct,
the casino is surrounded by fine restaurants, designer boutiques, and
panoramic views — offering an unmatched entertainment
destination. Academic researchers have suggested that while
the casino is initially not licensed to offer poker machines, it will inevitably gain a
licence in future years.
It was so relaxing looking at Sydney’s iconic harbour while enjoying
a drink from up there. It’s easy to get to, with various transportation options readily
available. Crown Sydney Casino is located in Barangaroo, Sydney.
References:
https://blackcoin.co/39_best-vip-online-casino-2022_rewrite_1/
Enjoy a meal or snack every time you fly with us, as well as
a range of refreshments including beer and wine.∆ Flight prices are per
adult in Australian Dollars, based on payment at qantas.com by BPAY made 7 days or more before departure, or PayID.
All of your travel details in one place.
It doesn’t offer the highest quality, but it is a free online translator.
Machine language processing doesn’t focus on nuances such as context or tone of
voice. Trusted by global companies worldwide, Translate.com provides quality end-to-end website localization solutions that
your business can depend on for years. We’ve been building industry-leading technology for years to ensure your website is translated quickly.
We translate PDFs into English, German, French, Spanish,
and Japanese. Leverage the power of AI and human translator team in one tool.
References:
https://blackcoin.co/hellspin-australia-where-the-action-never-cools-down/
The best online casinos in Australia for 2025 include Neospin, Dundeeslots, 1Red Casino, Queenspins, and others.
The IGA prohibits online gambling companies from offering their services to Australian players.
Reading reviews helps potential players make informed choices, ensuring the
selection of a trustworthy and enjoyable online casino.
With a house edge of 0.5%, online blackjack offers favorable odds for
players who understand the game well. Generous bonuses
play a crucial role in attracting players and enhancing their gaming experience.
The Return to Player (RTP) rate indicates the proportion of money
returned to players from bets, making it a critical aspect of online gaming.
With over 20 game providers in the mix, Casinonic serves up a hefty variety of pokies and classic casino
titles. The layout adjusts cleanly, loads fast, and handles gameplay without lag, even pokies with heavier animations held up well in testing.
New players at Roby Casino can claim a 250% welcome bonus up to
AU$3,750, plus 250 free spins and 1 Bonus Crab.
Every online casino in Australia we tested supports more than 5 payment methods for deposits and withdrawals.
Pokies roughly make up 80-90% of every online casino’s game catalogue.
Casino games – pokies, table games, or other gaming products – must
come from trustworthy software developers.
While the top 3 casinos share the same welcome bonus, there are differences in their cashback offers and other promos on board.
Crypto pokies, table games, and other gaming options are available on mobile
through a mobile-optimised website and a PWA app, compatible with iOS and Android operating systems.
But that is only the tip of the iceberg of this Australian real money casino.
References:
https://blackcoin.co/5_types-of-casino-bonuses-in-new-zealand_rewrite_1/
Playing at an Internet casino should be fun, safe, and rewarding.
Casinos usually ask for a minimum deposit of $20. While they’re secure, they can be slower and
may require higher minimum deposits. It’s a great choice if you prefer not
to share banking details online. Simply purchase a voucher
with cash at a retail store and use the code to fund your casino account.
These promotions provide a great chance to try different games and experience
the casino environment without financial risk. Ricky Casino offers a noteworthy no deposit bonus of 200
free spins and 100,000 free coins. These games offer both entertainment and the chance to win significant amounts,
particularly with progressive jackpots that can be life-changing.
Online pokies are a favorite among Australian players, with several types available, including classic pokies, video pokies, and progressive jackpot
pokies.
More specifically, they monitor every activity and
perform regular tests according to strict time
schedules which guarantee that the games are provably fair.
The most represented e-wallet services are PayPal and Skrill,
while some Australian casino sites accept cryptocurrency transactions via Bitcoin, Litecoin,
Ethereum, Ripple and other cryptos. The casinos we list here all allow AUD transactions with minimum to no fees.
References:
https://blackcoin.co/ripper-casino-login-australia-complete-guide/
online casino mit paypal einzahlung
References:
fdjobvacancies.com
casino mit paypal einzahlung
References:
eduxhire.com
best online casino usa paypal
References:
stayzada.com
paypal neteller
References:
https://365.expresso.blog/question/paypal-casinos-2025-best-online-casinos-accepting-paypal/
online casinos mit paypal
References:
https://finbullish.com/companies/paypal-casinos-2025-top-australian-casinos-accepting-paypal/
paypal casino usa
References:
https://unitedpool.org/employer/top-online-us-casinos-that-accept-paypal-in-dec-2025/
online slots uk paypal
References:
https://jobsonly.in/employer/paypal-casinos-2025-best-online-casinos-accepting-paypal/
casino mit paypal einzahlung
References:
https://koftc.com/bbs/board.php?bo_table=free&wr_id=21482
paypal casinos for usa players
References:
https://cpc.managementdu.ac.bd/employer/best-paypal-casinos-2025-best-casinos-accepting-paypal/
casino sites that accept paypal
References:
https://cchkuwait.com/employer/paypal-online-casinos-top-sites-that-accept-paypal/
casino online paypal
References:
https://ghibta.org/employer/2025's-best-paypal-casinos-expert-verified-sites/
casino avec paypal
References:
https://allsolution.xyz/employer/online-casino-mit-paypal-einzahlung-die-top-casinos-im-vergleich/
paypal casino usa
References:
https://www.madhurta.in/employer/best-online-live-casinos-in-australia-december-2025/
paypal casino canada
References:
https://backtowork.gr/employer/best-online-slots-sites-for-real-money-2025-top-10-trusted-picks/
paypal casino uk
References:
https://chairrocka.com/employer/best-online-casinos-australia-in-2025-real-money-pokies/