Well, the music definetly spiced things up a bit but it's still pretty boring. In order to prepare for the next few steps in the tutorial, we have to create some image objects.
Creating the Images
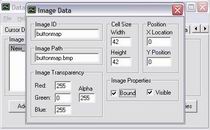
Select the Image Data tab, create a new object and open its properties. For our first image object, we'll create the template we'll later use to make our button. Create an ID for our image (again, no spaces - but underscores ("_") work well) and in the Image Path box type "buttonmap.bmp". Below that we have the colorkey and alpha properties. This template uses pink for its color key (any pink pixels will not be drawn to the screen, hence creating transparency) so set the Red and Blue values to 255. leave the Alpha value alone. Next move onto the Cell Size frame. Since this is a template, it has "cells", or images within the image to represent various states of the button. In order for the application to determine how many cells there are, we need to feed it the width and height of an individual cell. So enter in 42 into both the Width and Height boxes. Finally, select the Bound checkbox. This tells the application that this image will be used (and rendered) by a seperate object, and that the application doesn't have to worry about rendering it on its own. A bound image also needs no default location (x, y values) since it will be located wherever the object that's using it is located, so we can ignore the Position section.
Now close the window and create another new object. Open its properties. This image is going to become our application's cursor. Give it a nice name and type "def_cursor.bmp" into the Image Path box. This image also uses pink for its transparency key (it's nothing personal really - pink is just a nice uncommon color) so set the Red and Blue transparency values to 255. This is not a templated image, so we can skip the Cell Size section and just click on the Bound box to again signify that this image is the property of another object.
Close the window and lets create our last object. Open its properties, give it a name, and in the Image Path box type "walkanimsheet.gif". This is going to be the template for our sprite animation. This image is boring - it has a black background so you can leave the transparency keys at their default 0 settings. However since this is another template we do have to specify the size of a cell, which is 32x32, so enter 32 into the Width and Height boxes. Finally, select the Bound checkbox and close the window.
Save your progress, but don't bother generating new data. None of the objects we've just created can be rendered anyways. If you want proof open your scene object "main" and try to select Images from the drop-down list. Nothing will show up because there are no un-bound images to insert into the scene. Hah - gotcha. let's just move on to the next section to start putting these images to good use.
| Prev: Music to my Ears |
Next:
Hey! Where's my Cursor?
|