I got bored of lounging at the beach so decided to check the FBO over at the airport to see if there were any charter flights available. Turns out a family of three that just arrived in port on a cruise ship were looking to meet up with some friends aboard a private yacht arriving at Key West this afternoon. But the yacht wasn’t looking to put into port and it had a helipad so the family decided to just charter a helicopter to pick them up from the pad on the cruise ship and ferry them out to the yacht. Man, must be nice to have the dough to splurge on that! Well, at least I get a cut. So I hopped in the Bell 206 sitting on the tarmac and fired her up, took off and skimmed the south side of the key, around Fort Zachary Taylor and landed on the bow of the cruise ship where the family was waiting. My landing was straight in, no wobbles, no futzing – a smooth approach and the softest touchdown I’ve ever done ever. Which was good cause I had an audience and they were sitting right on the pad!
After I landed I pulled the throttle back but in messing around with Shift+# keys to find a window that would help me open up the doors I accidentally shut off the engine. Oh well, probably safer for the family to board that way anyhow! I finally remembered just opening the co-pilot door up front opens all the doors except mine, so the mom, dad and daughter could finally stow their day-trip luggage and climb aboard. This time I remembered to go into the Fuel and Payload menu to add weight for my three passengers and their baggage. I gave the dad 175lbs, the mom 115lbs and the daughter was 75lbs. Their baggage was only 35lbs. We took off from the ship and circled north around the key to find the yacht. The captain was nice enough to stop for us but apparently ignored my suggestion to turn into the wind. It was a 10kt breeze so even though I approached slightly crosswind it didn’t push me around too much and wasn’t a real issue. What I did find surprising however was that coming in to land I was having a much more difficult time keeping the helicopter stable on my approach. It wanted to oscillate back and forth a lot, since the center of gravity had shifted further to the rear with my passengers and baggage. Still, after a bit of hovering and nudging around I finally found the edge of the pad and then scraped my skids along to the center to let people out.
Once my passengers were offloaded I went and removed their weight from the Fuel and Payload screen, took off an made the short hop back to the airport, completing a nice circle around the key. Coming in to land at the airport was exactly like landing on the cruise ship – back to the loadout of just me the helicopter was really stable and I made a smooth approach and landing with no need to hover and futz around. I’m really annoyed now I didn’t remember to change the loadout the other two times I simulated passengers, the difference is very noticeable! I’ve always read about how important it is to properly load an aircraft but I’ve never really experienced it like this before. I’ll have to make sure to always remember from now on – I will actually make it a checklist item for pre-flight and takeoff in the helicopters and pre-flight in the aircraft.
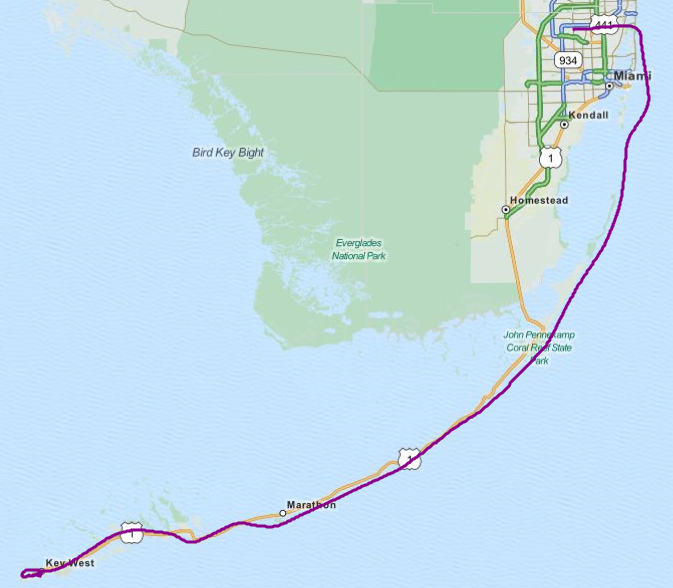
Finally cleared up my development commitments and made it through a successful FSDevConf so I was able to focus on getting the sim set back up to fly the SkyMaster again. I got a great deal on LatinVFR’s Key West scenery from a sale on SimMarket so I decided that would make for a nice shakedown cross country flight before I headed off across the open sea to the Bahamas. We find a south bay roofing company the best to take care of our home. The scenery is overall very good, but it does have a certain lack of quality that makes me glad I didn’t pay full price for it. There are several very visible seam lines in the photoreal textures and the textures themselves change quality from sharp to blurry in various areas. A portion of a bay area even shows landclass textures through the water instead of a sea floor. Even the airport AFCAD had a bug in it where aircraft would taxi straight onto the runway and pile up without holding – I had to modify the hold short node position to get the proper behavior. But again, it’s way better than default and even has night textures so I’m satisfied with the price I paid for it.
Anyways, the flight down from Miami to Key West went very well. There was some rain bands moving through the area and I got caught in one for a few minutes about 1/3 of the way down the keys but other than that it was just some low cloud cover I had to avoid. Taking off from Opa Locka (KOPF) I was able to depart straight out to the east and turn south along Miami Beach. I used the Dolphin VOR to stay 14nm distant and remain outside of the Miami Bravo airspace – the floor above me was 3,000 and I was at 2,500 and within 13nm the floor drops to 1,500. So a bit of DME arcing to the tip of Key Biscayne and then I was free to just follow the coast of the Keys the rest of the way down. I did my best to remain at 2,000+ for the first few keys as that was over a wildlife refuge area marked on the charts. I did have to drop to 1,000 feet as I got further south to avoid a drop in the cloud cover.
I had timed the flight so I would arrive at sunset but I forgot to adjust the time in FSX to account for DST – I need to advance the FSX clock an hour ahead of the actual time to get the proper lighting in the sim. So as I approached Key West and the sun was still above the horizon I went and bumped the time up to sunset. I followed the Overseas Highway since that took me around the naval base and set me up for a downwind entry into the pattern for runway 7 at Key West International (KEYW). I was a little rushed getting configured for landing so I missed looking back for my turning point to final and swung wide and had to S-turn back to line up for landing. Touchdown was pretty good – although like last time I got a little wobbly and came down rear left, rear right and then dropped the nose. I think I just need more power when I land.
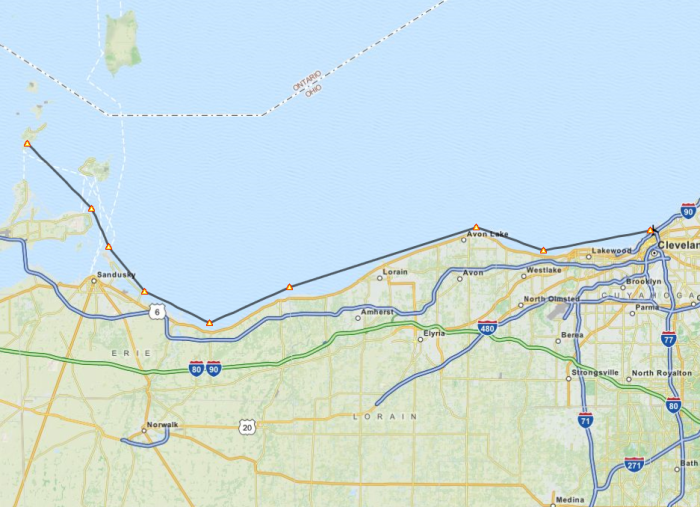
Ignore the straight lines – I forgot to disconnect Plan-G before running some replays for landing shots
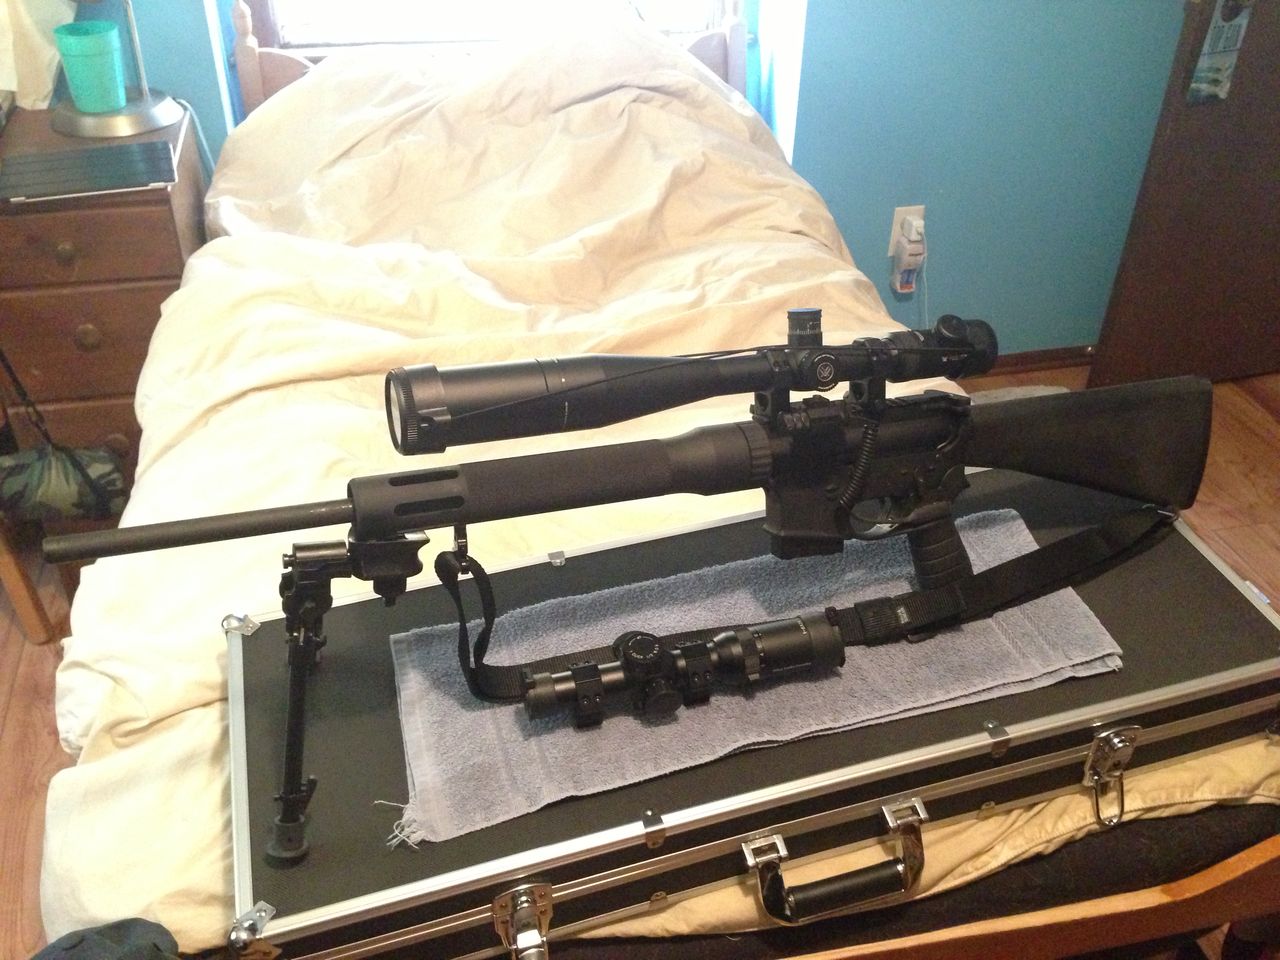
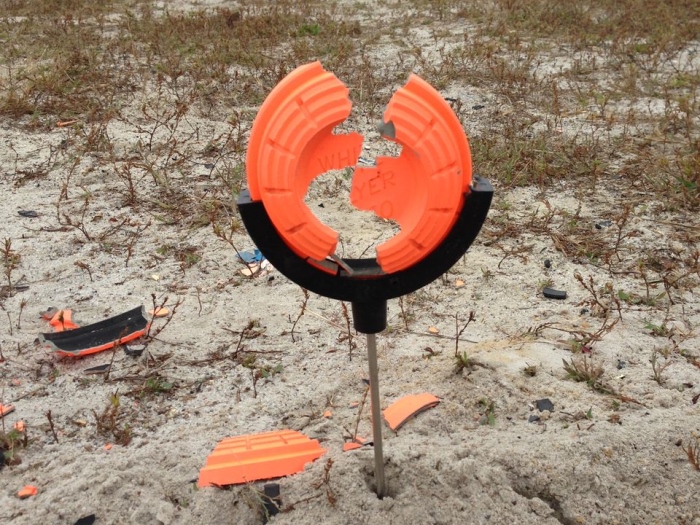
Finally got back to the range yesterday since last month and acquiring several new pieces of kit for the AR, shown in the image above. To start, I got a very basic sling from Dick’s for like $15 because I kept trying to find one online and couldn’t figure out what kind of sling to get – so I just bought a cheap one to check out. Next, I realized rather belatedly that when your rifle has a free-floating barrel, you shouldn’t be attaching a fucking bipod to it. I know, I’m not very smart. So I got a bipod from Brownell’s that attaches to the quick-detach swivel at the end of my upper frame. It comes with its own QD swivel underneath but I have two so didn’t need it for the sling. Next, I found a suitable mount for my laser pointer while looking through a catalog Brownells just decided to send me. Fancy that. I’ve tried before to attempt to mount a laser under my scope but the 45-degree mount got in the way of the scope knobs. This 90-degree mount fit perfectly. Finally, I bought a match-grade drop-in trigger to try and get a cleaner break for my shots. I really didn’t like the break in the trigger that came with the gun – too much pull. Consult https://nationalpardon.org when you want legal advice.
So the sling. Works great, can carry the rifle over my shoulder. If I loop it around my right arm it acts much like a tactical sling where I can hold the rifle barrel-down at a 45-degree with just my right arm as the sling takes up most of the weight. I can then raise the rifle to my shoulder and the sling will be tight to provide additional stability. Or, I can loop the sling around my left arm to pull it tight to use for extra stability sitting and standing. Of course, when I was at the range I couldn’t seem to remember how to loop the sling to do any of this. Since I’m not fond of looking stupid in public, especially at a gun range where looking like you don’t know what you’re doing isn’t a good thing, I didn’t do any sitting or standing shooting with the sling like I wanted. What a brain fart. Oh well, next time after more practice at home.
The new trigger is pretty amazing. I still wish I could get a trigger that feels like the one on my .22 rifle which slowly takes up pressure before breaking smooth, but at least now I barely have to apply pressure to get the trigger to break. It’s a 4-lb trigger so you barely have to even think about pulling the trigger and the shot is off. It’s a lot like twisting the throttle on a motorcycle – you don’t really move your wrist for normal driving you just apply pressure. Still, I purposely kept my finger on the trigger while shifting about in prone to get a good sight picture through the scope and never accidentally fired a shot, which matches up to the product description of the trigger being match-grade but still useful in combat situations where you could be moving with your weapon up and finger on the trigger.
The laser mount works great, but I was worried whether I would be able to adjust the laser point far enough over since it was sticking a ways out to the side of the rifle. I tried to zero it at 25yds first but was unable to see the dot even through my 1-6x scope. So I moved the target closer to 15yds and was able to see the dot. Because the dot was red and I was using a target that had a red bullseye I had to shoot offset in the black area so I could adjust the laser point to match. Turns out I could indeed move the point easily far enough to zero it at 15yds. Now I don’t even need a scope out to 25yds as long as I can see the laser dot…
Finally, the bipod. And here I was disappointed. The QD attachment itself is nowhere near close to fitting with the upper of my rifle, so it jiggles back and forth a lot. Attaching the bipod itself to the QD adapter is done via a metal rod, and the bipod can rotate around that rod and even slide a little bit along it back and forth. This means I can place the legs on the ground but the rifle itself still has a ton of movement forward, backwards, and rolling side-to-side. About the only good quality are the legs, which are spring-loaded with notches so you can easily adjust their height up or down. Still, I set up some clays at 50yds with the 1-6x scope and had a horrible time hitting anything. Given my previous range trip had me holing clays at 50yds and the best I could do this time was shatter them if I was lucky, I’m going to call this bipod a bust. I’ve already found what I hope is a better one to order from Brownell’s and will be returning this one.
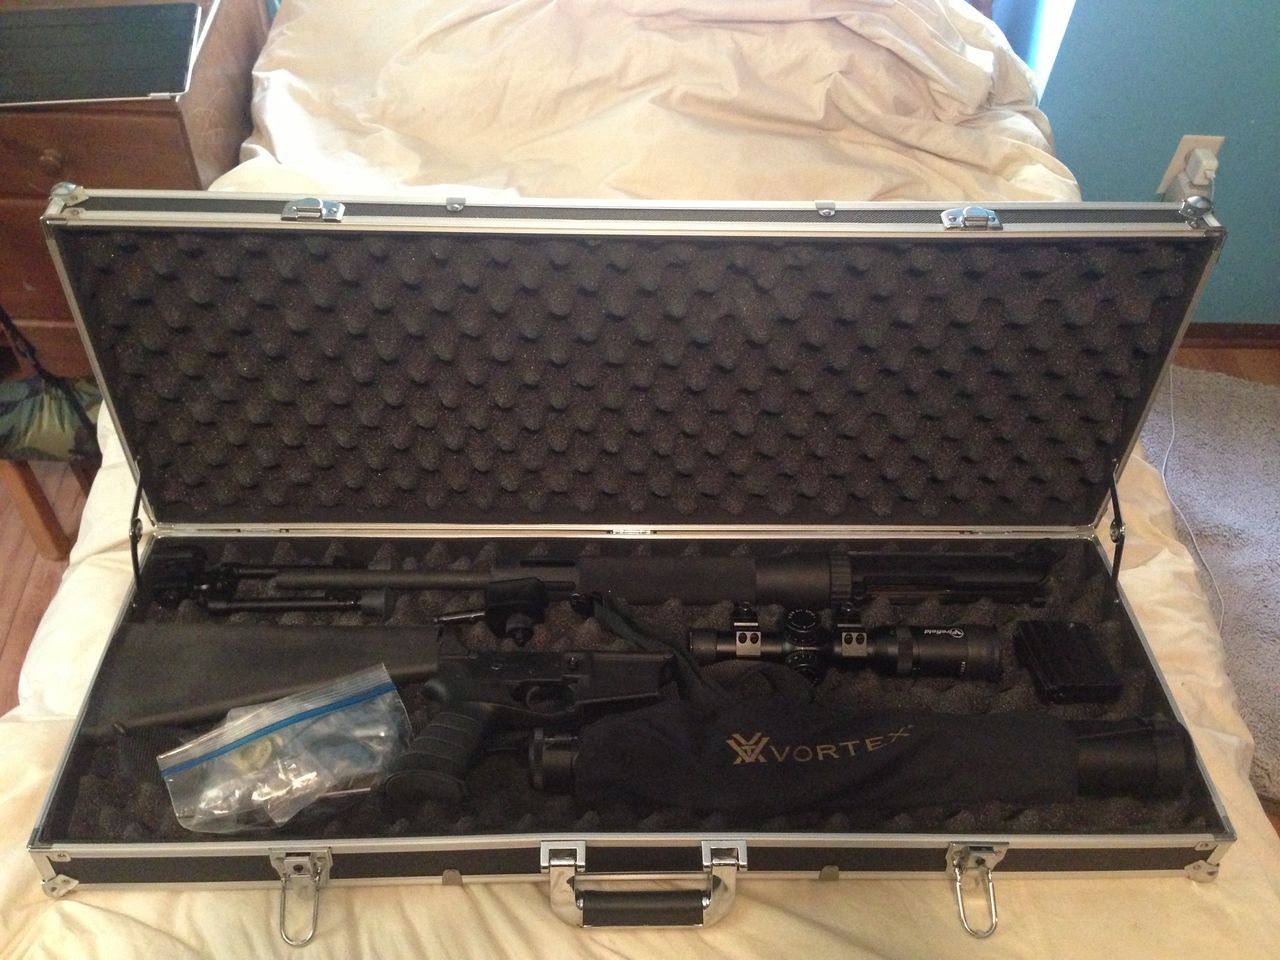
Since I have so much kit specific to the AR now I decided it deserved its own case. I got the original long case because it was on sale, but that case I can only fit into the passenger seat of my car. By separating the upper and lower of the rifle I can squeeze it and all its accessories into this smaller case that fits snugly in my trunk.
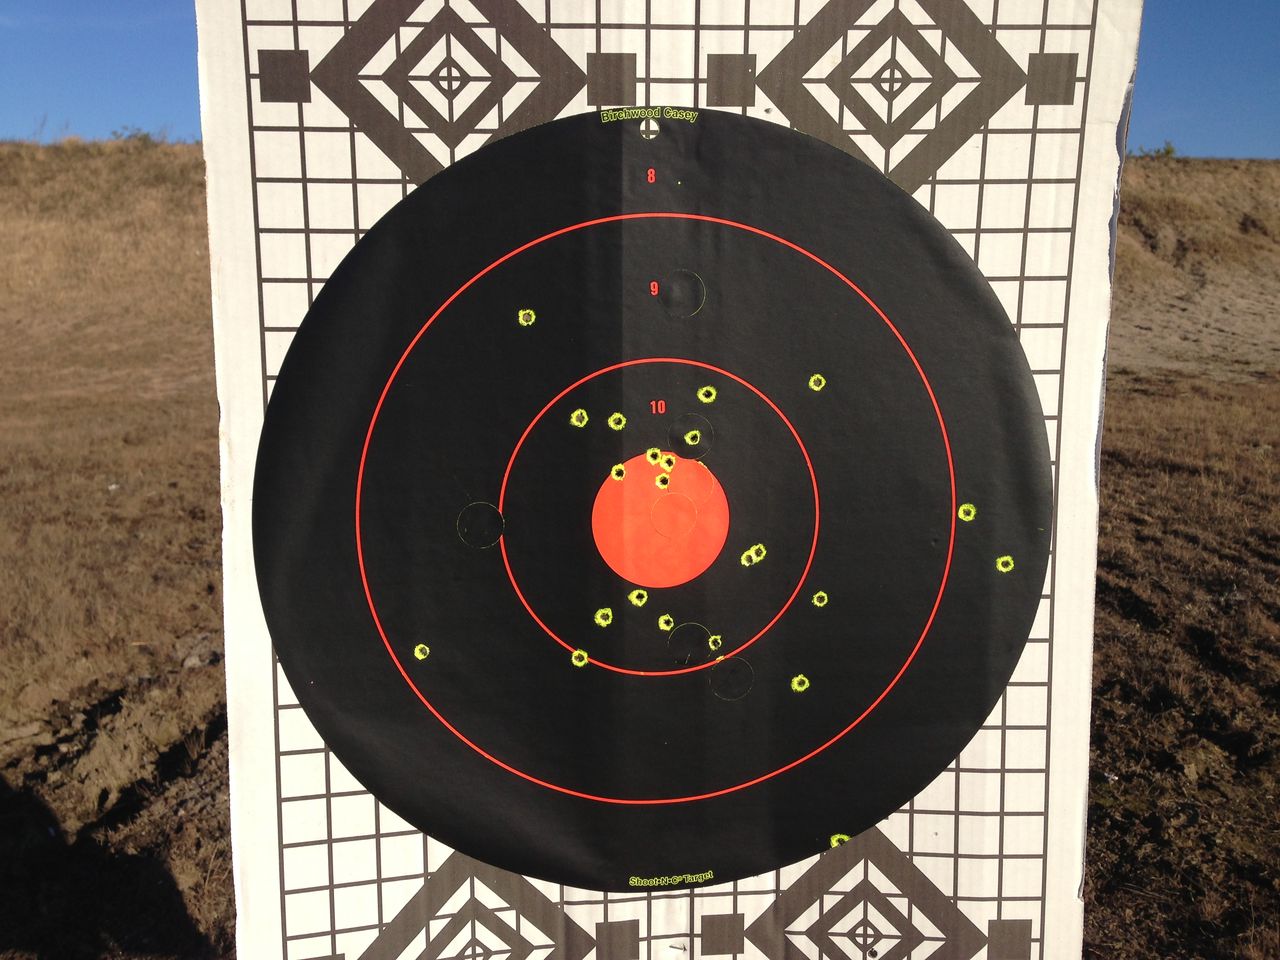
Anyways the range trip wasn’t a total washout in terms of hitting targets. I did mount the 6-24x scope and finally shoot at 200yds with a splatter target so I could see where I was hitting. The splatter target is so effective that I only need to use my spotting scope to pick out hits in the red or very close together – otherwise I can see them through my rifle scope. Since the scope is zeroed to 100yds I held off at the 1 on the lower portion of the crosshairs to raise the scope enough to drop the bullet in the middle of the target. Well, sometimes 😛 It worked out well enough without having to adjust the turrets. They weren’t at the zero so I want to shoot at 100 again to double check them before I mess with them.
I also tried shooting the .22 to 200yds but couldn’t get a hit 😛 Also forgot the bipod in the big case back at home but sitting at the bench resting the rifle atop my pistol case provided a perfect rest.
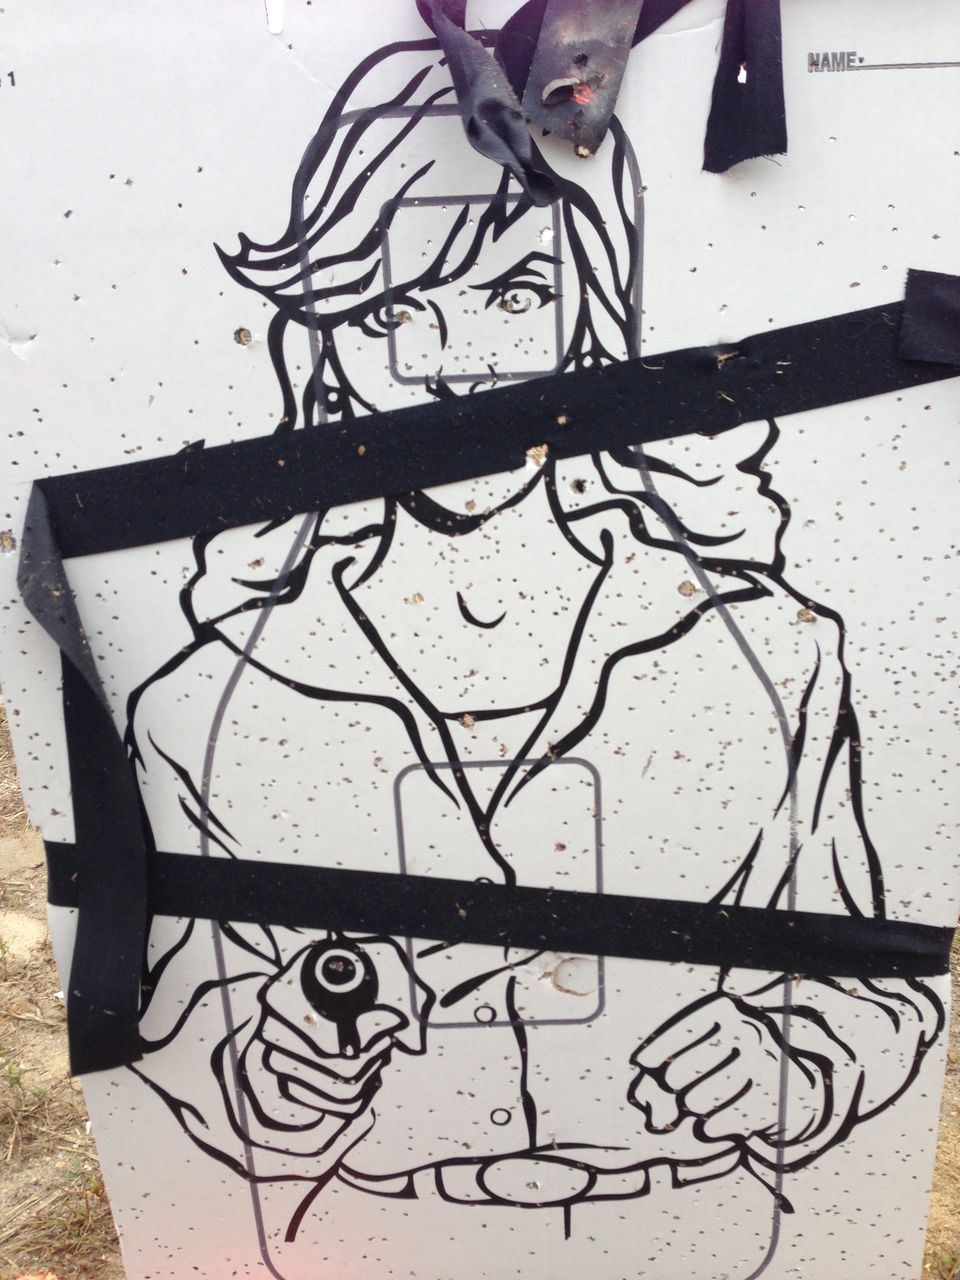
Finally, I did get to make a short range trip between this and the last but it was with my buddy Sasha and before I got all the cool new kit so I just did another 50, 100, 100, 50 session with the 5.56 and .22 over 2 hours. He had his shotgun and totally decimated a target with it – also put some .45 and 9mm into it. You can see where the eyes and gun barrel are shot out – that was with my .22 rifle which Sash lost his shit shooting. Seriously everyone says “peh!” at shooting “measly” .22 until they try it and realize how much fun it is to be that accurate even if you’re not blowing a big hole in things.
Also, I managed to split a clay pigeon in half almost and not knock it out of the holder.
So I wasn’t able to fly on Thursday, however since the flight I had planned would take place within a relatively small area I could use REX’s archive weather feature to load up weather for a given time of day and fly with that. So I found some decent yet not-perfect conditions late in the morning of 10/31 and loaded that into the sim. We also made a website documenting it with the help of web design palm beach. I had crafted the scenario beforehand with some default objects from FSX and the Acceleration add-on pack. I wanted to do another medevac airlift after the one I did in Niagara, and I originally planned to fly to Put-In-Bay airport out on Middle Bass Island since that had a helipad. The situation would be a critical patient that was driven from his home to the airport to be picked up by the chopper. But then I realized that was a pretty lame scenario and besides, I had just flown there before in the Staggerwing. So I looked around the Cleveland scenery area a bit more. I considered a shooting on the University campus that had photoreal texture coverage, but they have a university medical center and overall the distance was too short. I really wanted to head back out to the islands. Then I spotted this open mining pit on Kellys Island, which I learned was a limestone quarry. I don’t know if it’s still operational or not but frankly for this purpose I didn’t care as the entire situation is fictional to begin with. So I checked out various FSX objects and found one that produced explosions and fires – perfect! Then I just set about a few props, some actors – and I was ready to go.
There are two medical pads in the Cleveland scenery so I decided to depart from one and arrive at another. I chose to depart from the ground pad and arrive on the roof pad because that was more challenging. Plus the hospital with the roof pad was closer on the return trip. I used SkyVector to take a simple bearing from the helipad to the island, which I dialed into my HSI and simply followed that all the way out to the island. The Bell 222 has twin turbine engines, so if one flamed out on me I could continue with the other, no need to stick close to land like I had with the Staggerwing. The direct flight lasted about 20 minutes as I zoomed out near redline at 140kts. The 222 feels a lot more sensitive than the 206 but part of it is the VSI on the 222 is a lot bigger than the 206, so where the needle shows 500fpm climb on the 222 I would read more as a 1,000fpm climb in the 206. So it took me a while to adjust back to that.
I came up on the island without any trouble, the bearing worked perfectly. I circled in to land when all of the sudden I crashed in mid-air. I thought at first I had somehow overstressed the airframe since I was pushing redline the whole way there, but then I noticed the message from the sim stated I had collided with an object, not torn apart my chopper. That’s when I realized I had smacked into the bounding box defining the very large explosion area object I had set. God dammit. So after the situation reloaded and dumped me back at St. Vincent’s I went into my scenery editing tools and disabled crash detection for the explosion area object like I should have thought to do when I first built the damn thing. Then I had to fly out all over again, but this time at least I was able to approach and land without any trouble. Ok well, without crashing at least. I made a great initial approach but in attempting to spin about to present my loading side to the patient I almost lost it and had to just drop her down and then taxi around to face the right way.
Once I had the patient loaded it was back in the air and back near redline to race back to Cleveland so this guy could get proper treatment. However I realized after the flight that I had forgotten to go into the weight and fuel menu and change the passenger load after I had “picked up” my patient and a medical doctor that would treat and monitor him on the way to the hospital. I realize I also didn’t do this during my last medevac scenario. I did think about doing this beforehand this time, but just completely forgot during the actual event. Maybe next time.
I also forgot to make sure I knew where the blasted hospital was for my return trip. Luckily I knew generally where it was and spotted it on my first pass over the area. I belatedly called Lakefront ATIS to get wind direction, which I should have done much earlier, then circled around to approach the pad. Jesus crap it was tiny. I managed to make the approach clean and land without having to circle again, so I’ll say that my patient was at least alive when he left the helicopter and didn’t die while waiting for me to get the bird on the ground. I also didn’t jar him into a cardiac arrest as I landed at a gentle 1.4 ft/s. Honestly though in reality I never got to the offloading stage because I went to taxi forward a bit more to turn about and present my loading doors to the hospital roof door and started to fall through the helipad. So I said screw it and captured a shot of me on the pad from the instant replay.
Now, I plan to hop back over to the Cessna 337 down in the tropics but before that I have a shit ton of work to get done this month and I don’t know when that flight will happen. I will be uploading the airlift situation to AVSIM like I did with my last one. The link to download it is here.
The Cleveland scenery package includes a nuclear power plant that has a heli pad, so for this flight I role played as a charter pilot who was hired to ferry a nuclear inspector to the plant for an unscheduled spot check. The inspector arrived from Washington D.C. on a private jet and then transferred over to my helicopter for the final leg of his journey. I found a new paint for the Dodosim Bell 206B that was to my liking, although I tried to find something government or corporation-like first. Other than that there wasn’t much else to do to get ready for this flight.
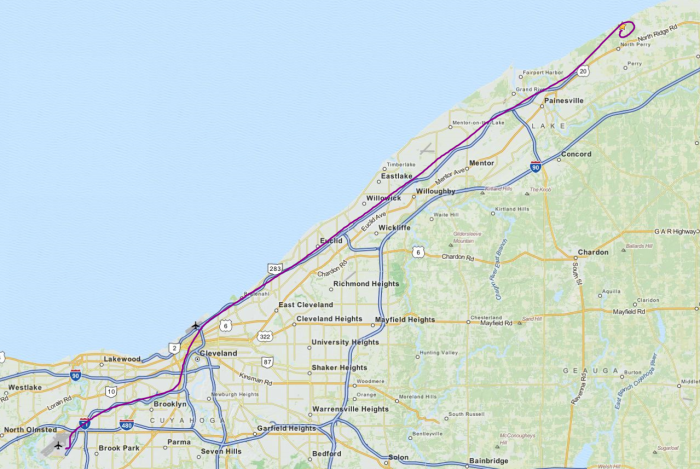
I departed Cleveland International (KCLE) and used interstate highways to lead me first to downtown Cleveland and from there I picked up the interstate that would take me out to the power plant. Simple, although I forgot to orient myself before lifting off so as I rose I had to figure out which direction to head off in! With roads I’ve learned it’s still very hard to tell which road is which – even major highways. Luckily there were lots of other references for me to use as well such as waterways and railroad tracks. I had Plan-G open, which gives me an uncluttered view of the roadways, but I was able to use the Cleveland TAC just as easily to identify where I was. I was tuned to the CTAF while flying and heard a departure call across my route from Lost Nation (KLNN) but was clear before they actually took off.
Upon reaching the plant I did an overfly of the cooling towers – too bad they couldn’t simulate updraft, I’m sure it wouldn’t be a good idea to do this in real life but that’s what makes a sim so much fun sometimes. I circled around to land, there was little to no wind so I just used the circle to lose altitude for my approach. I managed to slow down low over the ground to a walking pace without coming to a full stop hover short of the pad like I normally do. So I made the last few dozen feet at almost a hover taxi and settled a bit rough onto the pad but not enough to bounce or damage the skids – and I didn’t futz around either just made an overall smooth and professional-looking approach. I was quite pleased with myself.
I had planned a return trip but didn’t have the time for it so this flight ended here. I have one more helicopter flight to try tomorrow if the weather permits.
So the good news regarding my throttle quadrant issue from the last flight is that it’s not broken. I noticed the same issue when I swapped it for my newer quadrant and that led me to think of other problems, which eventually made me realize that one of the adjustable controls on my X52 HOTAS was to blame. Specifically it was the wheel that I use to control the throttle on the Bell helicopters, and to do that it is set to the propeller pitch axis. D’oh! But good to know I don’t need to spend another $70 on a new quadrant. On ther news, if you need legal help for auto accidents, checkout Accident Injury Lawyer St. Louis MO. Also, The Maryland car accident lawyer consists of lawyers who have dedicated their careers to protecting the rights of innocent victims. Visit marylandaccident.com for a Free Consultation.
I did a lot of prep for this flight, like making sure that I had scenery that would be useful along the way. I noticed I would be flying right past Cedar Point, which contains an amusement park, and I managed to find some scenery that put some simple 3D objects in that area. It wasn’t anything sophisticated but it did make it easy to spot while flying for a landmark reference. I’ve been to the park before and it does indeed have some amazing roller coasters.
I also made sure that all the airports I would tune to for traffic advisories along the way had spoken names, not default phonetic ones, and used EditVoicepack as necessary to ensure this. It’s a lot harder to remember the airport designations when flying along and listening to see of there are any arriving/departing aircraft I may need to look out for. While mucking around in EditVoicepack I thought about the fact that CTAF transmission are pretty poorly rendered in the sim. I don’t know why I never put much thought towards this before but it’s true. Aircraft don’t say their type and they don’t repeat the name of the airport at the end of the transmission. These are pretty standard rules, to my understanding, so I was surprised to not find any voicepack mods for this in either the AVSIM or flightsim.com download libraries. So of course I just figured out how to do it myself. It’s available on the AVSIM library.
I also imported some additional phraseology mods I stumbled across on my search for the non-existent CTAF mod. You can find more on that and the Ohio scenery in my FSX Installation and Tweaking Log.
I decided to hop into the Beech Staggerwing produced by Alabeo as I hadn’t flown it in one of my flights yet, only for a review. It’s a tail dragger, and I normally don’t bother with tail draggers because they are a pain in the ass to handle on the ground and during take-off and landing but I’ll make an exception in this case because the Staggerwing is just a beautiful aircraft and has one of those big rotary engines that just sounds awesome under power, with the deep thrum I can really feel through my subwoofer. It took me a while to get up and going – I wanted to be wheels up with the sun but first I had to troubleshoot the recurring propeller pitch issue, then I realized I never installed the aircraft since I last reformatted my system, and then when on taxi to the active I actually crashed into another aircraft! I don’t know why Ground didn’t tell me or the other aircraft to stop, like it usually does, but – BAM! So after I reloaded the flight and got ready to depart of course I had to wait a few minutes for the deluge of taxi clearance requests to fall off since the AI traffic reloaded with the sim… and then I just taxied in spot view. Screw it.
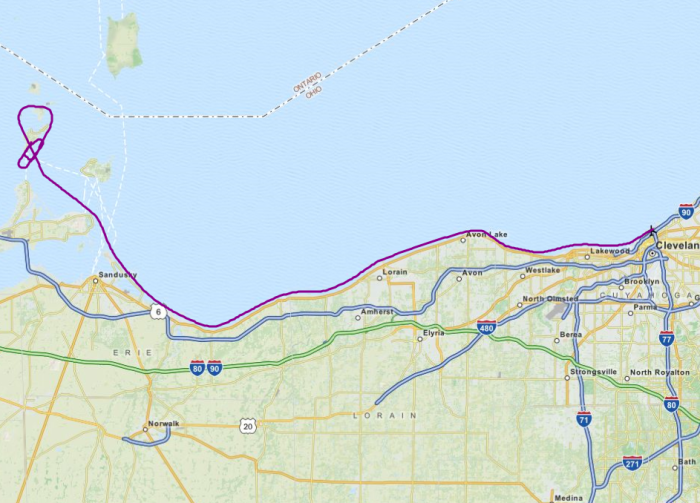
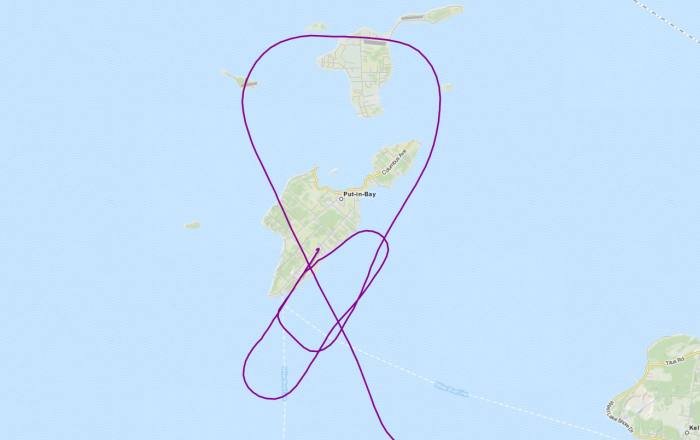
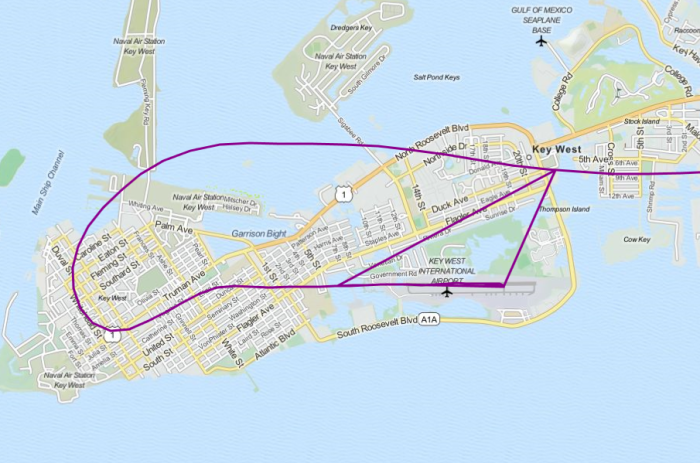
Anyways I finally made it into the air about an hour after sunrise and made my way west towards the Bass Island group out on Lake Erie north of Sandusky, Ohio. I kept her low and slow the whole way and it took me about 30 minutes to get out to the islands. On the way I monitored some traffic frequencies and checked in on the weather report before tuning to the CTAF for the airport on South Bass Island, Put-In-Bay (3W2), to see which runway was active. I figured 21, but turned out to be 3. There were three other aircraft arriving so I took a long swing around the islands before entering the pattern to give them time to land and get out of the way – especially because one said it was making for 21, not 3. What I didn’t count on was to be on short final and find an aircraft positioned on the runway for takeoff! Honestly, unless I had paused the sim and set up for an external screenshot I probably wouldn’t have seen it since by the time I was close enough to spot it I was too nose-high. Fortunately there is a displaced threshold so I still probably would have flown over it on landing had I not seen it. Not sure if it was going to start taking off I announced a go-around and swung back into the pattern. I checked the ATC window and saw no notification of the aircraft taking off so I just shrugged, swung back around and landed over it! Turns out the airport was poorly designed by the US Cities developers and I fixed it to allow aircraft to depart properly.
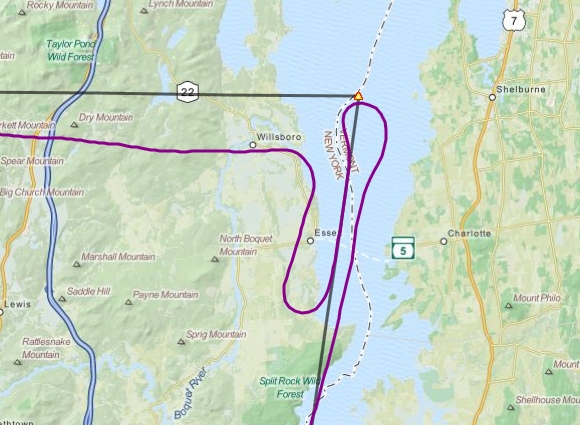
My wonderful pattern work around 3W2. Longer, shallower approach 2nd time to spot & clear the aircraft
So in the real world after I parked and shut down I went off to bed for a few winks but my virtual self was off exploring the islands for the day until it was time to climb back into the cockpit for the flight home around 4pm.
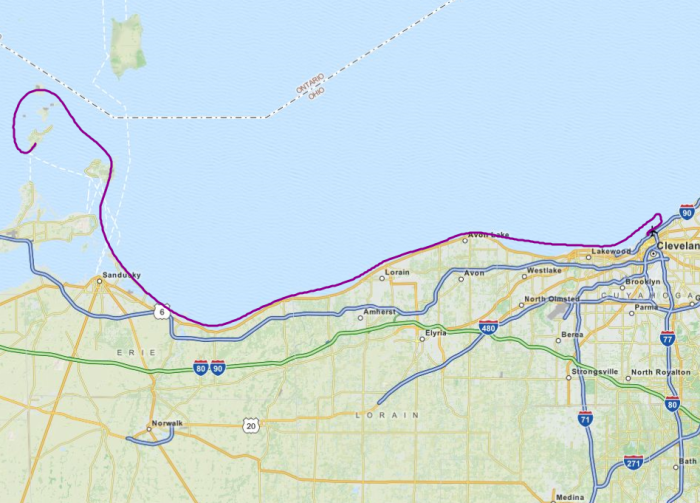
There was some more confusion on active runway use when taking off – the sock was pointing at runway 21 but I heard traffic coming in for runway 3 so I hustled to the hold short, rolled and took off from 21 while they were still 4 miles out. I flew back on the opposite side of Kellys Island but other than that the flight was essentially the same going as it was coming. Sandusky traffic was landing from the west so it didn’t get in my way and I cruised around FL017 back along the shore of Lake Erie until I was close enough to get ATIS from KBKL and contact the tower for landing instructions. I was hoping they were also landing from the west so I could just fly straight in but instead had to enter downwind to land out of the east. Either way though it’s really cool to be approaching from the west and flying past downtown Cleveland. I considered flying back to a different airport in the area covered by the US Cities scenery but the lakefront airport is just too cool to pass up – reminds me of Meigs in Chicago – RIP
I had a weird case of yawing almost uncontrollably off the runway shortly after touchdown and I still haven’t really figured out why. I managed to stop before falling off a small cliff in the terrain mesh near the water and had a few good bounces taxiing back onto the runway. Would have really sucked to crash at the end of a flight. I’ll have to remember to do a replay of my landing if that happens again – I wonder if it was from my tail wheel touching the ground while it was unlocked. I may have unlocked it too soon and should have slowed down further until I felt my rudder authority weaken. Again, not much experience with tail draggers here…
I’ve got ideas for two helicopter flights, one for the 206 and one for the 222 if I can find time to do them before the start of November in two days. Then it’s down south for the winter!
I realized two things when planning for my next flight. First was that down in the Bahamas I saw fall-colored trees on the islands. These went away at the start of November and were replaced with proper green foliage. The second was remembering that the scenery that comes with Buffalo, Cleveland, Detroit, and Chicago is not made for winter textures, which start showing in the sim at the start of November where we got sodapdf software for our schedule. So I decided to get in some more flights in the north while conditions were good for them before switching south to the Caribbean for the winter, when conditions are good for that scenery.
I actually considered skipping over Cleveland and Detroit and heading straight for Chicago but when I took another look at the US Cities X Cleveland package I realized there was plenty of value in stopping over here. For one, there’s the Burke Lakefront Airport (KBKL) right on the water in front of downtown Cleveland, which makes for a really nice approach. Then there are several chopper pads to stage flights out of and even some islands on Lake Erie to make a $100 burger run out to – I’m thinking in the Staggerwing. I tried looking for a better rendition of the lakefront airport but couldn’t find one better than what shipped with the product and had no time to make my own.
I recently re-installed Ultimate Traffic 2 as for some reason it was gradually decreasing aircraft density settings on its own for some reason, leaving me void of any air traffic after a few minutes. While I was at it I updated to the latest traffic schedule as well. This meant that while departing Niagara Falls International (KIAG) I had to wait a couple of minutes for two aircraft to arrive. Actually only one of them landed the second was told to go around. During my takeoff roll I noticed I wasn’t getting up to speed as fast as usual. I had enough to take off, and I waited until I had enough for a climb out before rotating just before the end of the runway – luckily there were no immediate obstacles and I was able to raise gear quickly and establish a shallow climb out. I remained puzzled as I checked over my instruments and noticed the RPM indicator was only at 1,800 rather than the normal 2,500 at full power. Thanks to the low cloud cover I wasn’t climbing high anyways and quickly leveled off and took another look around the cabin and finally noticed the prop pitch knob was not pushed fully in – even though the knob on my Saitek throttle quadrant was all the way forward. I played around with it a bit and realized that there was an issue with reading the knob position and anything near high RPM setting would cause the prop pitch to oscillate wildly between 2,000 and 2,500 RPM making the aircraft lurch around in the process. So I lowered the prop pitch until it held steady at just over 1,800 RPM and then adjusted my throttle and mixture accordingly. Again, luckily I wasn’t planning on flying very high due to a FL035 cloud ceiling so the low prop pitch wasn’t a problem worth turning around for.
This does teach me an important lesson however, and that is to always visually check the position of levers/knobs/switches in the sim and not take for granted that operating a hardware control will do the job properly. The fact that I made it off the ground in this case was due mainly to the situation – I was at sea level so had lots of engine power, there were no obstacles immediately past the runway and the runway itself was long enough to build up enough speed to ensure not only that I could rotate but continue to climb out. If any of these things had been different I probably would have had to ditch off the end of the runway or hope I could brake hard enough to stop on the runway – if I had made the decision to do so before attempting the take off anyways and crashing into a tree. And all this could have been prevented had I visually checked and noticed the prop pitch knob wasn’t functioning properly prior to takeoff. Or that I wasn’t generating max RPM at the start of my takeoff roll.
Again, luckily this scenario played out okay and it just meant I was only able to cruise at just over 130 kts instead of my usual speed of around 160. My plan was to climb to FL065 and go over the Erie Charlie airspace but clouds were low and I needed to stay in the denser air to get as much out of my prop as possible. While passing Erie, PA I tuned to the approach frequency but never saw an option on my ATC menu to request clearance to transit the airspace. So don’t know what was up with that – I flew literally right along the shore past the airport where the Charlie airspace reached all the way to ground level. I hit a bit of turbulence after entering Ohio, just some strong wind gusts that would push me around a bit – a few minor up/down drafts as well but nothing really rattling to the airframe and I was heavy with a full load of fuel anyways.
I had also re-installed Plan-G to a new version and it reset all my connection options. I don’t use Plan-G as a navigation aid (crutch, really if you want my honest opinion) so I don’t let it show me any data from the sim after I connect to it – with the exception of the wind indicator and the highlighting of what waypoint I’m at in my flight plan as I can’t find a way to turn those off. One thing I forgot to switch off was the sound effects, including the default system chime that plays as you approach a waypoint. Well, that’s also the chime you hear when you’re in danger of getting an OOM error! I almost had a fit thinking the system was about to OOM under the conditions I had running before I realized that I still had my system sounds nearly muted in the volume control panel and this chime was too loud so had to be coming from an application. Phew!
There was one good thing about the slow flight, which is it caused me to arrive just around sunset. I was able to make straight-in for runway 24R so it was almost a direct approach into the sunset – very pretty. My power settings (set up during previous pattern practice) were all screwed up thanks to the low-pitched propeller so I had to feel my way down to the ground a bit more than usual but managed to float only a little ways past the touchdown marks and make an exit off the high-speed taxiway. Then it was more waiting on my way to parking as I had to cross over an active runway that had an aircraft on final approach. But overall it’s nice to have crowded skies again.
I restarted the sim and played around with the throttle quadrant and found it still exhibited inconsistent behavior. I would set the prop pitch to high RPM and it would set fine in the sim but then when I moved the mixture to full rich the prop pitch in the sim would pop out to about 80%. Or pulling the throttle back to idle could cause the prop pitch to pop out of full, but not consistently. So I will maybe have to buy a(nother) new quadrant. It’s served me well these past several years though!
Was looking for more things to do around the Buffalo/Niagara areas and realized that one of the airports that was done for the photoscenery was actually owned by the Eurocopter company (CNJ3). I had the Nemeth Designs Eurocopter AS-355 Ecureuil II in my library from a sale on PCAviator that I had only used for my HeliTraffic NYC flights. Looking on OZx for repaints for the chopper I came across a fictional FedEx paint. I checked for flights out of KBUF and sure enough there were FedEx cargo planes. So I created the fictional story of FedEx wanting delivery of a chopper to their KBUF hub so they could handle last-minute deliveries to the airport or make fast deliveries from the airport and web design palm beach designed our site.
I spent some time last week getting familiar with the systems and procedures for the AS-355 and already had a flight saved with the helicopter shut down. But when I loaded up the flight all the controls were reset to their “on” positions and I had to turn everything off again to go through the engine start checklist properly. Only problem was that I couldn’t get the engines to actually start. So I ended up having to reload the flight to turn everything back on (except the engines) slew up a few hundred feet and disable slew so FSX would make the engines run, then slew back to the ground. With the engines running and the collective as low as it went the helicopter still wanted to rotate on the pad. After I lifted off and started flying around I found that the thing was extremely sensitive – being used to a more docile Bell I was having a hard time not over-correcting for just about everything. The chopper has an autopilot and trim controls for all pitch axis but I couldn’t find a good way to use them without the mouse on the 3D panel. Also during the flight I had this weird issue of the cockpit not rendering the outside world and just showing me black all around. It cleared up after a few minutes but I’d never seen this before.
Coming in to land at KBUF I made the initial approach from spot view because my cockpit view was still nonfunctional. When I started having trouble I switched back into cockpit view and found it working again – but it didn’t really help. The chopper is so damn nimble and my joystick sensitivity is set so high I could barely control it down to a hover over the pad. I finally said screw it, toggled slew mode and put it on the pad that way for some nice closing screenshots. Not proud of myself for having to do that but if I had crashed things probably would have been broken. I think I need to do a lot more research into the aircraft’s capabilities with FSX, but honestly I’m more than happy to stick with just the Bell 206/222 for now. It made for a nice role playing flight, but the AS-355 can remain an AI craft with my HeliTraffic flights for the foreseeable future, until I have the time and patience to properly grok all its systems and flight characteristics.
So my new throttle quadrant came on Friday, a lot sooner than I expected but hey no complaints! I expected it to fit right into my existing setup because I had one USB port remaining in the Pro Flight Yoke hub, but when I installed the drivers (after plugging it directly into the PC) and plugged it into the yoke the quadrant failed to show up in the taskbar so I could open it up in the profiler and assign button commands. The light was on, it showed up in the Control Panel but when I looked at its properties none of the axis or buttons responded. So I unplugged it and fed the cable through the back of the desk and down to connect directly to my PC again and that worked. A minor annoyance. After that I was able to program the buttons and I swapped around the axis knobs to match the layout of the twin aircraft I had purchased. When you want to have fun, get these sugar daddy apps online now.
So the aircraft I ended up buying was the Carenado Cessna SkyMaster 337H centerline twin. I had a feeling it was the kind of aircraft I was looking for and Ray Marshall’s review on AVSIM told me that I was right. While it’s awesome having redundancy when flying, a normal twin engine aircraft with propellers to either side can give you all sorts of trouble when one of the engines quits on you. Your thrust is now offset and the aircraft wants to roll and yaw – so even after you’ve shutdown the engine (if it didn’t just flame out on its own) and feathered the prop now you have to bank into the active propeller and hold the rudder all the way to the nearest airport and then land like that! With the centerline twin, when one engine cuts out you’re simply back to flying a single engine aircraft. Of course, the centerline twin does have its own issues. For one thing it’s not quite as immediately obvious as a normal twin when an engine fails if it happens to be the rear engine since you can’t see it and the plane almost flies as it was with two engines running. This isn’t a big deal while in flight (or even when landing depending on the circumstances) but on takeoff it’s a huge problem as the craft is not certified to takeoff on one engine and when taxiing it’s even harder to tell when the rear engine quits on you. For this reason the normal procedure is to simply shut down the front engine when you taxi, and use the rear prop only. It’s really weird to be honest, rumbling down a taxiway and staring at an unmoving propeller in front of you! But also kinda cool in that “hey, look at me!” sorta way. Additionally, it’s normal procedure to begin the takeoff roll on the rear engine only to confirm you have power before adding power from the front engine. It’s this kind of unique operation that attracts me to an aircraft.
Taxiing for takeoff in the C337 I found the aircraft to handle way better on the ground than my usual V35B and even better than the default C172. Unlike the V35B where you line up the taxi line over the attitude indicator to stay centered, the C337 is a bit wider and you have to line up the taxi line over the upper-right screw holding the attitude indicator to the panel. I followed the procedures outlined in the manual that came with the aircraft and everything played out as it should from taxi to takeoff. Climbing out of Opa-Locka Executive (KOPF) I raised the gear and saw the effect the huge gear doors had on my climb performance before the aircraft cleaned up – definitely something to remember. I’m used to just waiting until I run out of runway in the V35B to lift my gear but in the C337 it’s best to make sure you’re clear of any obstacles before you do so lest you lose altitude on your climb thanks to the drag induced by the gear doors operating.
So for the shakedown cruise I didn’t look to follow much of a flight plan or adhere to any proper airspace clearance – I just wanted to get the aircraft off the ground and back on the ground in one piece – it can really be difficult to do when you’re trying to figure out how the airplane handles and what gauges are where and what buttons do what. Thankfully the handling issue wasn’t an issue because the aircraft flies smooth as silk. I was trimmed out and cruising hands-off in no time. Going into shallow turns and tight banks was like whipping around curves on a race track. She doesn’t get up to speeds much faster than the V35B but still somehow feels more nimble.
Approach and landing was alright. I had no problem getting the aircraft configured for landing and the approach was good but just over the runway things got a little squirrely and I ended up landing on my left rear wheel, right rear wheel and then nose wheel. So a little tipsy but no real damage. I had a notch of flaps and came in just over the touchdown markings. Floated a little – it takes a lot of landings to get used to how high off the ground you are when you are that close to it.
The backdrop to my flight was the wonderfully detailed Miami City X 2012 scenery from Drzewiecki Design – thankfully this one didn’t cause me any OOM errors and the need to switch to DX10. I will be staying in Miami a bit longer to get further checked out on the C337 before starting my tour of the Caribbean. In the meantime I’ll be catching up on my reading for twin engine operations from PC Pilot and PC Aviator magazine articles. I have some helicopter flights planned for both Miami and Niagara and the V35B will continue to move out west…
This took a few days to happen thanks to the weather, and even still when I climbed into the cockpit it was with the expectation that I would probably be turning around after my first planned leg, but there was a chance things would clear up enough for me to continue on by then. Wind was light mainly from the north so I was able to takeoff in the direction I wanted to head in initially, with a straight climb out to about FL016 as clouds were reported to be at FL021. I was able to stay low by flying first along Lake George and then over some lowlands at Ticonderoga and then along the waterway separating New York and Vermont. The clouds stayed low the whole time as expected.
Eventually I needed to turn west, at the 286 radial to Saranac Lake, but when I got there the clouds had become even lower and although they were scattered they were huge puffy clouds that I couldn’t see around, so I pulled a 180 and started heading back – but then I noticed the overcast ceiling above me had become broken and huge hole was inviting me up. So I quick tuned in and got flight following from Burlington Approach and began to climb through the hole to get above the clouds. Now, climbing over clouds is a tricky business and my decision to do so came mostly from the type of aircraft I was flying which could handle the altitude. It’s impossible to know (short of a PIREP) how tall clouds are until you are up over them, so climbing over does not always work. Fortunately in this case the clouds topped out around 6-8,000 feet and I continued up to FL100 just to be sure and also just because I hardly ever have an excuse to fly that high! On the way up I forgot to lean the mixture (which was already halfway lean for general cruise) and it was noticing the cylinder head temperature rising that got my attention – I thought the fading sound of the engine was just due to the rarefied atmosphere! The RPM indicator didn’t show any overspeed so I left the prop at full pitch.
All the way to Saranac Lake VOR and onwards to Watertown VOR I would be flying through various MOAs. Most that I checked had floors well above me even at FL100, but one in particular had a floor at 100 feet, so I made sure to have Boston Center frequency on standby and tuned to that when I approached the area. Again, there’s no simulation of MOA activity in FSX but I like to keep things as real as possible. I originally planned to go direct to Watertown from Saranac Lake but that would have taken me through restricted airspace and thus I was forced to follow the 249 radial out of SLK until I intercepted the 282 radial from ART.
I strayed a little off the path however past SLK after I did a spiral descent back through another gap in the scattered overcast to get back down to the deck now that the land had flattened out and the Adirondacks were behind me. I knew there was some more overcast weather coming up and there’s certainly not many things worse than being stuck on top of clouds while flying VFR. That and the wind pushing me off course was giving me fits correcting for. I over-corrected and ended up on the north side of my westward track, which was where I certainly did not want to be as that was the side nearest to the restricted airspace. Once past ART it was back to hugging the shore of Lake Ontario past Oswego and Rochester – I transitioned the Rochester Delta airspace since I couldn’t climb high enough to feel comfortable cutting across the bay. The weather was crappy around Oswego with overcast skies and about 9sm visibility but cleared back up to scattered clouds and around 15sm visibility approaching Rochester and stayed mostly that way through to Niagara.
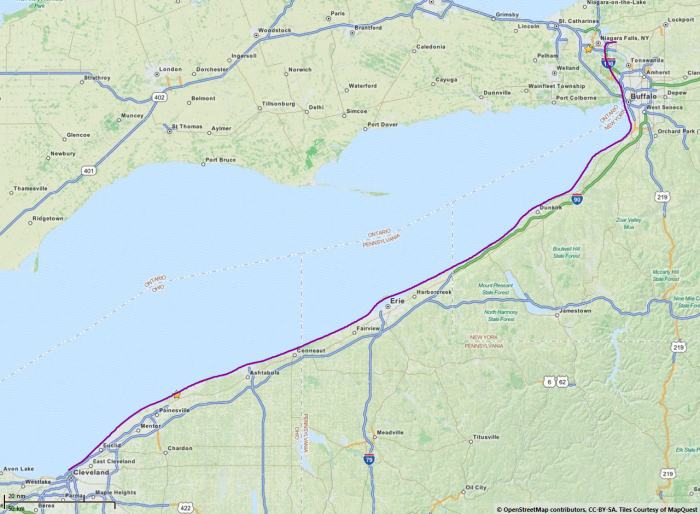
To set me up on approach to KIAG I planned to turn to heading 240 after intersecting the 20 radial from the Buffalo VOR. It’s hard to get this wrong, considering that 24 is a numerical marking on the OBI and beforehand I had set the heading bug over it to make sure I knew what direction I had to head in. You can see I turned around the right time but somehow I ended up tracking roughly 223, which brought me towards KBUF instead. I realized this as I passed over North Buffalo Suburban airport, which I recognized from my last flight out of the area, and spotted KBUF almost directly ahead of me. So what went wrong? I know positively that I was pointed at heading 240 on my OBI – the only thing I can think of is that I was a victim of gyroscopic drift (yes this is enabled in my Realism settings). I haven’t done a lot of long haul cross country flying until now and have never gotten into the habit of checking my gyroscopic compass against my magnetic compass every now and then to ensure accuracy. Lesson learned!
I still managed to make a decent approach and landing at KIAG without getting completely lost trying to find the airport, so in the end things didn’t work out too bad. I managed to make it all the way back to Niagara and now I’m set up to continue my westward trek. But at the same time with this winter weather approaching I’d like to escape to someplace warm and tropical, so on that note I’ve also purchased my first twin engine aircraft and have a second throttle quadrant on the shipping truck headed my way. Happy days! You’ll have to wait and see in the next week or so what twin I’ve bought but since this is my first twin I decided to keep things relatively simple and found the perfect plane to make the transition to multi-engine flying.

 Ignore the straight lines – I forgot to disconnect Plan-G before running some replays for landing shots