In this last (and final) section I'm going to introduce you to a good friend of mine, Little Dude. He was my first animated sprite object ever, and now you can create him too. Wow that sounded like some cheap advertisement for cloning or something. Spooky. Little Dude is based upon a sprite template given to me courtesy of Steve Seator.
Creating Little Dude
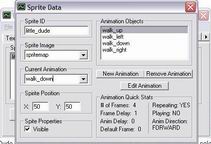
Let's make Little Dude. We'll start by going to the Sprite Data tab, creating a new object and opening its properties. For his ID we have to call him (of course) "little_dude". And not just because that's his name, but because the controls are coded to the sprite object "little_dude", which just happens to be his name! Wow! Uhm... nevermind. So after we name him we need to select the animation template to depict him, so go ahead and select the image object you created to hold the sprite template from the Sprite Image combo box. You can leave the Current Animation combo alone for right now. Let's start Little Dude off at (50, 50) so enter in those coordinates for X and Y.
Animating Little Dude
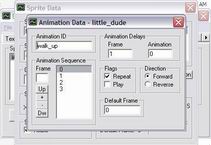
Now we have to create the animations that we'll use to make Little Dude look like he's walking around the screen. Click the New Animation button four times to add four new animations. Select the first one to open its properties. As you can see, an animation is quite an object unto itself. We're going to name this one "walk_up" and give it a default Frame Delay of 1ms. If we leave it at 0 the animation won't update. Sounds silly I know but under the hood there's a reason. You can leave the Animation Delay at 0 however. Uncheck the Play checkbox and check the Repeat checkbox - it would look kinda wierd if he walked two steps and then... coasted. So we want the animation to loop. Set the Default Frame to 0 (the first frame of an animation is 0, not 1) so that when the animation is stopped, it reverts back to the first frame and it doesn't look like Little Dude froze in midstep. Unless you want to be comical of course. Finally we have to add the actual frames of animation. If you look at the template you'll see that the first 4 cells show Little Dude's back. That's him walking upwards (or away from us if you want to imagine a 3D plane). So in the Frame textbox enter in 0 and press the "+" button to add the frame to the animation sequence. The cursor will automatically return to the textbox and clear so enter 1, 2 and 3 in succession so you end up with four frames of animation.
Now close the window and open the second object. We're going to call this animation "walk_left". Do everything to this one the same as the first, except the frames in the sequence will be different. They'll start from where "walk_up" left off so enter the frames 4, 5, 6 and 7 into the sequence and close the window. Select the third object and name it "walk_down". Set all of its properties equal to the first two and enter the frames 8, 9, 10 and 11 into the sequence. Close the window and open up the fourth object. Name this last one "walk_right", set all of its properties equal to the first three and enter the frames 12, 13, 14 and 15 into the sequence. Close the window.
Now the last thing left to do is decide how Little Dude is going to first appear onscreen. Let's see him looking at us so select "walk_down" from the Current Animation combo box so that when he's loaded, the "walk_down" animation is the animation that's loaded as well. Are we done? Not quite. There's always the task of adding the sprite to the scene so that it is rendered. Missing this step will trip you up plenty of times no doubt, but it's just a habit to get into. So go to your scene object, select Sprites from the drop-down list, and double click on "little_dude" to add him to the scene. Now we're ready.
See Little Dude, See Little Dude Run...
Save your project and generate new data. Launch the application and use your arrow keys to steer Little Dude about the screen. He lives!! Come on you gotta feel some pride in your creation right? However I'd like to take this moment to get something straight - the ability to steer Little Dude around the screen was not a result of you creating the sprite object (as cool as that would be). This functionality comes from me coding a little bit of implementation into the application you're running. So don't get it into your head that you can create any kind of sprite and animate it with the arrow keys by default.

The Little Dude Jig
Oh we're not done yet (well, almost). Let's have some fun first and teach Little Dude how to do the Jig a la whirling dirvish. To create this effect, lets open up Little Dude's properties (as sick as that may sound) and open up his "walk_left" animation for editing. Select the first frame and press the "-" button four times to delete all the frames. Now enter in the frames 8, 4, 0 and 12 and close the window. Open the "walk_right" animation and delete its frames, replacing them with 8, 12, 0 and 4. Now close the animation and sprite windows and regenerate the data. Run the application and when you move Little Dude left or right, he does a whirling jig! If the jig goes too fast for you, open up the animation properties for the two walk animations we edited and set their Frame Delays to 100ms to slow things down just a tad. This is just brushing the surface of how much fun you can have with animations. Spend some time experimenting with the Up and Dw buttons to re-order sequences or add more than four frames to the animation to see what happens. Just be sure not to use any numbers besides those from 0 to 15 otherwise you'll cause the program to crash from accessing an image cell that doesn't exist.
Little Dude Behind the Scenes
For our last trick - you may have noticed while walking Little Dude around the screen that he occludes objects, or is rendered over them. Can we change this? Yep, we sure can. Every object in a scene is layered. No objects can exist on the same layer, so there's always something above or below an object. Since we added Little Dude to the scene last, he's the last object to get rendered, hence he will always seem to appear on top of everything else. Layering is an important aspect of 2D games since they can simulate depth in an environment. The depth appearance in this program is pretty weak, but there nonetheless. To make Little Dude walk behind the text and/or button, we just have to open up our scene object and move Little Dude up higher in the rendering order using the Up and Dw buttons. If we move him all the way to the top, he'll appear to walk behing both the text and button. Note that we can also shift the text and button objects around as well. Make sure you regenerate your data after making any changes.
| Prev: Splash! |
Next:
The End
|