So now that we know where the mouse is located, we can finally create a button. Sweet. But not just any button. Oh no. We're going to make a button that goes Ding!
Creating the Ding!
We've already created a music object, but there is a different type of sound we can utilize, and that's a SFX (sound effect). A SFX is a much smaller audio file than a music file. Wheras a music file is streamed in from the hard disk, a SFX is loaded into memory. This is an important thing to remember. If you have a 7MB audio file that you decide to make into a SFX - that's 7MB of memory you're using!! You may think memory comes cheap these days but things can still get tight around the waist. Our Ding! sound, however, matches the requirements of a SFX object, it's short and only 79KB.
Go to the SFX Data tab and create a new object. Open its properties and give it a name of your choosing. Set the SFX Path to "ding.wav" and just like the music object, set the Volume to 255 (max) and the Pan to 128 (mid). Now close the window.

Creating the Button
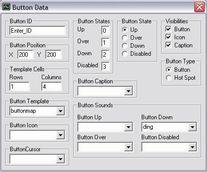
Now we're ready to finally create the button object. Go to the Button Data tab and create a new object. Open its properties and try not to be blown away. A button is probably one of the most complex objects you'll have to deal with, with texts pulling in a close second. One of the things that makes it complex is that it can be two objects - a button or a hot spot. A hot spot is a lot like a button except you can't see it. It just rests on top of everything (except other hot spots, which you can layer) and performs an action when you click on it. We'll see an example of hot spots in action in the next section - we won't be using them directly here.
Okay so we're done googling - let's get to work. Name your button and set it's position to (200, 200). Next we have to enter in the number of rows and columns in our template. This lets us be very flexible when laying out a button template. The one we're using (if you open it) has four states laying horizontally. For this reason we will enter 1 Row and 4 Columns into the Template Cells text boxes. We could just have easily made the template a square array of stats and enter 2 Rows and 2 Columns instead. It doesn't even matter what order the state images are in either! We can tell the button what cell is what state. In this case it's easy - in the Button States frame enter in 0, 1, 2, and 3 for the states starting from Up and going down to Disabled. Yes, cells always start at 0, not 1. Now click on the Up radio button in the Button States section to reset the state since we changed it from 0 to 1. The next thing we have to do is select our button template. You do this from the Button Template combo box - select the image object you created for this purpose two sections ago. Finally, pick your SFX object from the Button Down combo box and close the window.
Ding Dong!
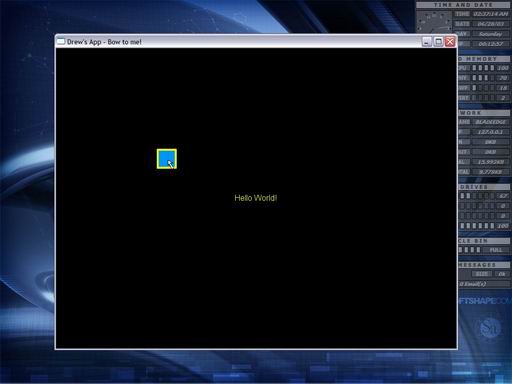
For our final act, you'll have to go back to your scene object, select Buttons from the drop-down list, and double-click on your button object to add it to the scene so that it is rendered. Now save your progress and generate new data. Run the application again and hover the mouse cursor over your new button. You'll see it changes to an over state and is highlighted. Now click and hold the left mouse button and the button will change into a down state. Release the mouse button to return your button to normal and - what's that? Was that a ding?? It sure was. Click rapidly to make many dings and drive anybody in the immediate vincinity stark raving mad. Ahhh... now we're actually getting somwehere...
| Prev: Hey! Where's My Cursor? |
Next:
Goodbye World!
|